Appearance
Advanced Variations
When a single product comes in many combinations, like a hoodie sold in five colors across four sizes, listing each version by hand quickly becomes tedious. Advanced Variations solves this by letting you define the option dimensions once and letting FluentCart build every combination for you. You set up reusable attributes such as Color, Size, or Material, pick the values that apply to a product, and FluentCart generates the full variant matrix automatically.
This guide walks you through the complete journey: understanding how the feature works, setting up your global attributes and terms, creating a new product with Advanced Variations, and switching an existing product over to it.
Understanding Advanced Variations
It helps to know how Advanced Variations differs from Simple Variations before you start.
With Simple Variations, you build each variant by hand and name it yourself, such as "Red / Small" or "Blue / Large". This works well for a handful of versions. With Advanced Variations, you instead define the dimensions (Color, Size) and their values (Red, Blue, Small, Large), and FluentCart creates every possible combination for you.
Here is what makes Advanced Variations powerful:
- Attributes are global and reusable. You set up an attribute like Color once under Products > Attributes, then reuse it across as many products as you need. Update it in one place and it stays consistent everywhere.
- The variant matrix builds itself. Once you choose your options and values, FluentCart generates every combination automatically, so you never have to type "Red / Small", "Red / Large", "Blue / Small", and so on.
- Color and image swatches are supported. Beyond plain text options, you can present values as color swatches or image thumbnails, giving customers a richer way to choose on your storefront.
INFO
Advanced Variations shines when a product has two or more dimensions that combine, like color and size. If your product only has one dimension and a few versions, Simple Variations is quicker to set up.
Setting Up Attributes and Terms
Before a product can use Advanced Variations, the attributes it relies on need to exist. Two building blocks are involved:
- Attributes are the option dimensions themselves, such as Color, Size, or Material.
- Terms are the individual values inside an attribute, such as Red, Blue, and Green inside Color.
You manage both from one central screen, and anything you create here becomes available to every product in your store.
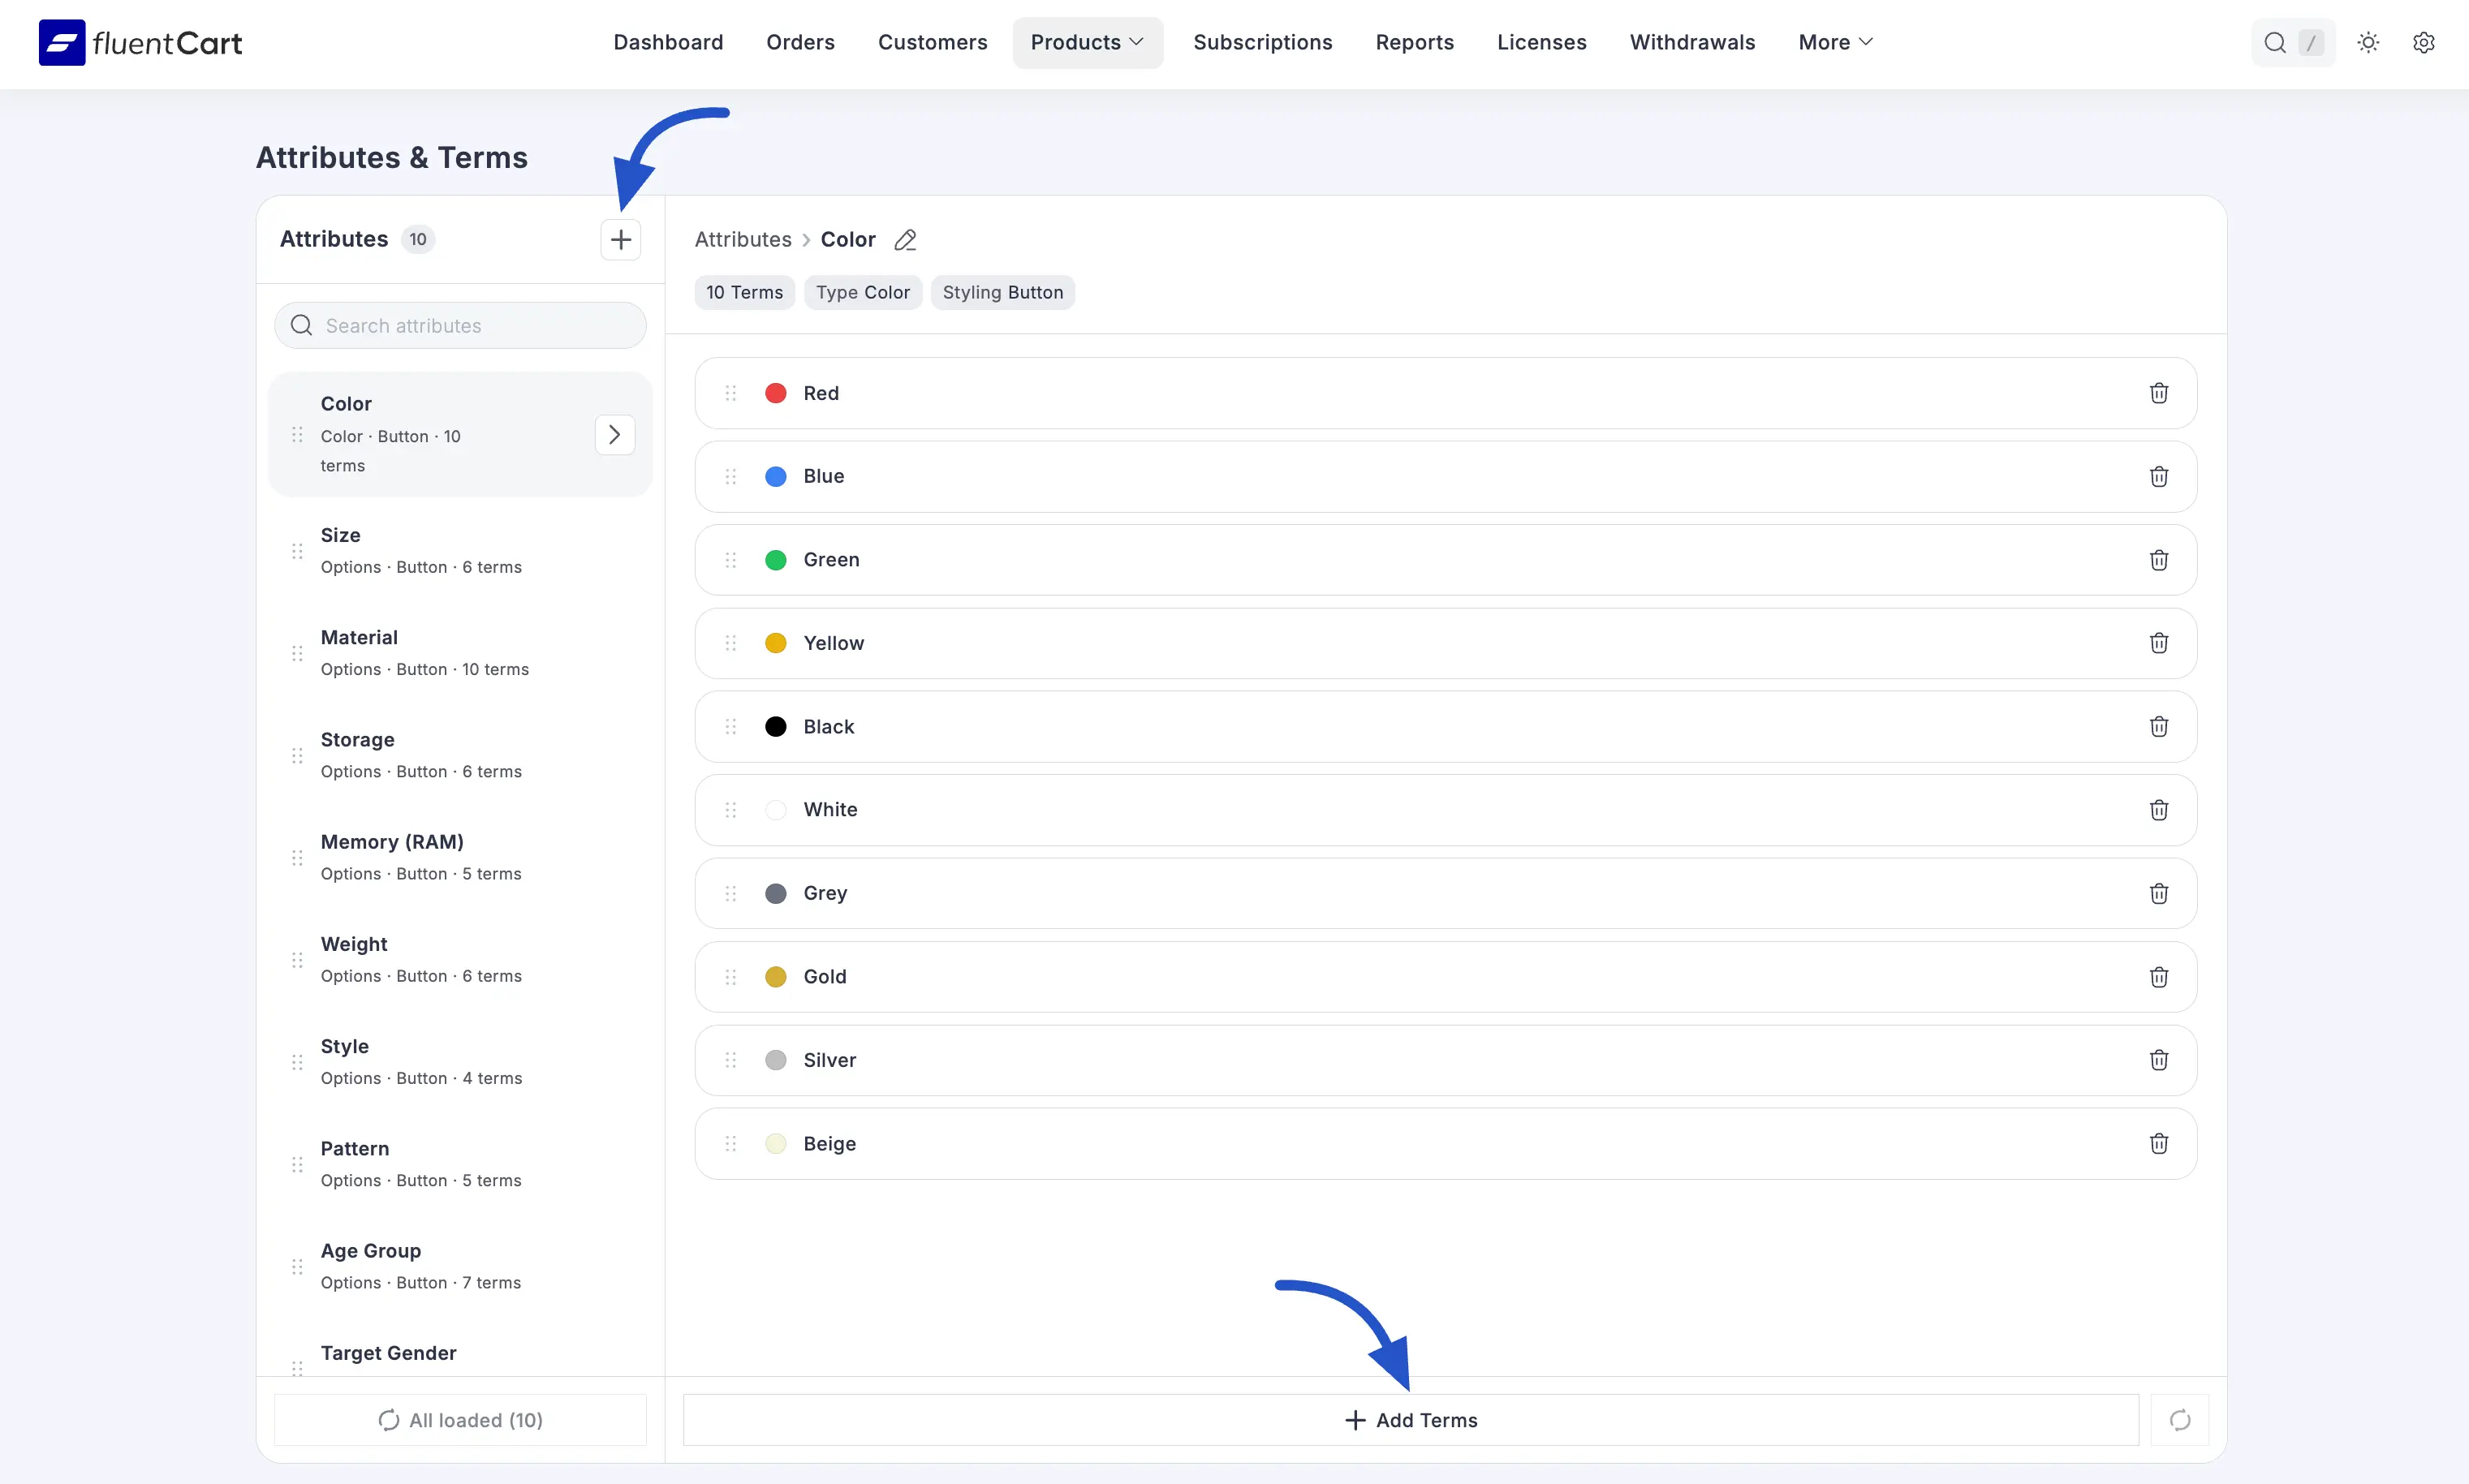
Accessing Attributes and Terms
First, open the attributes manager from your WordPress dashboard. Navigate to FluentCart Pro > Products, then click Attributes in the submenu.

This opens the Attributes & Terms screen. The left panel lists every attribute group in your store, each showing its type, styling, and term count. Selecting a group loads its terms on the right, where you can review, add, or remove values.
Creating an Attribute Group
To create a new attribute, click the + icon next to the Attributes heading in the left panel. The Add new attribute group modal opens with three fields to fill in.
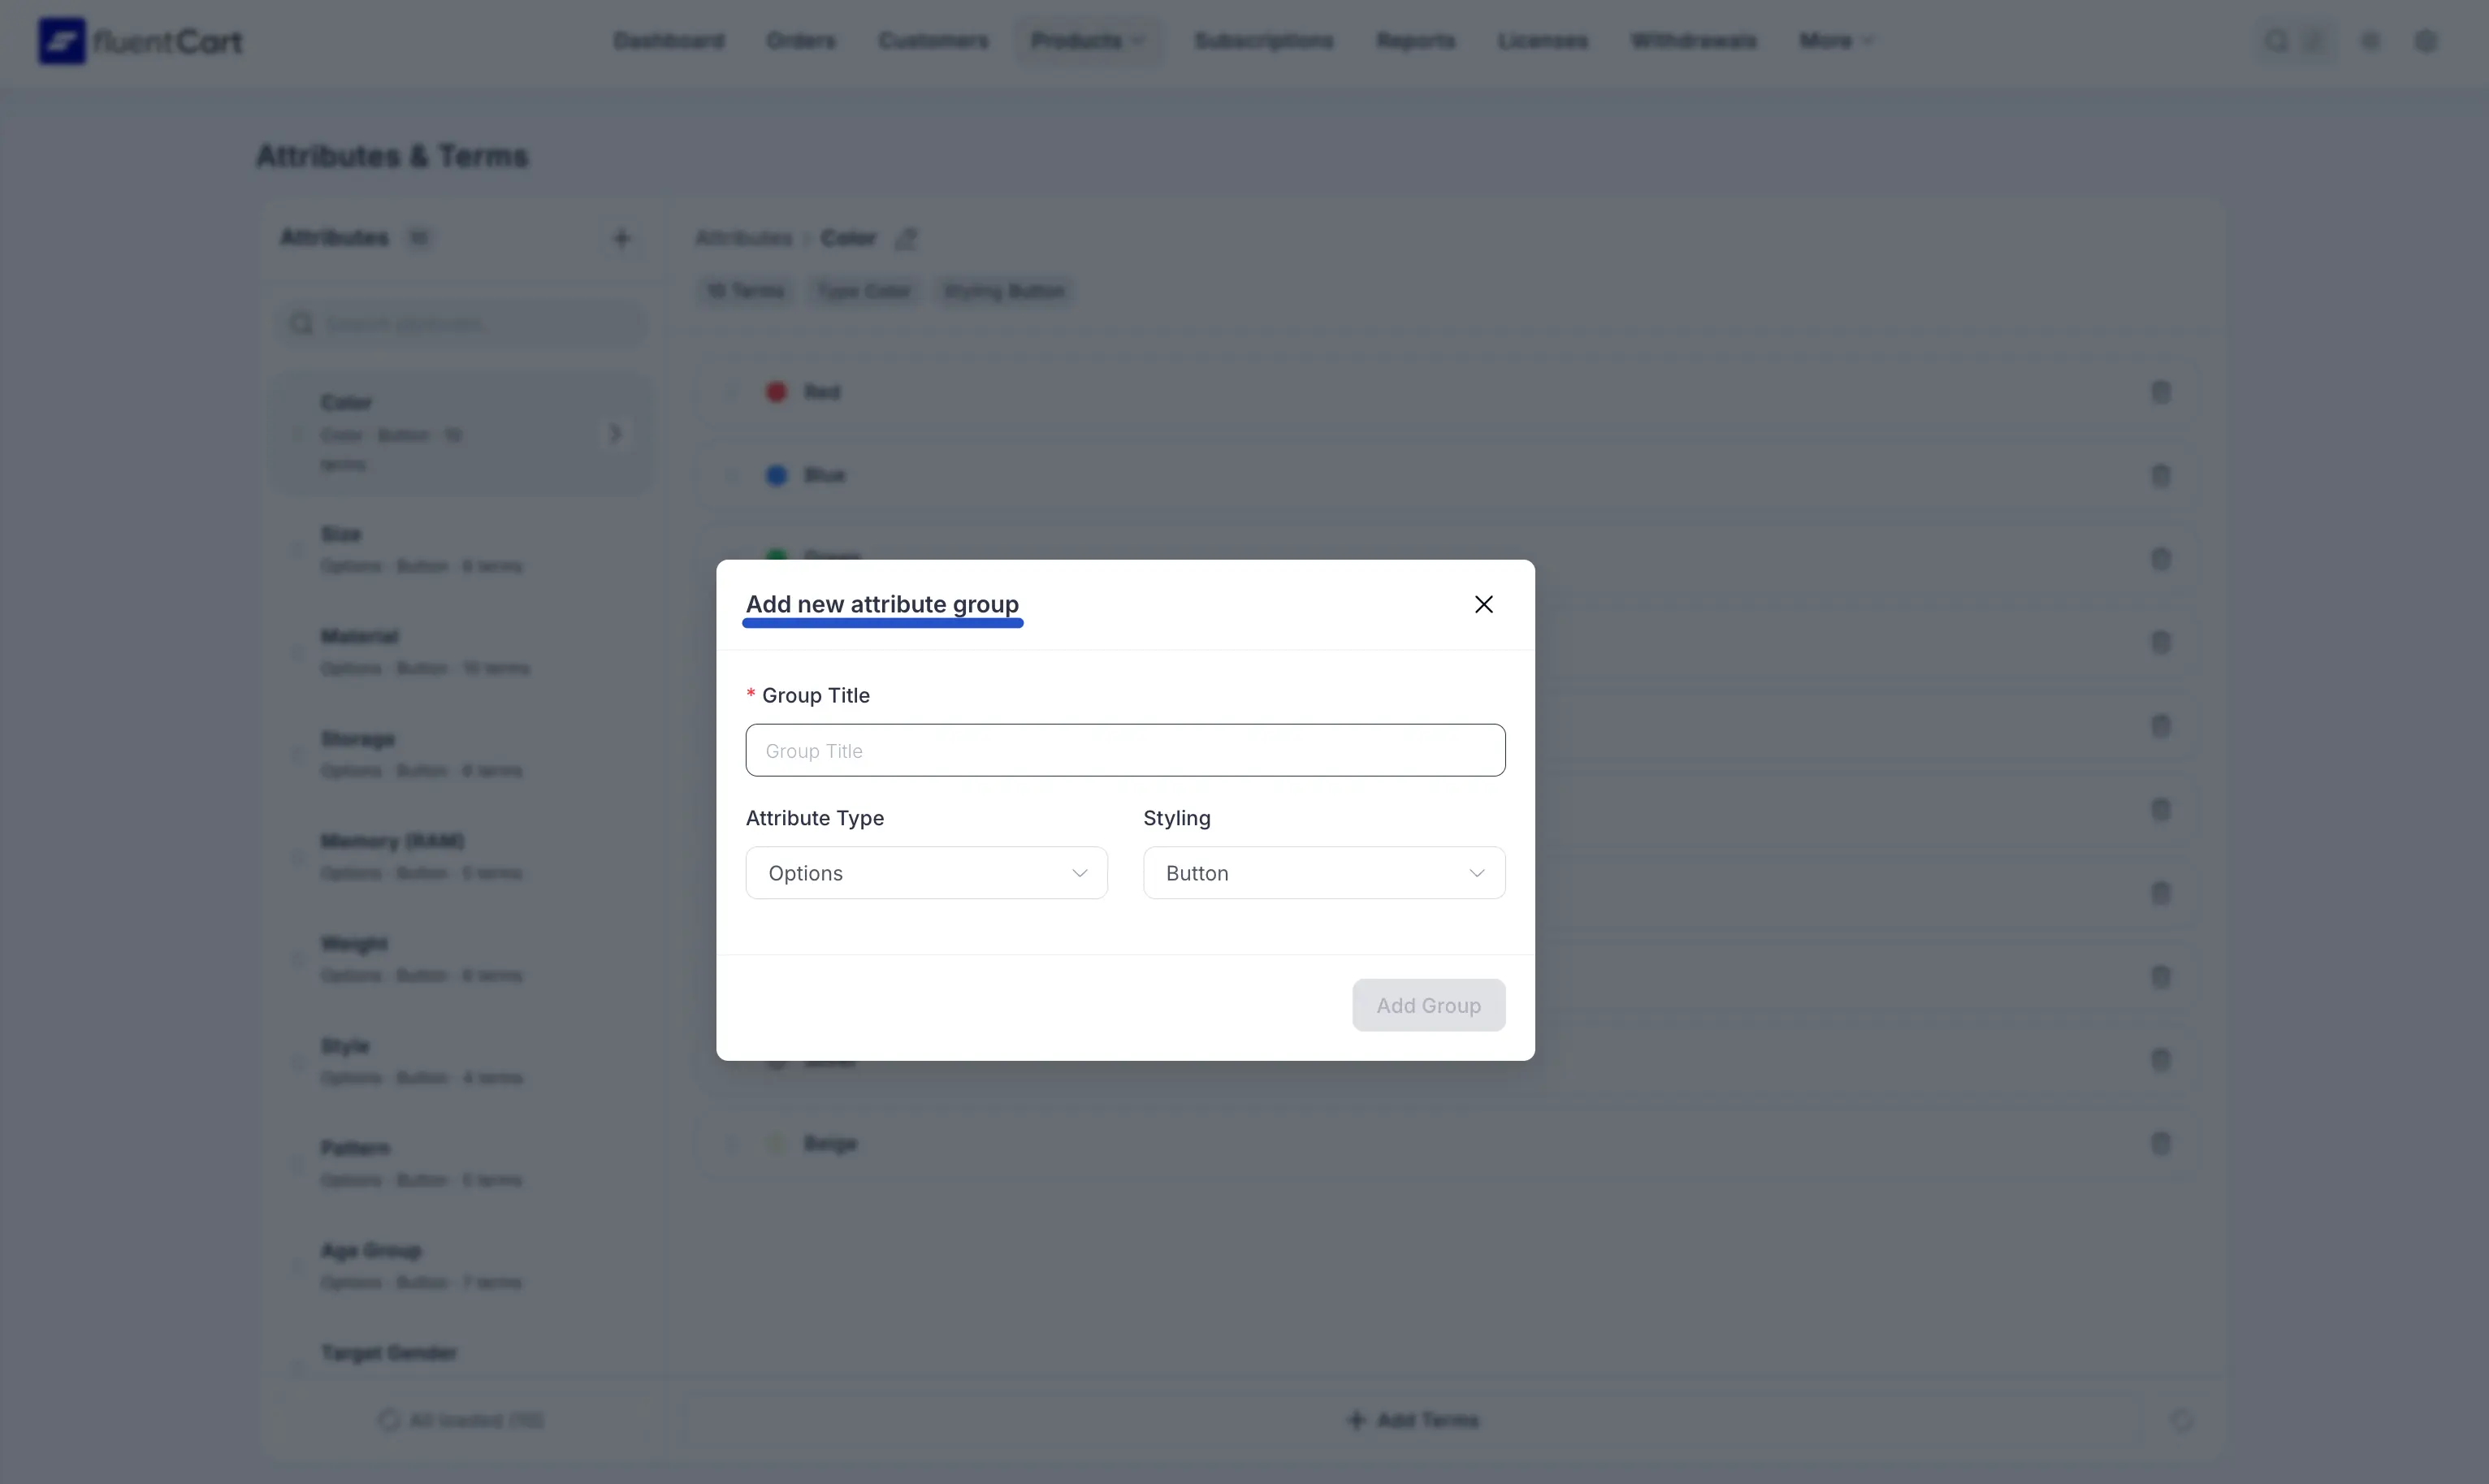
Here is what each field does:
- Group Title: (Required) The name of the attribute, such as "Color" or "Size". This label appears in the product editor and on your storefront.
- Attribute Type: Sets how the values are represented. Open the dropdown to choose one:
- Options: Plain text values, ideal for things like Size or Material.
- Color: Color swatches, where each term carries a hex color value.
- Image: Image thumbnails, where each term carries an image.
- Styling: Controls how the values appear on the product page:
- Button: Values display as clickable buttons (the most common choice).
- Dropdown: Values display in a dropdown select menu.
Once all three fields are set, click Add Group to save your new attribute.
Adding Terms to an Attribute Group
With your attribute created, the next step is to fill it with terms, the actual values customers will pick from.
Follow these steps to add terms:
- Click the attribute group in the left panel to select it. Its current terms load on the right.
- Click + Add Terms at the bottom of the terms list.
- An inline input row appears. Type the term title, for example "Cotton".
- Click + Add more to keep adding terms without leaving the panel.
- Click Save in the top right to apply your changes.
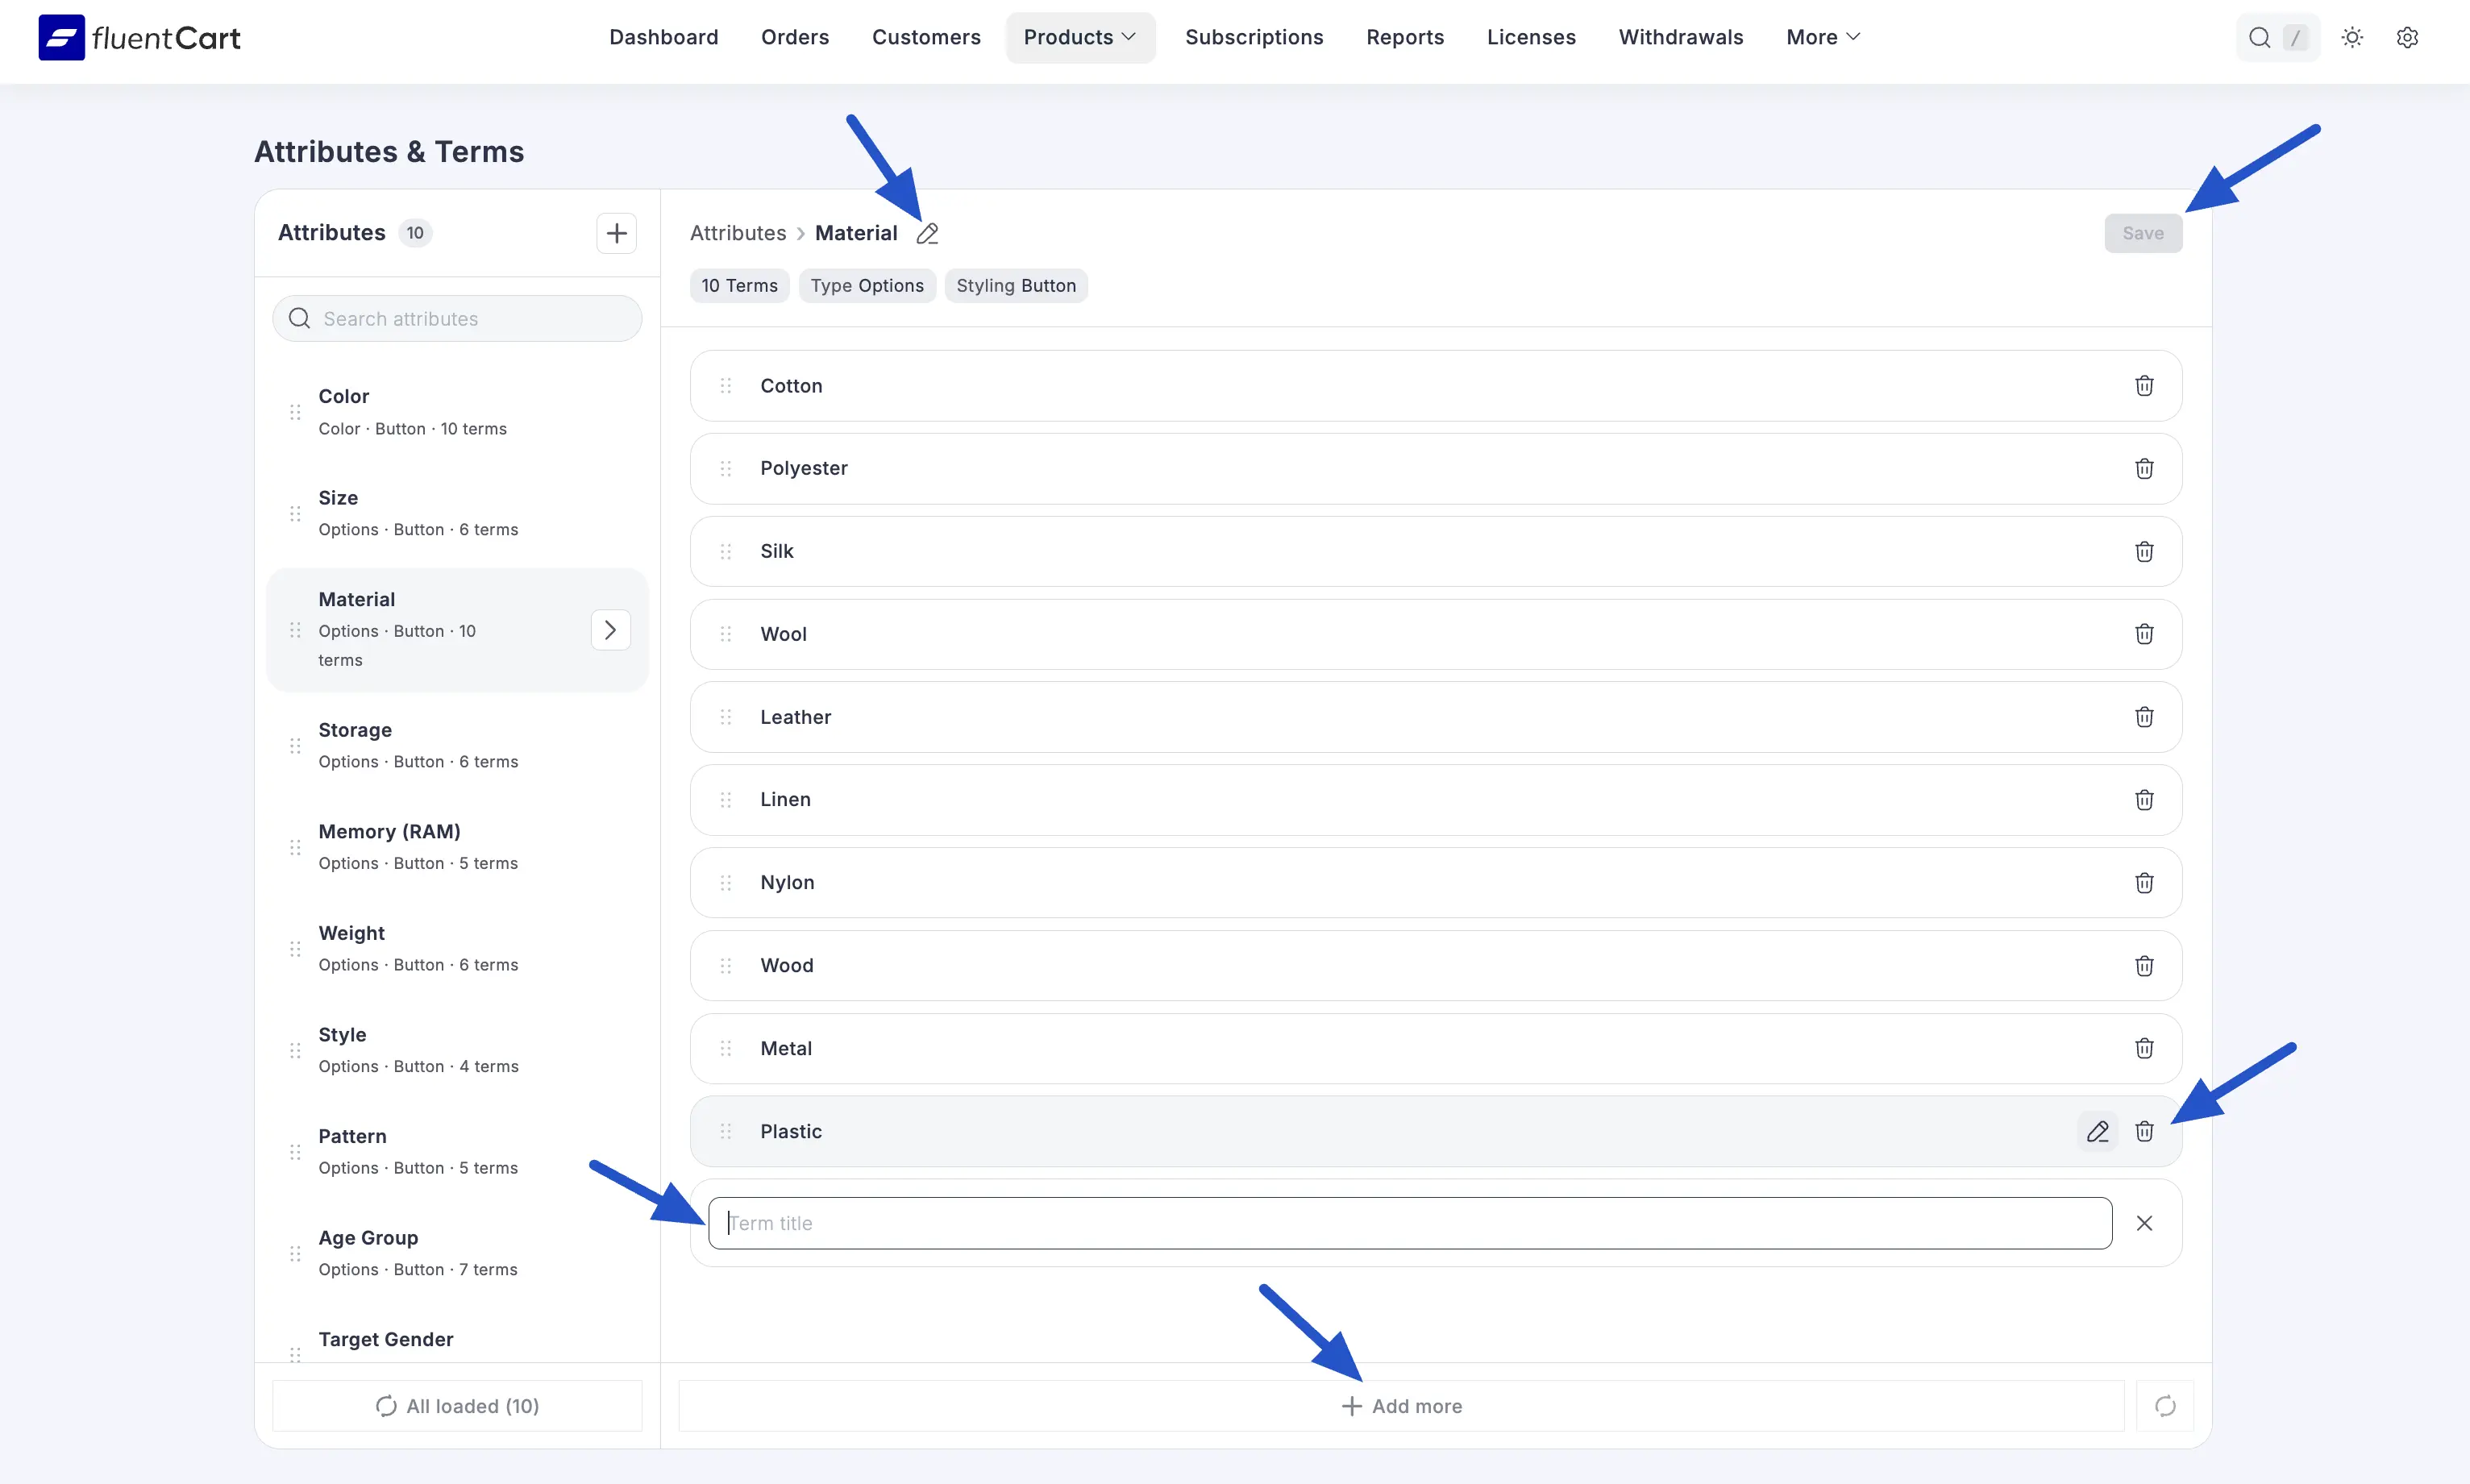
You can rename a term with the pencil icon or remove it with the trash icon beside each row.
📝 Note: Drag the handle on the left of any term to reorder it. The order you set here is the order customers see on your storefront.
Creating a New Product with Advanced Variations
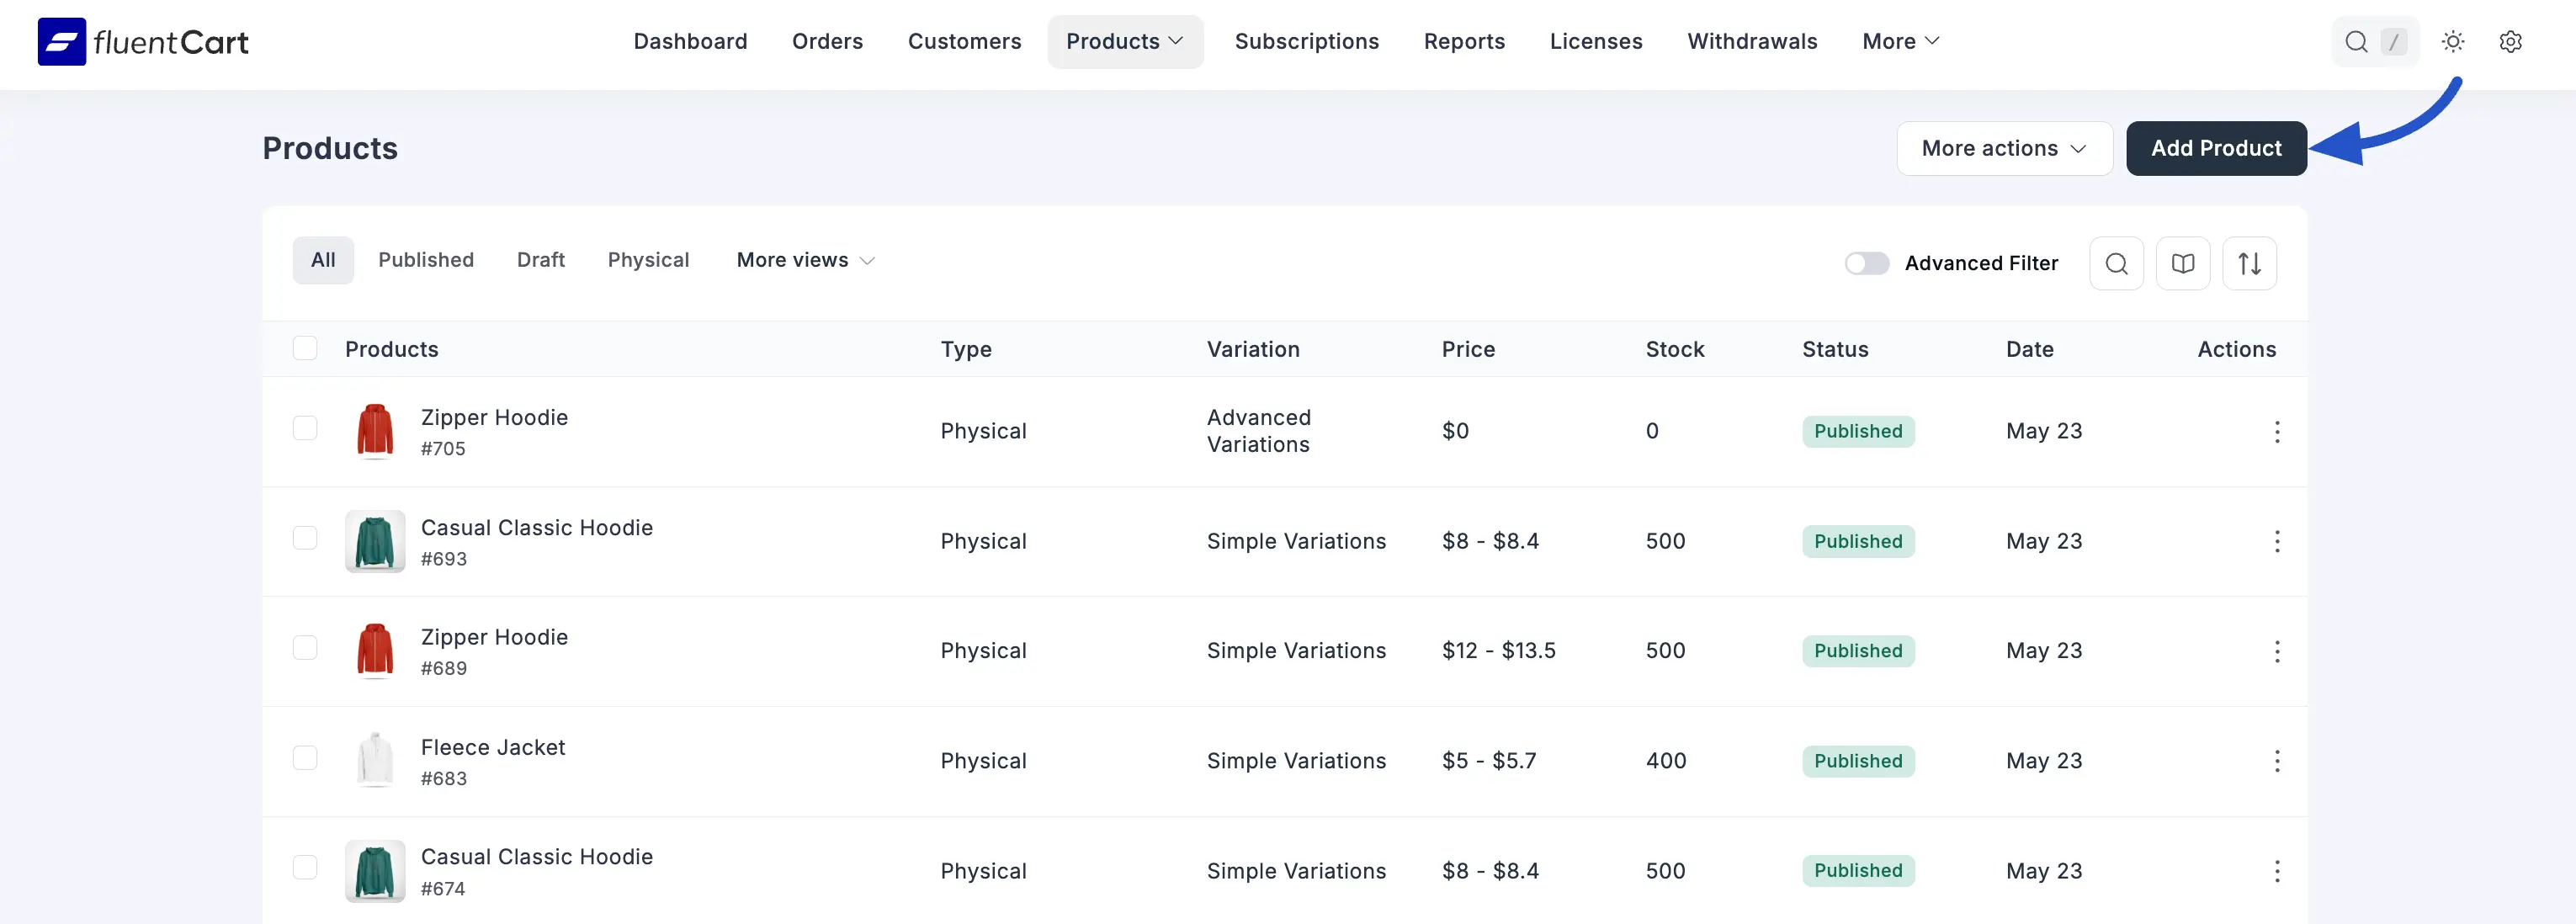
With your attributes and terms ready, you can build a product around them. The flow starts from the Products list, exactly like any other product type.
Step 1: Create the Product
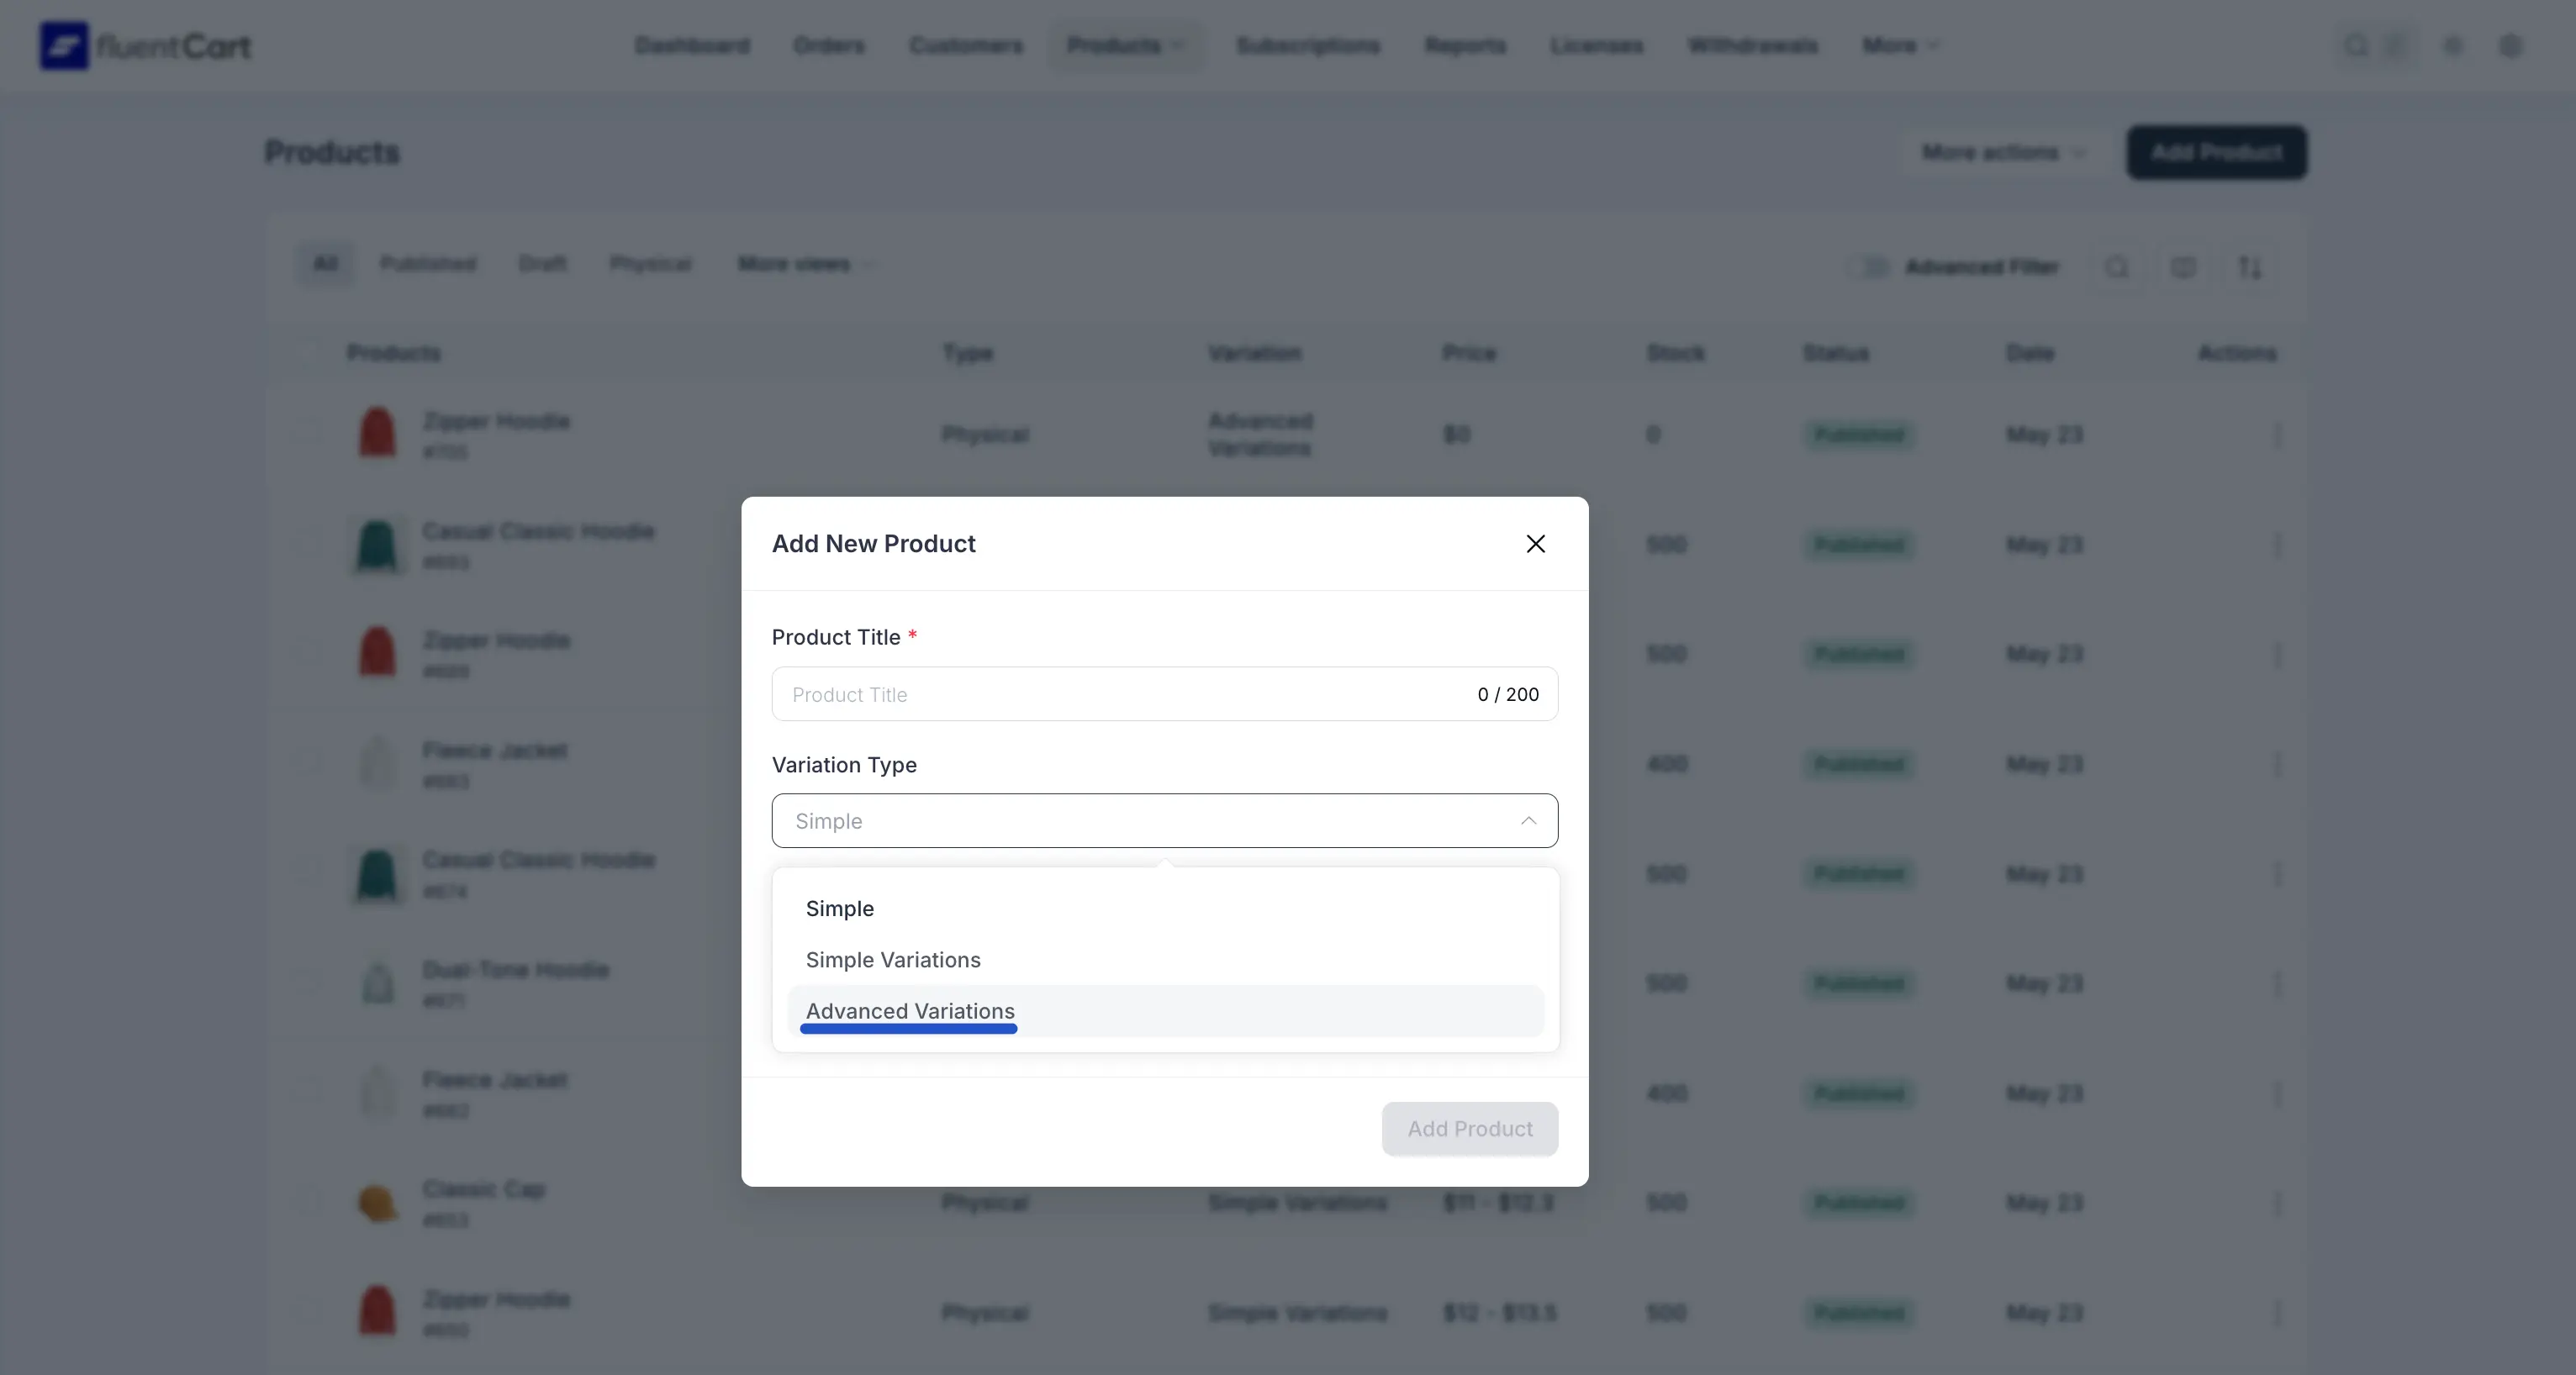
First, start a new product and tell FluentCart it will use Advanced Variations.
- From your WordPress dashboard, navigate to FluentCart Pro > Products.
- Click the Add Product button at the top right of the Products screen.
- In the Add New Product modal, enter the Product Title.
- Open the Variation Type dropdown and select Advanced Variations.
- Click Add Product. FluentCart creates the product and opens its edit screen.
Step 2: Add Options in the Pricing Panel
On the product edit screen, scroll to the Pricing panel. Because no options have been assigned yet, it shows "No options added yet" along with a button to get started.
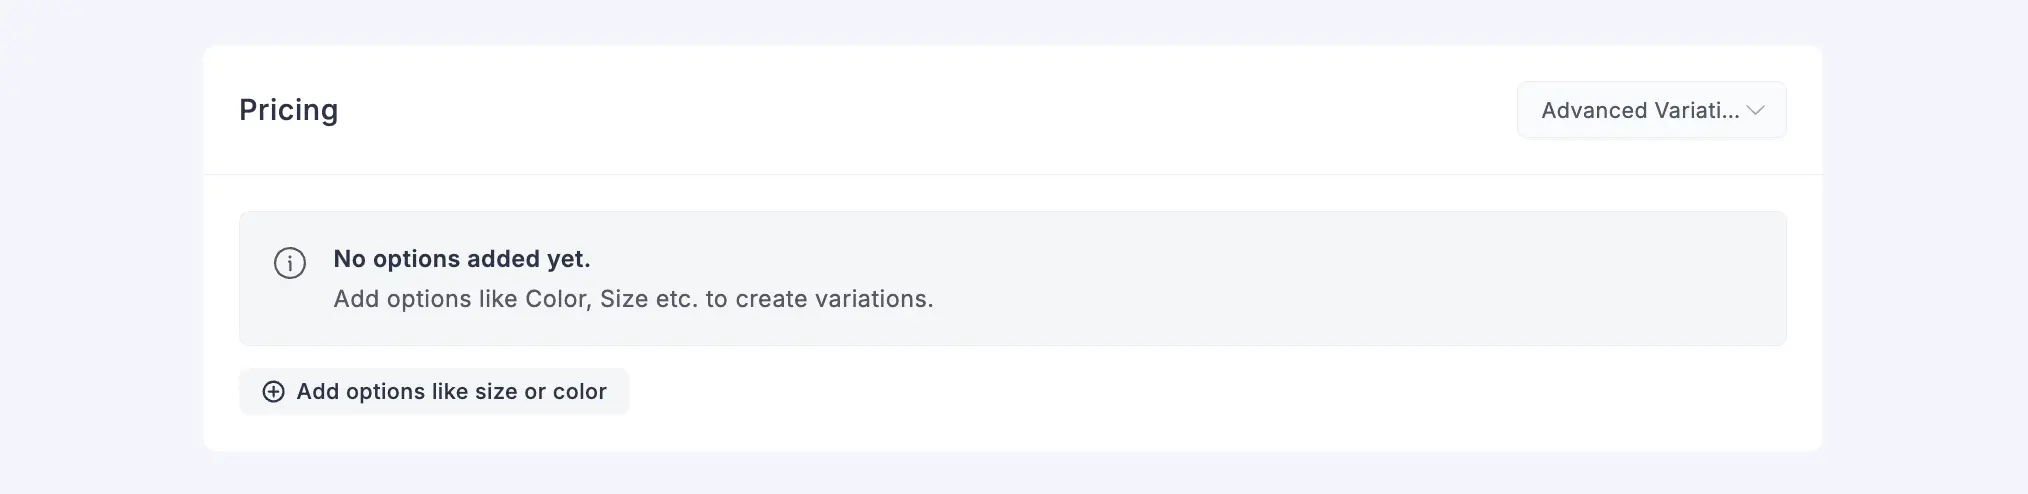
Now add your first option dimension:
- Click + Add options like size or color. A new option row appears with an Option name and Option values field.
- Click Option name and either select an existing attribute from the list, or click + Create new attribute group to define one without leaving the page.
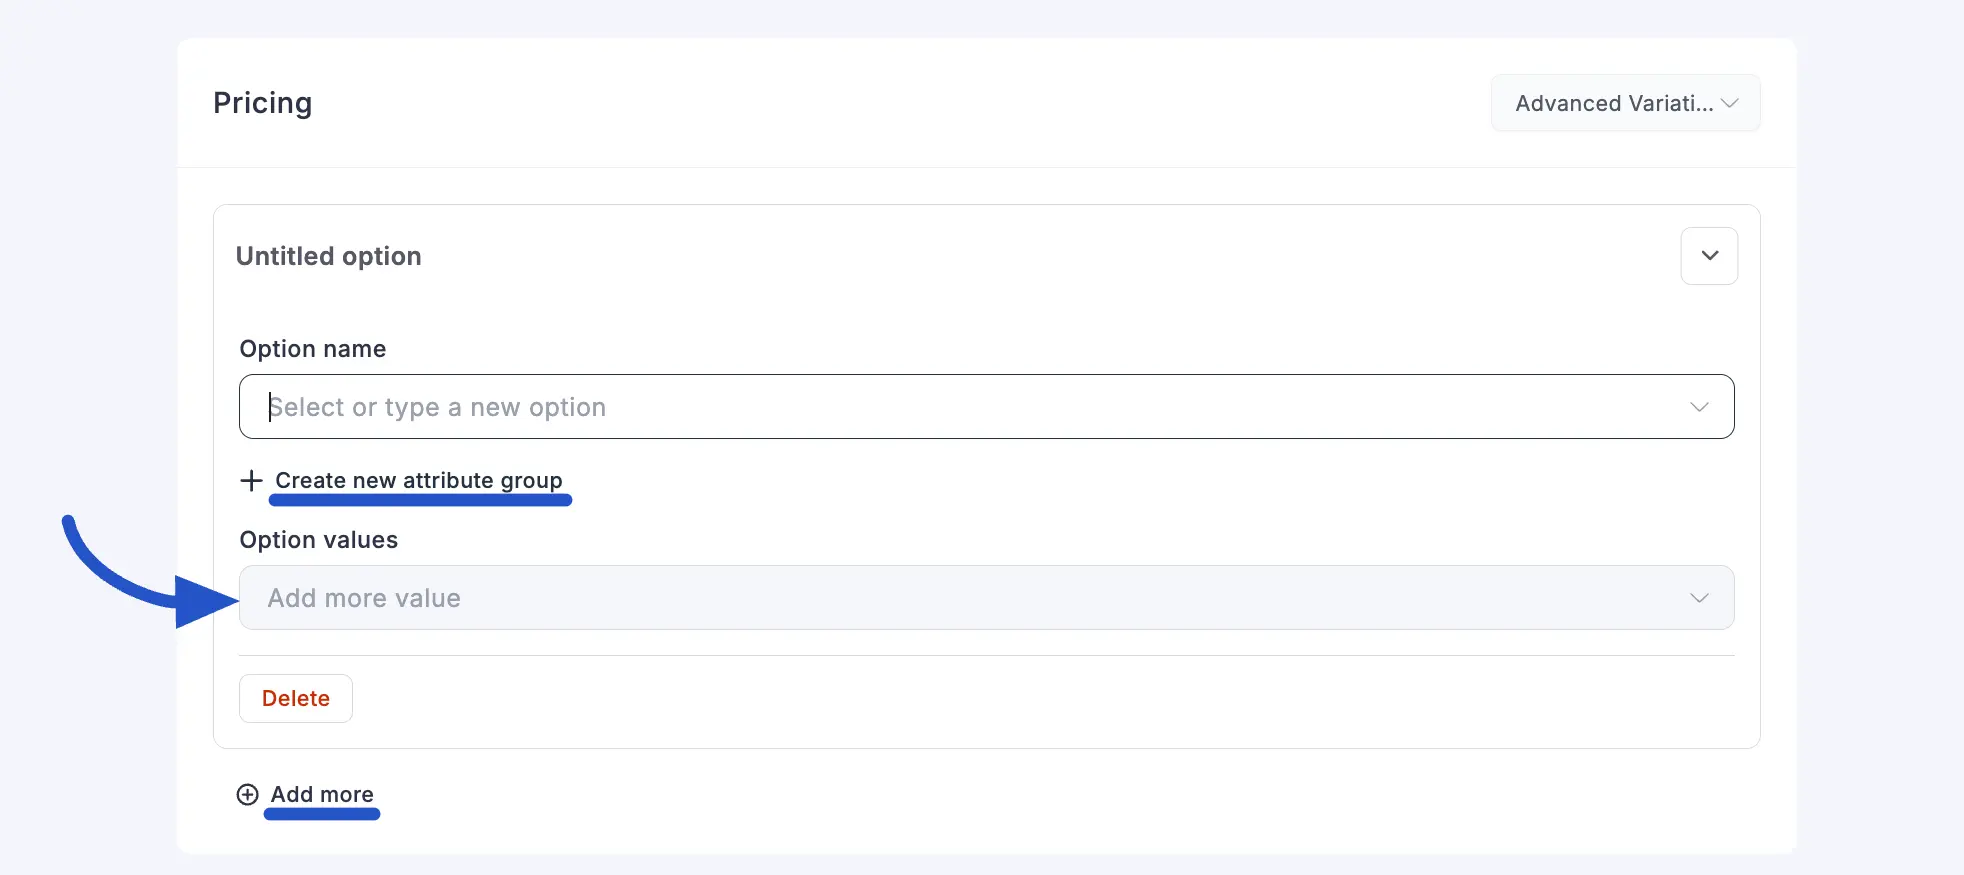
- Click Option values and check the terms you want this product to offer. You do not have to include every term from the attribute, just the ones that apply to this product.
- For a Color attribute, a color picker appears when you add a new value. Pick from the preset swatches or enter a hex code directly, then add it.
- To add another dimension, such as Size alongside Color, click + Add more and repeat the steps above.
- When your options and values look right, click Save. FluentCart generates the full variant matrix automatically.
INFO
After saving, every generated variant appears in the variant editor, where you can set individual prices, upload variation images, manage inventory, and assign SKUs. For a full field-by-field walkthrough, see Configuring Product Pricing.
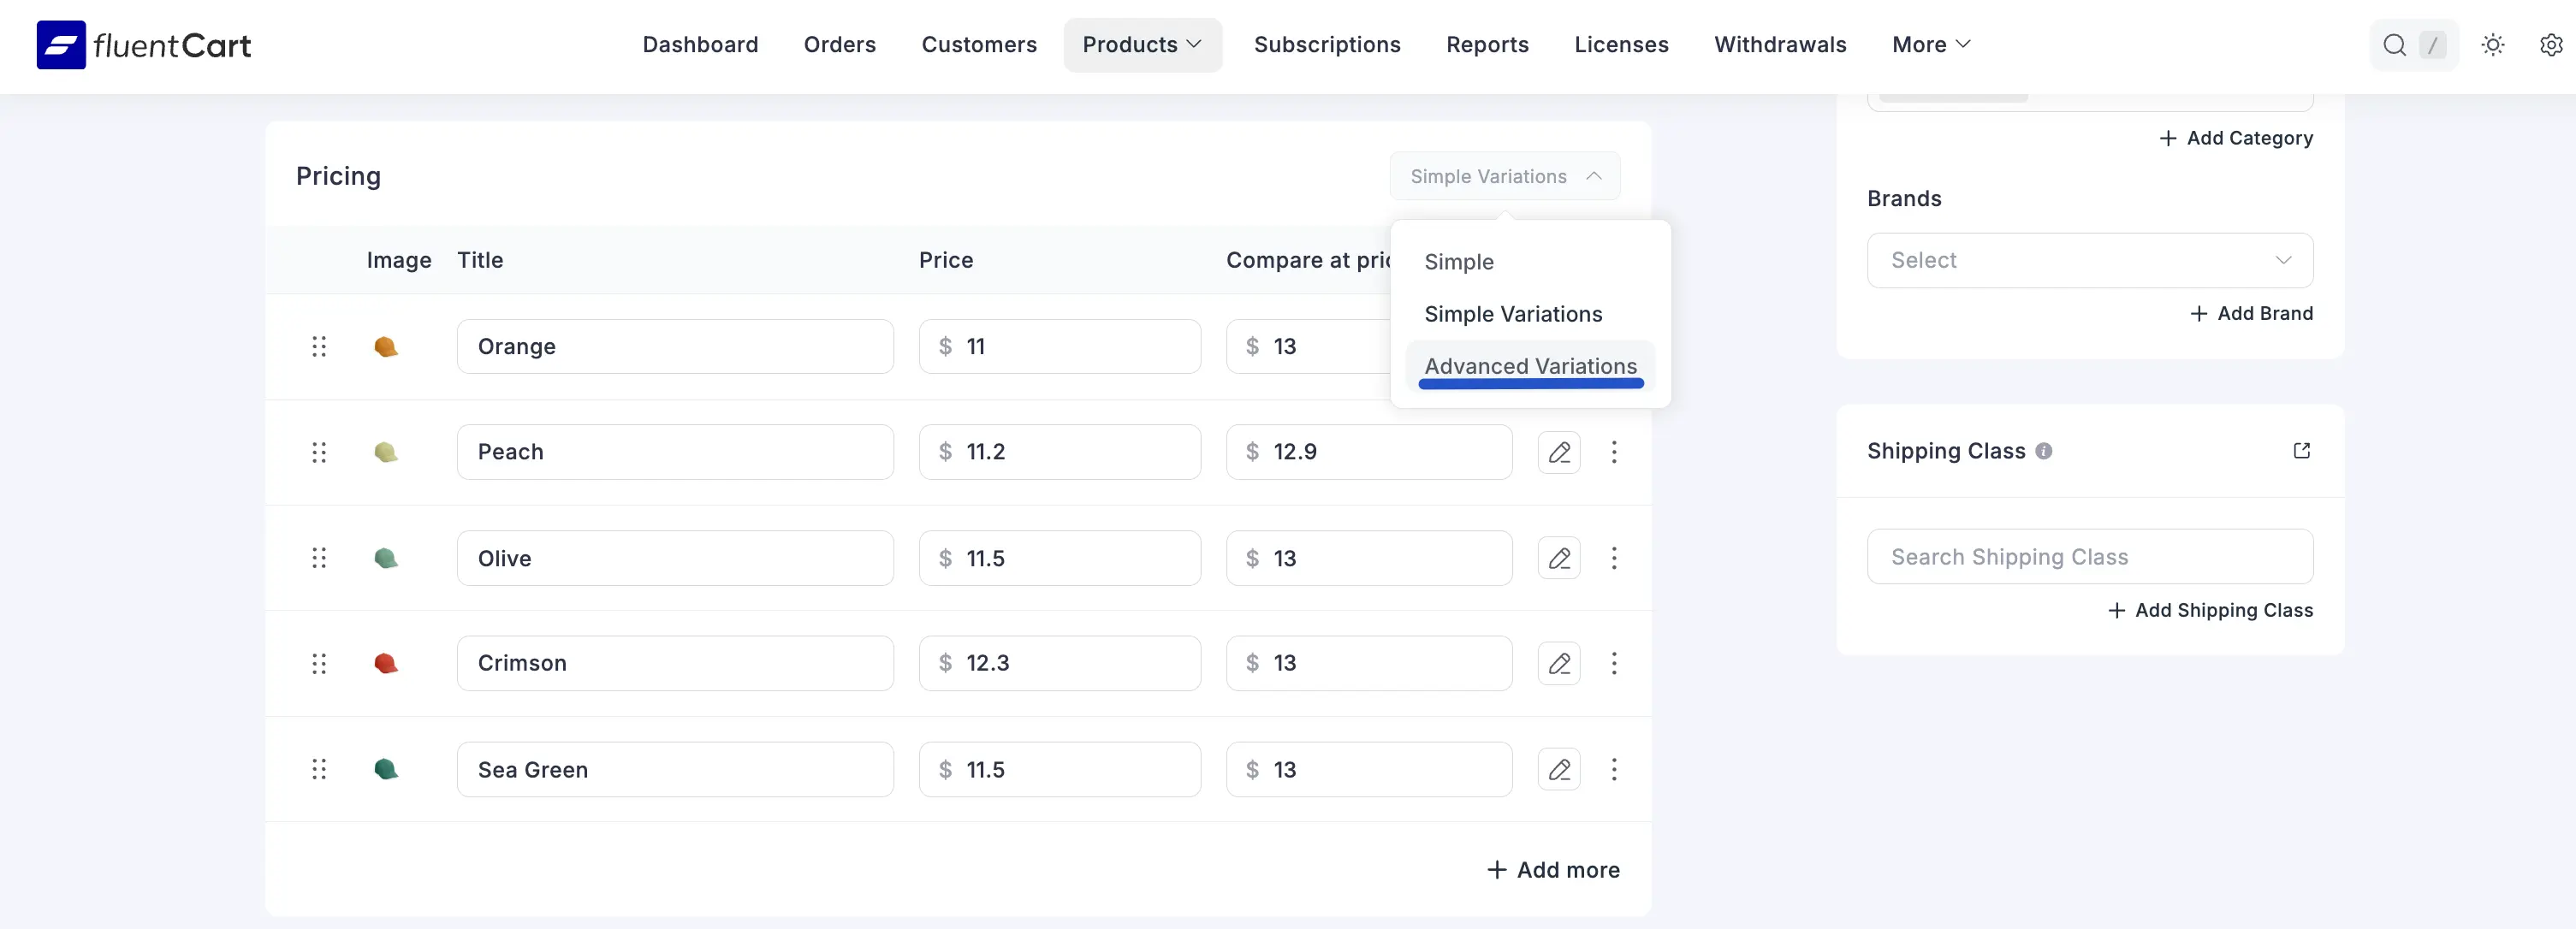
Switching an Existing Product to Advanced Variations
You can convert a product that currently uses Simple or Simple Variations pricing over to Advanced Variations at any time. Before you do, understand that this is a permanent, one-way change.
WARNING
Switching to Advanced Variations permanently deletes all current variations for the product. This cannot be undone, and you cannot switch back to Simple Variations afterward.
To switch an existing product, follow these steps:
Open the product on its edit screen and scroll to the Pricing panel.
Click the variation type dropdown at the top right of the panel. It currently shows your active type, such as "Simple Variations".
Select Advanced Variations from the dropdown.
A Confirm Delete! dialog appears. Read the warning carefully.
Type
proceedexactly into the text field. The confirm button stays disabled until you do.Click Yes, Delete! to confirm the switch.
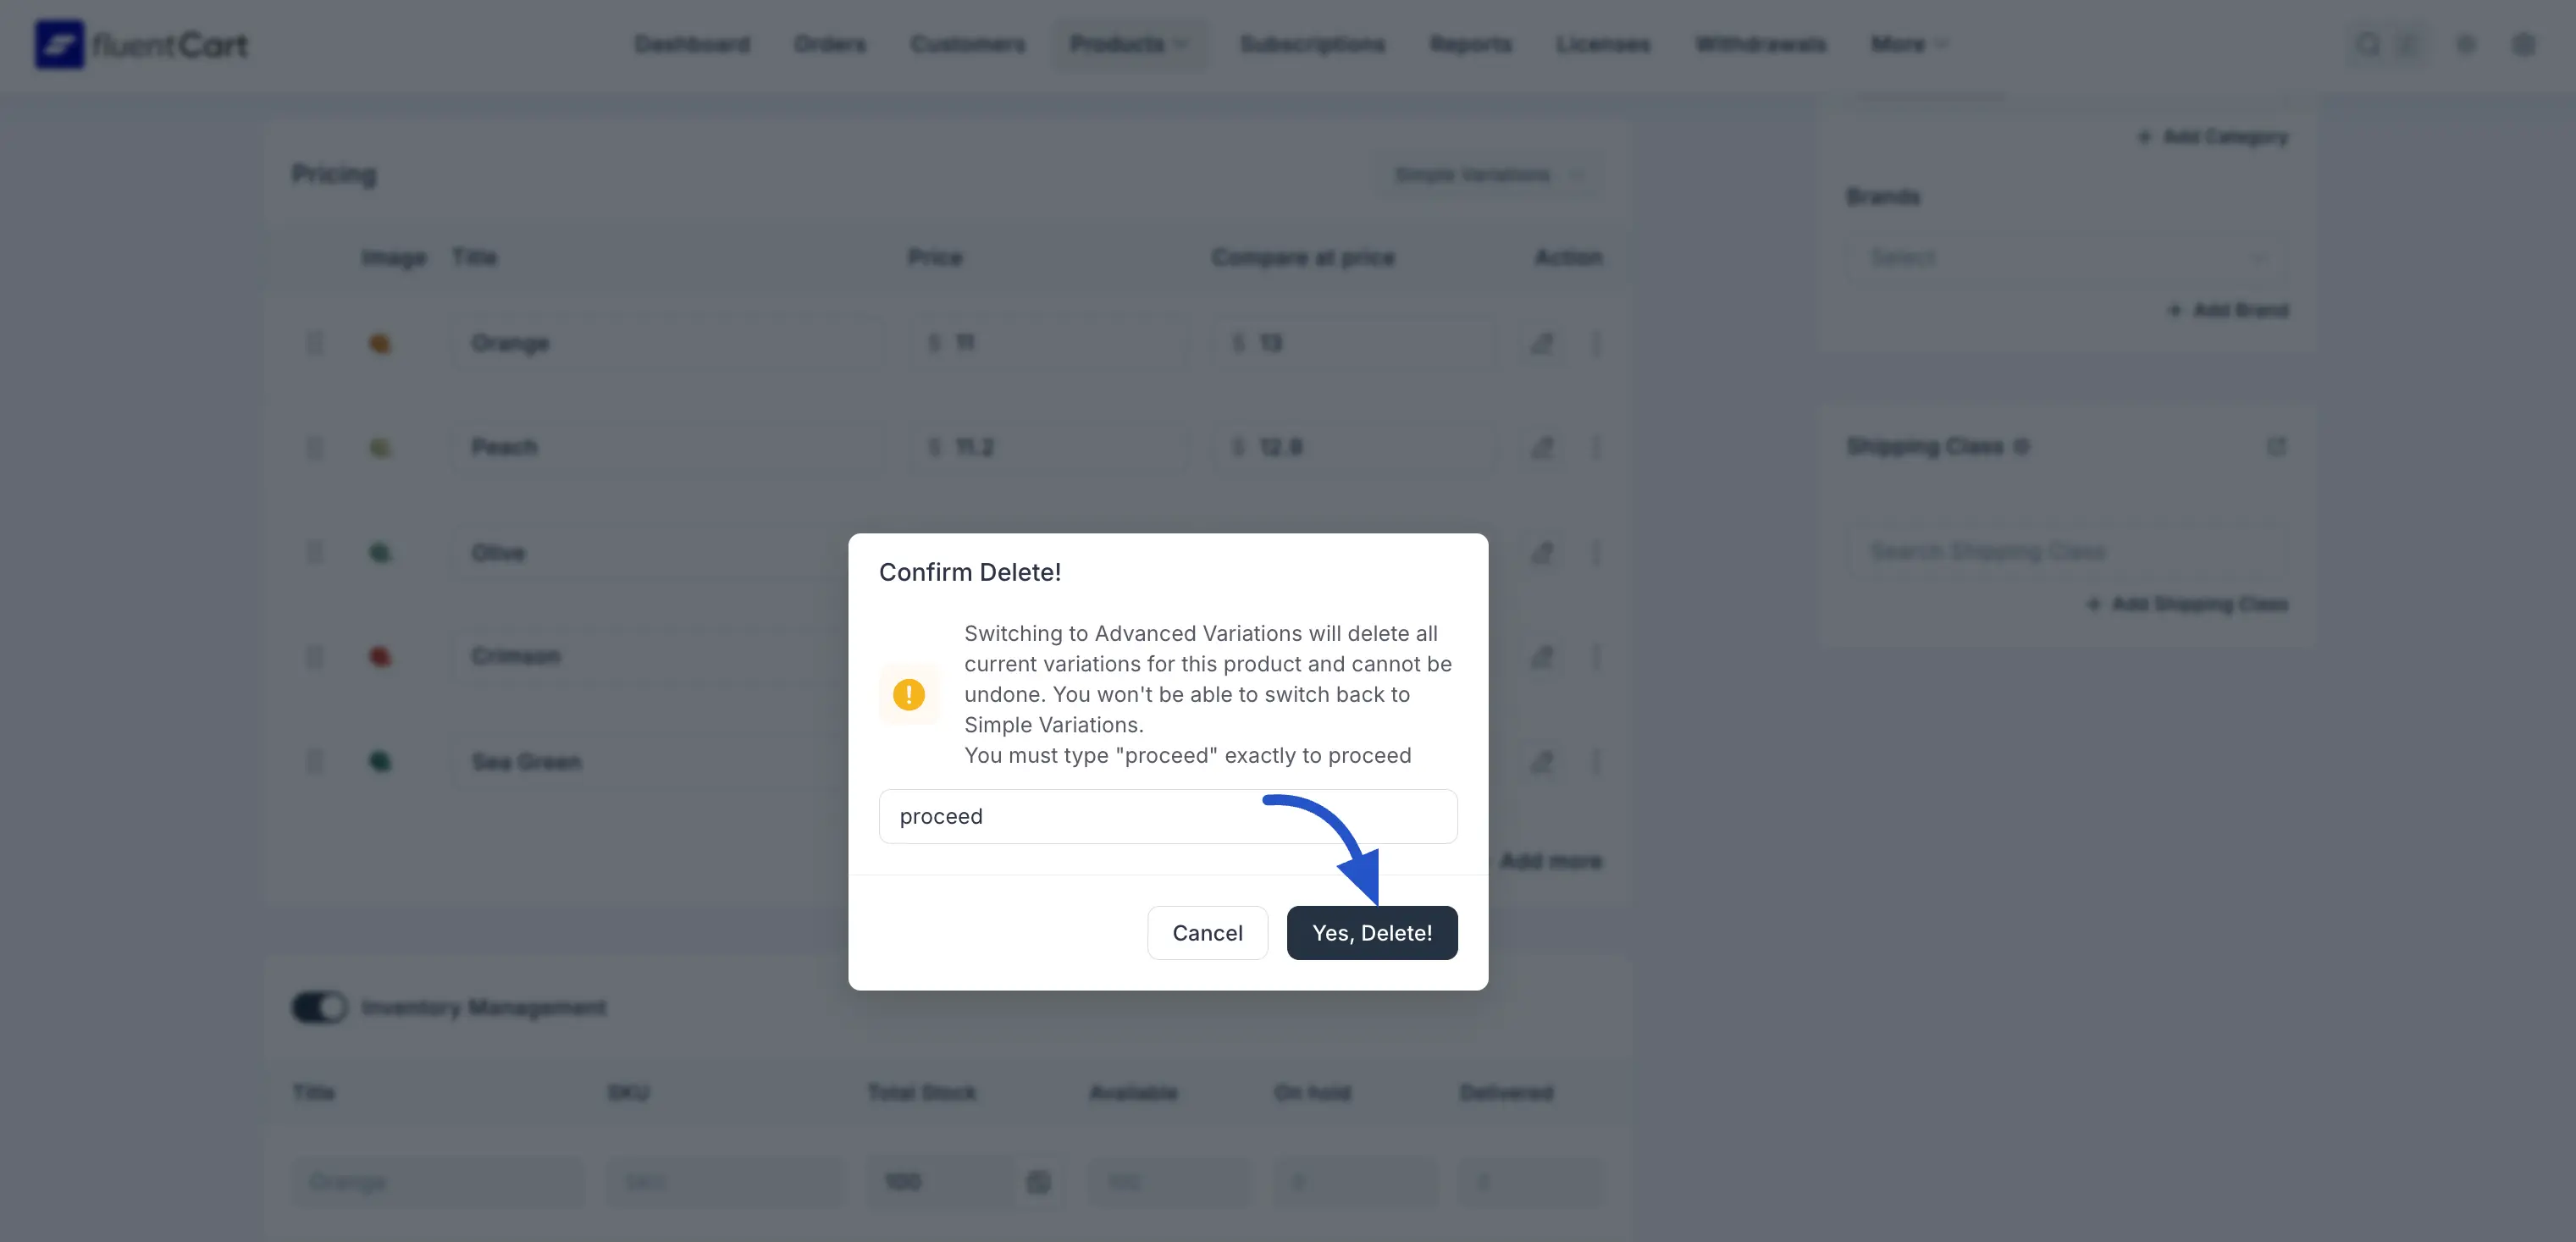
Once confirmed, the old variations are removed and the Pricing panel resets to the Advanced Variations empty state. From here, follow Step 2: Add Options in the Pricing Panel to build out your new attribute-based options.
How Advanced Variations Appear to Customers
Once your product is published, all the attributes you configured turn into interactive selectors on the storefront. Each attribute renders in the style you chose, so customers can mix and match options to land on the exact variant they want.
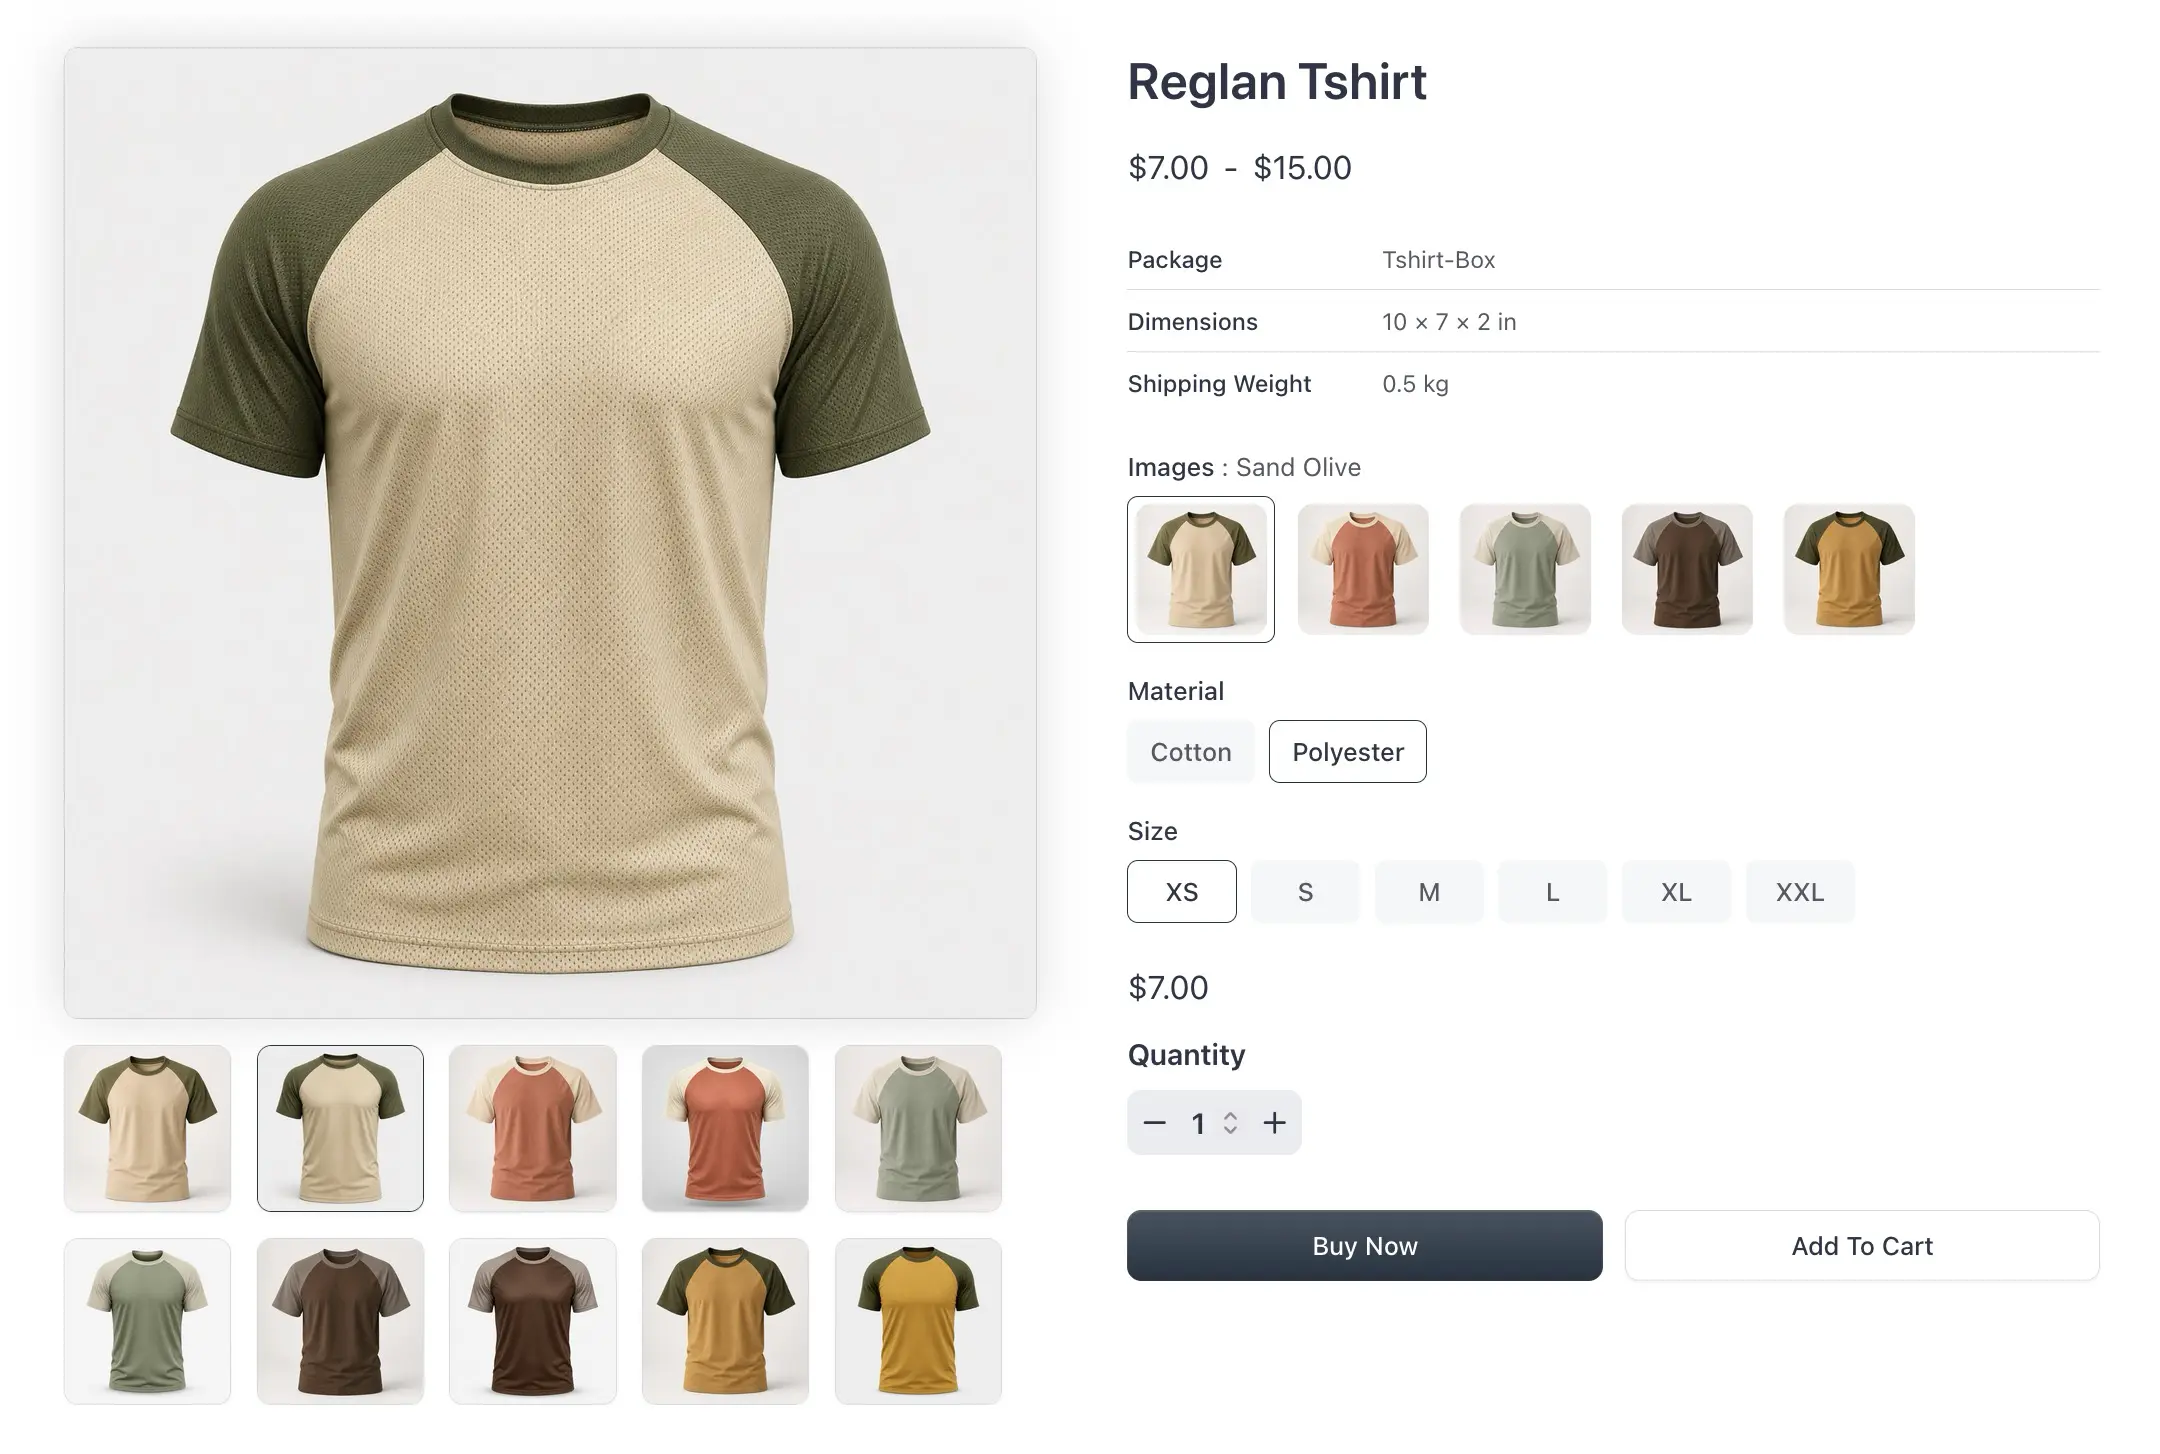
In this example, the Reglan Tshirt uses three attributes, and here is how each one behaves for the customer:
- Images: An image-type attribute appears as clickable photo swatches, with the selected value named beside the label (for example, "Images : Sand Olive"). Picking a swatch updates the main product image so shoppers see exactly what they are choosing.
- Material: An options-type attribute styled as buttons (Cotton, Polyester). The customer taps one to make their selection.
- Size: Another button-styled attribute (XS through XXL), letting the customer pick a size in a single click.
A few details work together to keep the experience clear:
- Price range: Before a full combination is selected, the product shows a range (for example,
$7.00 - $15.00) that spans your lowest and highest variant prices. - Live price update: As the customer settles on a combination, the displayed price updates to match that specific variant.
- Add to cart: Once a valid combination is selected, the customer can set a quantity and use Buy Now or Add To Cart to purchase that exact variant.
📝 Note: The way each attribute looks on the storefront comes straight from its Attribute Type and Styling settings. Revisit Creating an Attribute Group if you want to switch an attribute between buttons, a dropdown, color swatches, or image swatches.
Your product is now running on Advanced Variations, ready for you to assign attributes and let FluentCart generate every combination for you.