Appearance
Creating Physical Products
This guide will walk you through the process of adding a new physical product to your FluentCart store. A physical product is any tangible item that you sell and ship to your customers.
We will cover every essential step to get your product ready for sale. You will learn how to configure all the necessary details, including:
- Product name, description, and images
- Pricing and sales information
- Inventory and stock levels
- Variations such as size or color
By the end of this guide, you will be able to confidently list and manage any physical product in your inventory.
Steps to Create a New Physical Product
From your WordPress dashboard, navigate to FluentCart Pro > Products in the left sidebar.
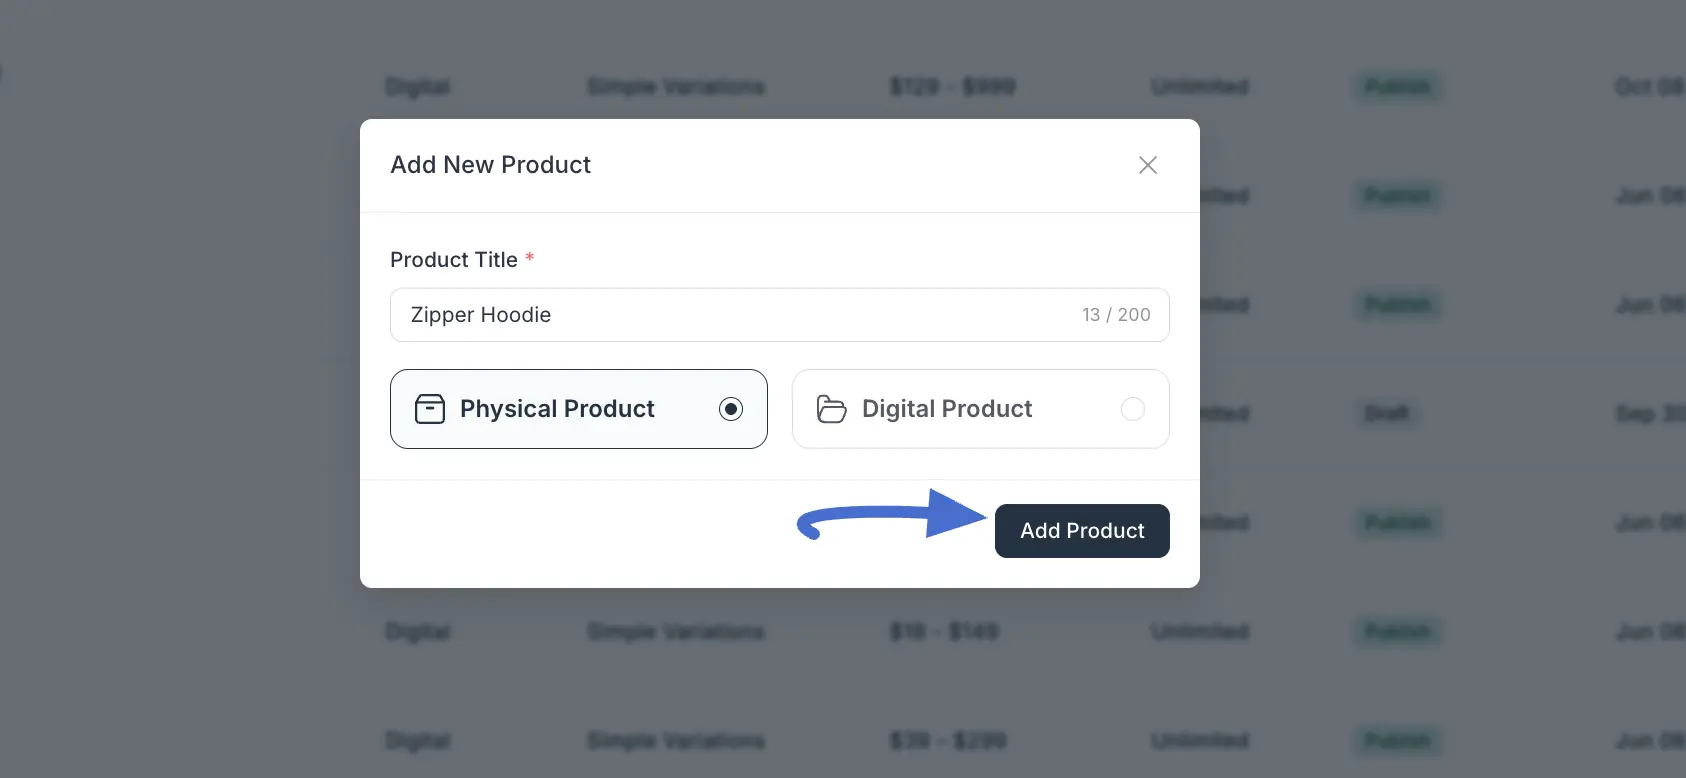
On the Products screen, click the "Add Product" button at the top right.

This action will open a new Add New Product modal, where you’ll enter the product name and select the product type, either Physical Product or Digital Product. After making your selection, click on the Add Product button and you’ll be redirected to the Edit Product page to configure all product details.
1. Basic Product Information
Title: Enter the main name of your product (e.g., "Purple Air Max Trainers"). This name shows up everywhere: on your shop page, in the cart, and at checkout.
Short description: Write a brief, simple summary of what the product is. This usually shows up quickly near the product picture or price, giving customers a quick, important overview.
Long Description: This is the large area for all the detailed information, like features, materials, and how to use the product. FluentCart offers two great ways to build this content:
Using the Visual Builder (Recommended for Dynamic Content)
The Builder option uses the powerful block editor built into WordPress (Gutenberg). This lets you design rich, visual, and highly effective product pages.
- Click the Builder button, located next to the Classic Editor option.
- Click Show Content Editor to open the design screen.
- This screen gives you the opportunity to create dynamic descriptions by adding any available WordPress content blocks. For example, you can add:
- Images & Videos: Show extra product media right within the description.
- Layouts: Use columns to put text and pictures side-by-side for a clean look.
- Lists & Tables: Clearly list specifications or sizes.
By using the Visual Builder, you get the power to create beautiful product descriptions that help sell your products better and give customers a great shopping experience.
Using the Classic Editor
The Classic Editor gives you a standard, quick writing space. Within this editor, you have two modes:
- Visual Mode: This is the standard view where you type your description directly. You'll have formatting options above (like bold, italics, lists) and options to easily add media with your text.
- Code Mode (HTML): This view is for advanced users who want to write the long description using raw HTML codes.
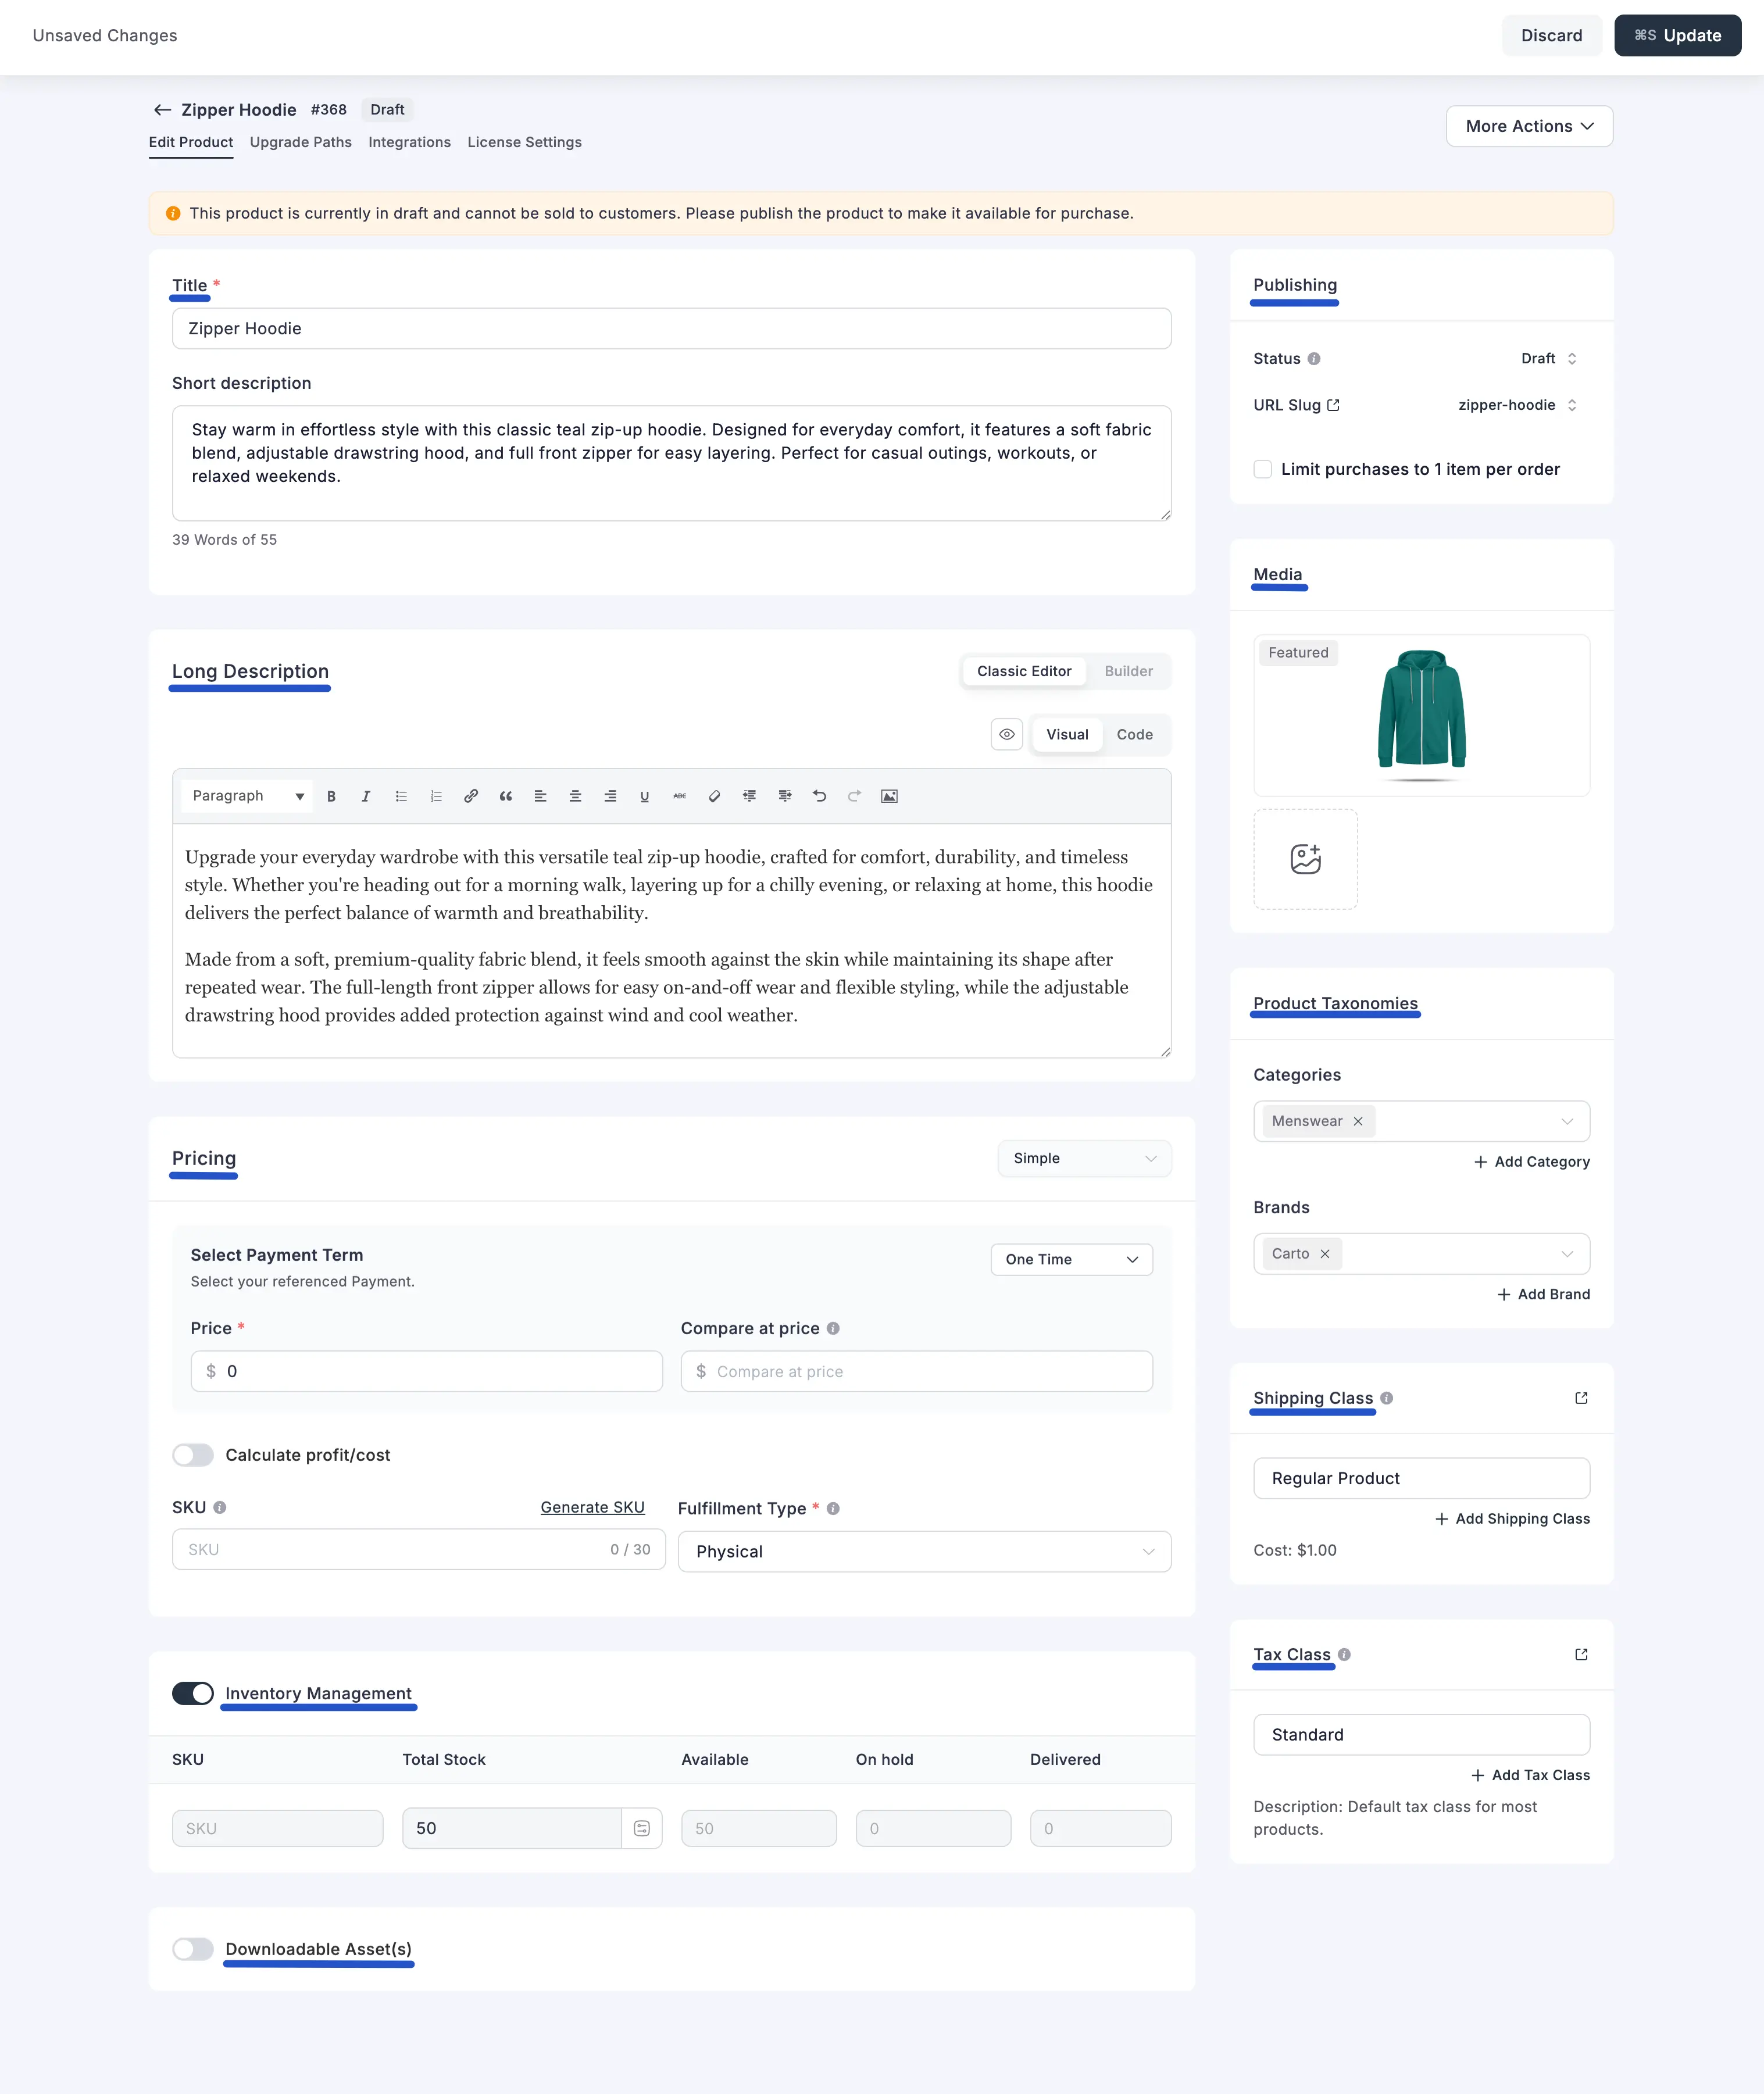
2. Media
This section allows you to manage the visual presentation of your product, ensuring customers get a clear view of what they are buying. You can set a primary image and build a gallery to showcase different angles or use cases.
Featured Image:
Set a prominent, high-quality image that will act as the main face of your product on the shop page and in the cart.
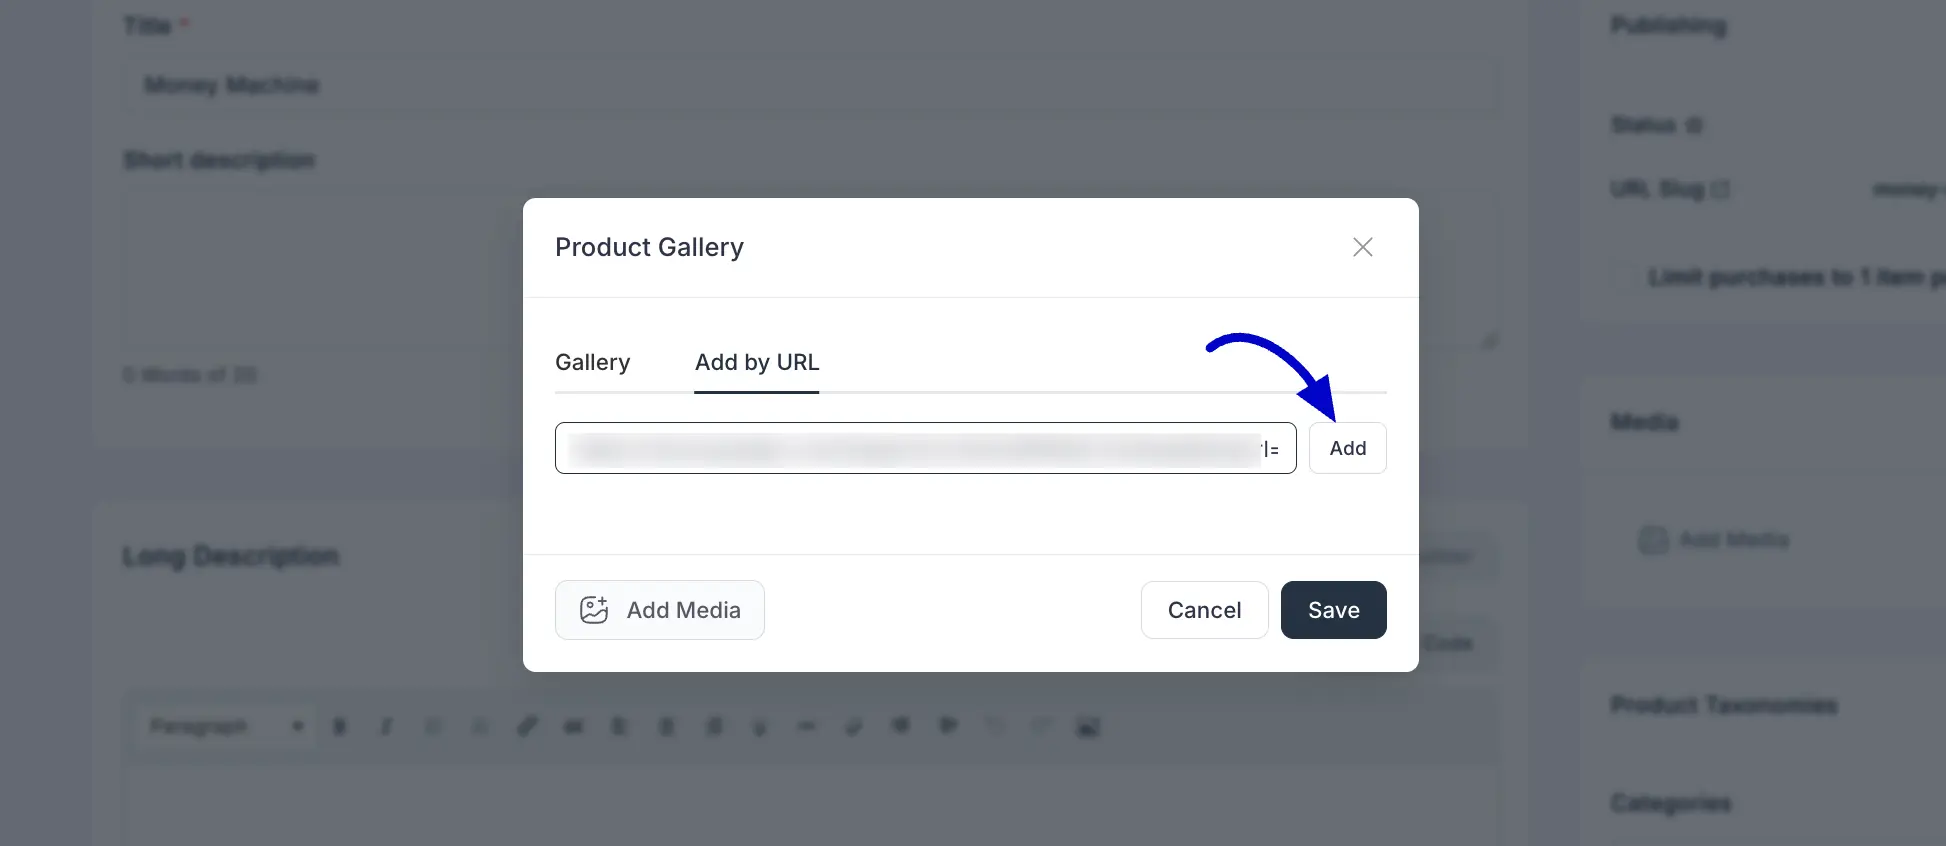
Product Gallery:
By clicking the Add Media button, you open the Product Gallery modal, which offers two distinct ways to add visual content to your item:
- Gallery: This is the standard method for selecting images or videos already saved in your WordPress media library or uploading new files directly from your computer.
- Add by URL: This convenient option allows you to link to an image hosted elsewhere on the web. Simply paste the direct web address of the image into the input field and click the Add button to include it in your gallery.
Once you have selected or linked your media, click the Save button at the bottom of the modal to update your product's gallery.
3. Product Taxonomies
This section helps you organize and tag your product using WordPress taxonomies for better filtering and presentation on your storefront.
- Categories: Assign the product to one or more relevant Categories (e.g., "Men's Shoes"). You can select existing categories from the dropdown menu or click + Add Category to create a new one instantly.
- Brands: Use this field to associate the product with a specific Brand. Select the brand name from the dropdown menu or click + Add Brand if the brand doesn't exist yet in your FluentCart settings.
By using these taxonomies, you ensure customers can easily find and filter your products on your shop pages.
4. Pricing & Variations
This is where your physical product gets its price tag — and FluentCart gives you the control to set it up exactly how your inventory works. Selling one style at a fixed rate? Or a hoodie that comes in six colorways, each with its own weight and box size? Either way, this section has you covered.
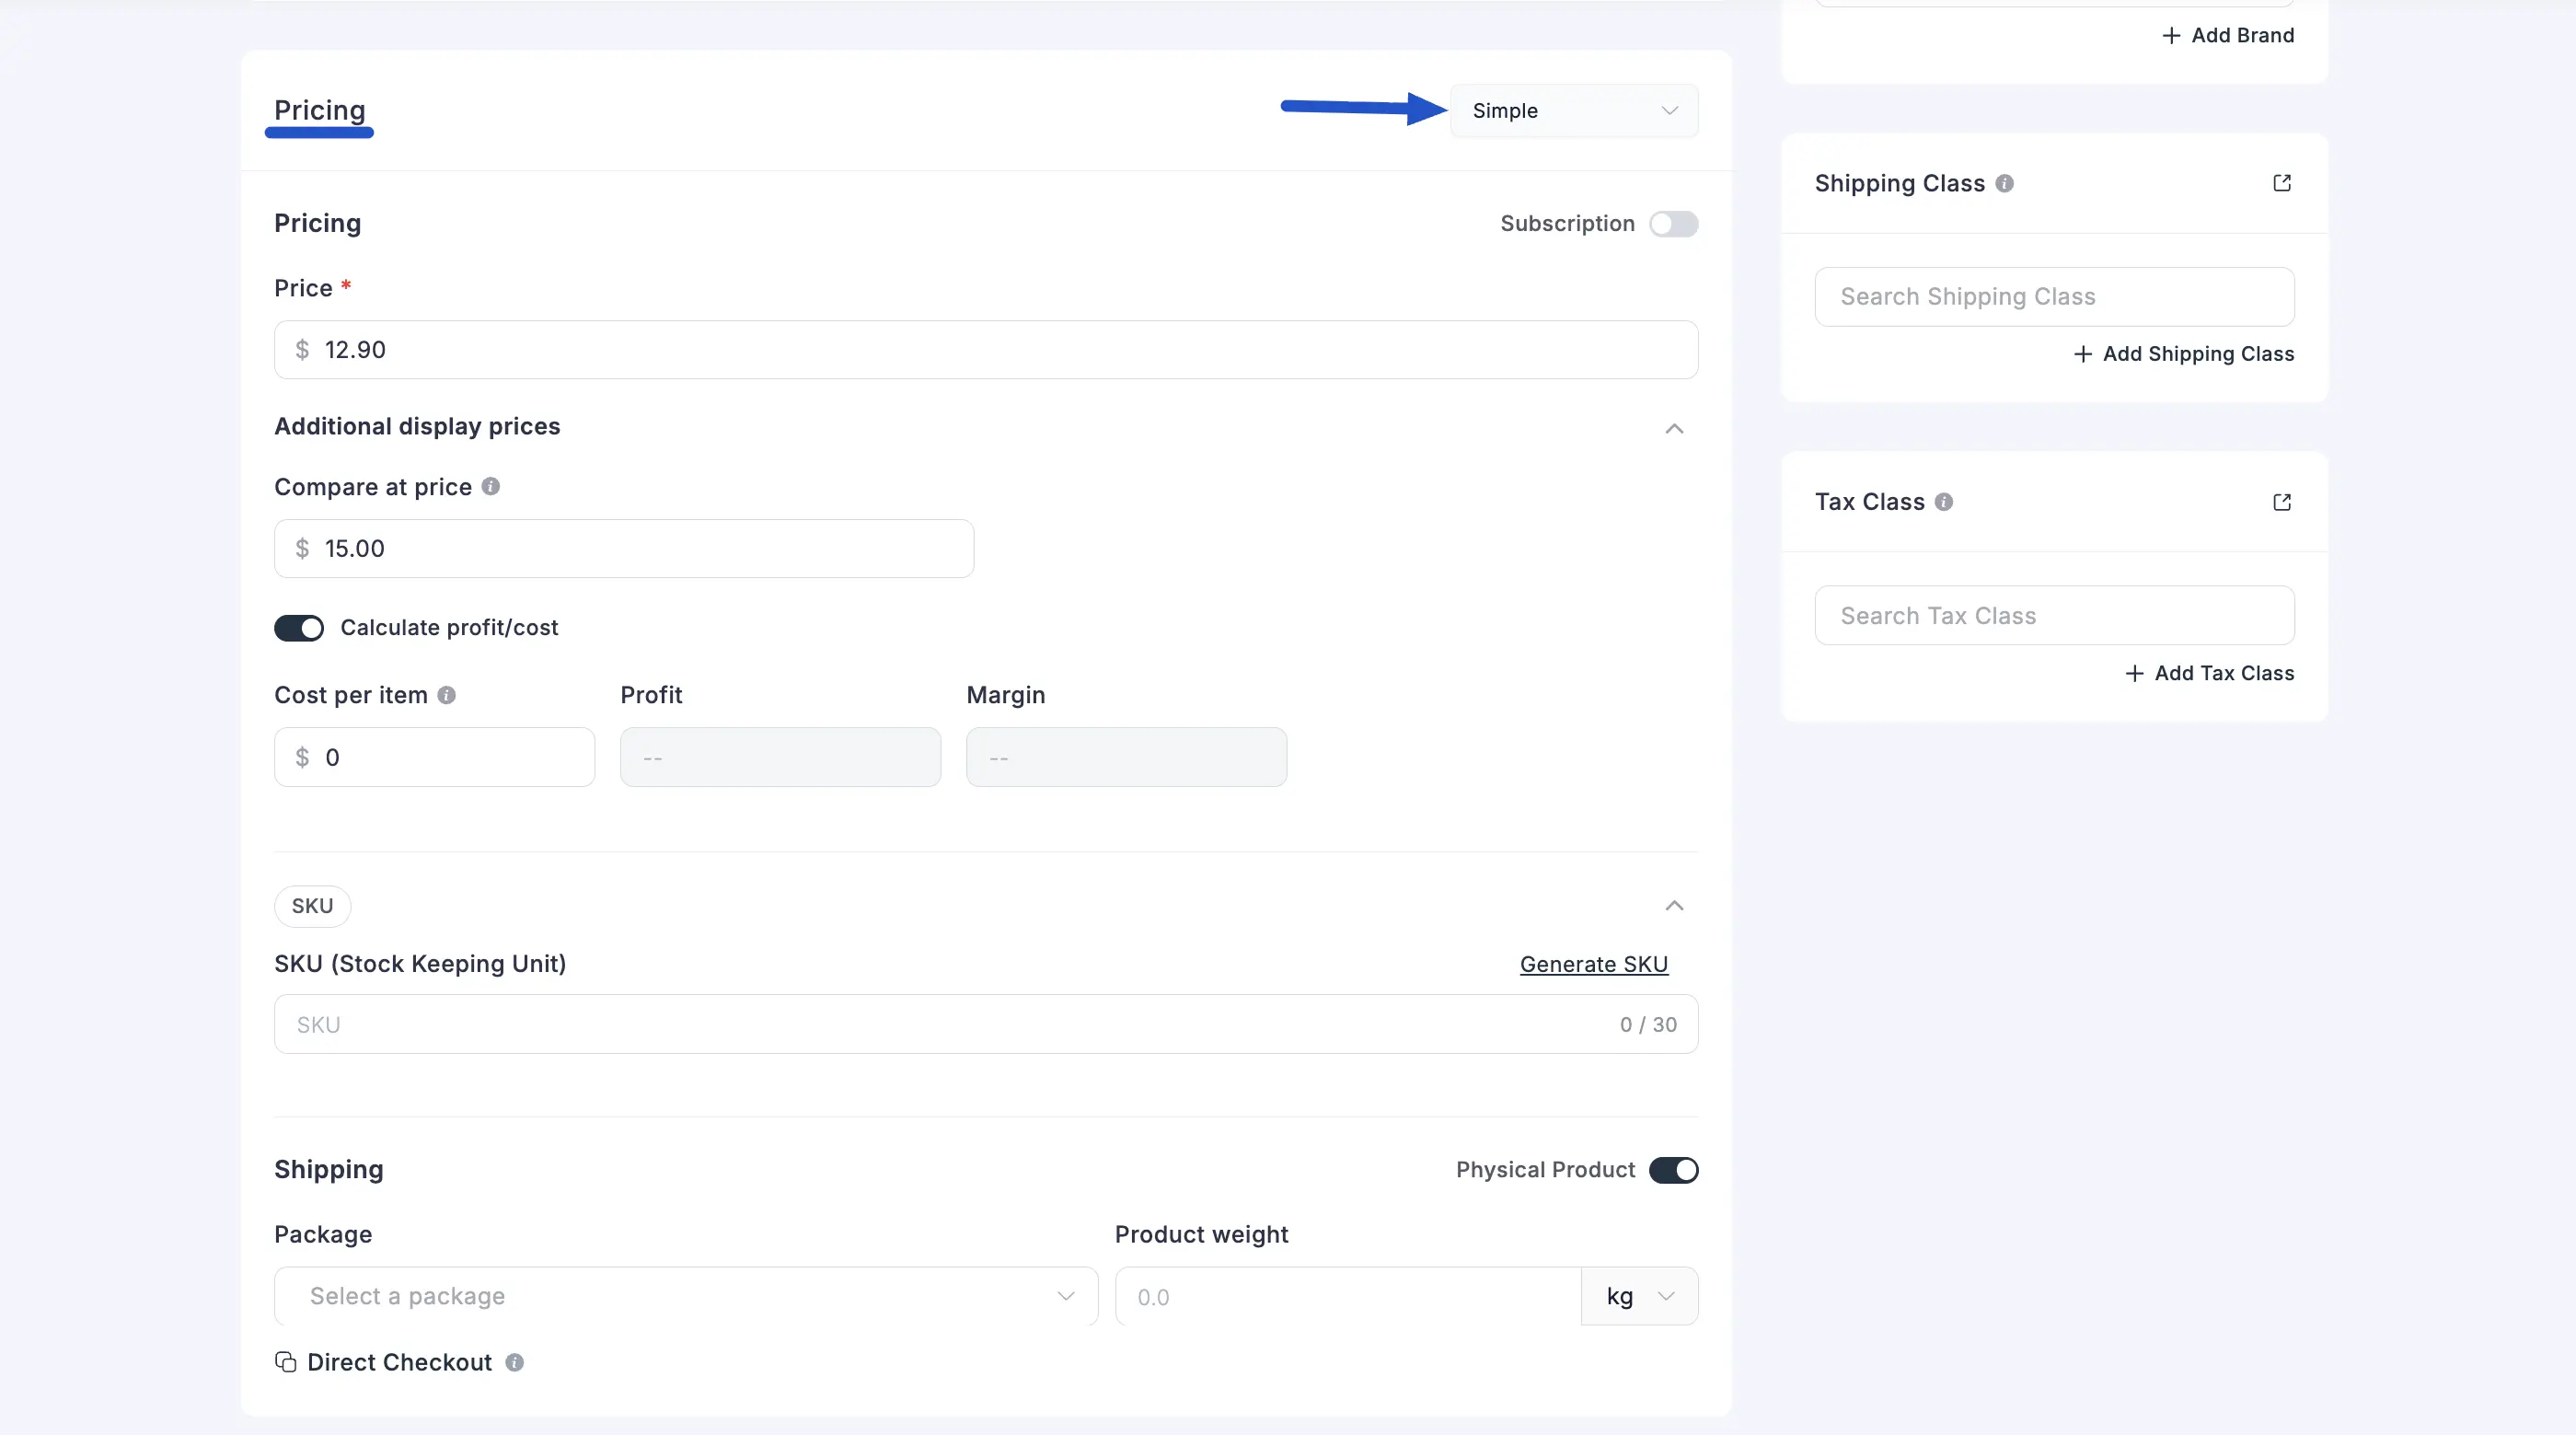
Open the Pricing panel and look at the dropdown in the top right corner — that's where everything starts:
- Simple — One version, one price. The right choice for any product with no variations.
- Simple Variations — Multiple versions of the same product, each with its own price, image, SKU, and shipping details.
- Advanced Variations — Versions built from reusable attributes like Color and Size, where FluentCart generates every combination automatically. See the Advanced Variations guide.
Pick the method that matches your product structure, and the fields below will adapt accordingly.
Simple Pricing
Choose Simple when your physical product is a single item — one style, one size, one price. A standard poster, a single-run tote bag, or a fixed-rate boxed kit — this is the right mode.
In the top right of the Pricing panel you'll also see a Subscription toggle. Leave it off for a standard one-time purchase, or switch it on if you're selling a recurring physical product like a monthly subscription box.
One-Time Payment
Price (Required) The amount customers will pay. This appears on your product page, in the cart, and at checkout. Always set this before you publish.
Additional display prices (Collapsible section) Click the chevron to expand and reveal these optional fields:
Compare at price (Optional) — Enter a higher "original" price here and FluentCart will display it with a strikethrough next to your actual selling price. Setting Price to
$39.00and Compare at price to$55.00, for example, gives customers a clear visual that they're saving — a small detail that can meaningfully lift conversions.Calculate profit/cost (Toggle — Optional) — Turn this on to track your internal margins. Three fields appear:
- Cost per item — What this product actually costs you to source or produce
- Profit — Auto-calculated (Price minus Cost)
- Margin — Your profit as a percentage, also auto-calculated
💡 Pro Tip: Cost and profit fields are entirely internal — your customers will never see them. Use them to make sure you're pricing for real profit, not just revenue.
SKU (Collapsible section) Click to expand and enter a unique tracking code for this product (e.g., SHOE-WHT-42). You can type your own or click Generate SKU to have FluentCart create one automatically. Accepts up to 30 characters.
📝 Note: Assigning SKUs makes inventory tracking, order fulfillment, and reporting significantly easier — especially when you're managing stock across multiple platforms or warehouses.
Shipping
Because this is a physical item, this section is critical. Getting it right means accurate carrier rates at checkout.
- Physical Product (Toggle) — Make sure this is on. It tells FluentCart to apply shipping calculations to this product at checkout. If you're selling a hybrid product that also includes a digital download, you can still leave this on — just upload the digital asset separately.
- Package — Select the pre-configured package this product ships in (the box, mailer, or envelope your carrier will use to calculate delivery rates). If no packages exist yet, click the dropdown and choose the option to add a new one — see Adding a New Package in the full pricing guide for a complete step-by-step walkthrough.
Simple Variations
When your physical product comes in multiple versions — different colors, sizes, materials, or configurations — Simple Variations is the right choice. Each variation gets its own price, image, SKU, and shipping details, tracked completely independently so you never mix up stock between versions.
Select Simple Variations from the pricing dropdown to activate this mode.
The Variations Table
You'll see a clean table where each row represents one version of your product:
- ⠿ (Drag handle) — Click and drag to reorder. The order here is the order customers see on your product page — put your most popular option first.
- Image — A thumbnail for this variation. Click to upload or swap it.
- Title — The variation name (e.g.,
Red,XL,Classic Fit). Editable directly in the table. - Price — The selling price for this variation. Editable inline.
- Compare at price — The "was" price, shown with a strikethrough. Also editable inline.
- Action — A pencil icon to open the full variation editor, and a three-dot icon for quick options.
Click + Add more at the bottom to create a new variation. A blank row appears — fill in the title and price inline, then use the pencil icon to configure the rest.
The three-dot icon gives you these quick actions:
- Duplicate — Copy this variation to use as a starting point for a new one
- Direct Checkout — Generate a buy-now link for this specific version
- Delete — Remove this variation permanently
- Skip inventory — Exclude this variation from stock tracking if needed
📝 Note: You can make quick edits to Title, Price, and Compare at price directly in the table rows. For everything else — images, inventory, per-variation shipping — click the pencil icon to open the full editor.
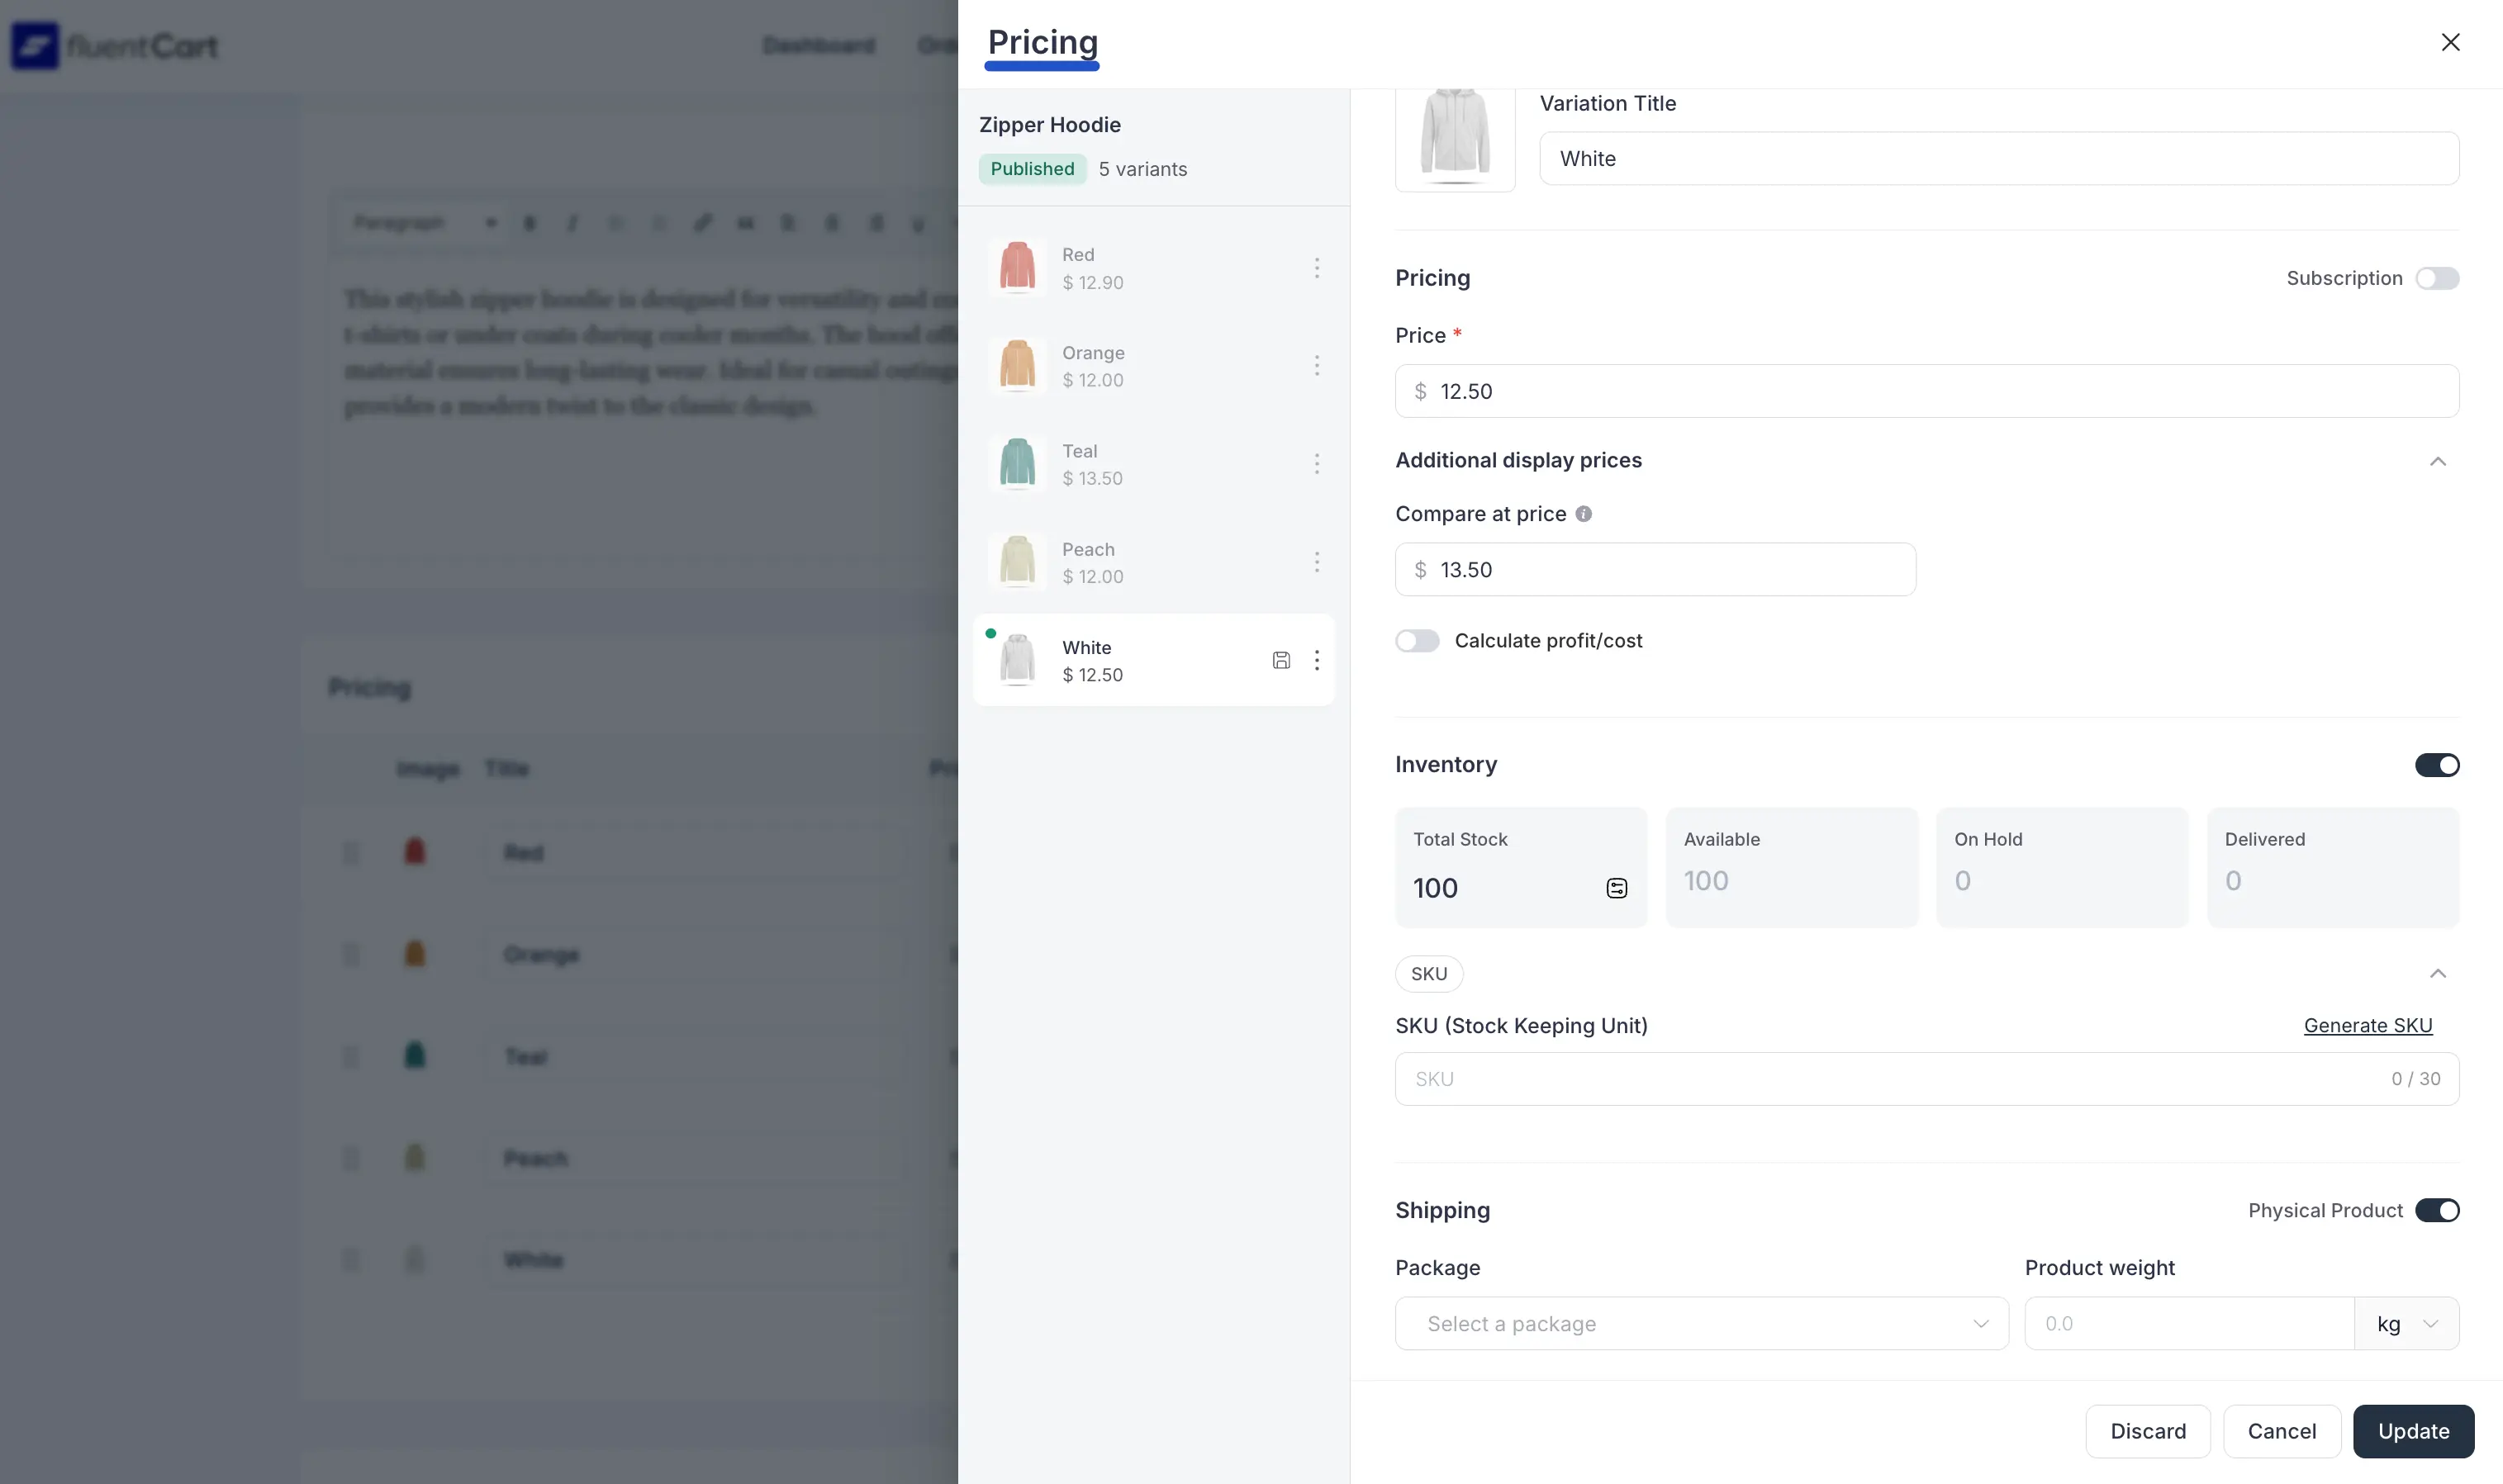
Editing a Variation
Click the pencil icon on any row to open the full variation editor — a panel with two sides:
- Left panel — A scrollable list of all your variations, each showing the product name, status, and total variant count. Click any item to jump to editing it without closing the panel.
- Right panel — The complete configuration area for the currently selected variation, highlighted with a green dot in the left list.
At the bottom: Discard (undo unsaved changes to this variation), Cancel (close without saving), and Update (save all changes).
Here's what you configure on the right:
Variation image Click the thumbnail to upload a photo specific to this version. Showing customers exactly what color, size, or material they're selecting builds confidence and reduces returns.
Variation Title The name of this specific version (e.g., White, XL, Slim Fit).
Price (Required) The selling price for this specific variation.
Additional display prices
- Compare at price (Optional) — A higher "was" price shown with a strikethrough for this variation.
- Calculate profit/cost (Toggle — Optional) — Track Cost per item, Profit, and Margin for this variation internally.
Inventory Toggle Inventory on to manage stock directly inside the variation editor — no need to navigate to a separate screen. Four fields appear:
- Total Stock — Total units for this variation. Click the edit icon to adjust.
- Available — Units available for customers to purchase (read-only, auto-calculated)
- On Hold — Units reserved in pending or processing orders (read-only)
- Delivered — Units fulfilled and shipped (read-only)
💡 Pro Tip: Per-variation inventory means you'll never oversell the Red hoodie just because you still have plenty of Teal ones. Every version stays tracked independently.
SKU Expand the collapsible SKU section to assign a unique tracking code to this variation (e.g., HOO-RED-M). Click Generate SKU for an auto-generated code. Accepts up to 30 characters.
Shipping Because different sizes and colorways often have different weights and dimensions, each variation gets its own shipping configuration:
- Physical Product (Toggle) — On by default for physical products.
- Package — Select the box or mailer for this specific variation. Different sizes can ship in different packages, so a small item and a large item don't have to share the same box.
- Product weight — Enter the weight for this variation with your preferred unit (kg or lb). Per-variation weights keep your carrier rates accurate when sizes genuinely differ.
When you're done, click Update to save all your changes.
INFO
For the complete field-by-field reference — including the full subscription setup for physical subscription boxes, installment plans, trial days, setup fees, and a step-by-step walkthrough of the Add Package modal — see the Configuring Product Pricing & Variations guide.
5. Inventory Management
To track the stock for your product, first, make sure the Stock Management feature is enabled from the settings section.
An inventory table will then be displayed, with a separate row for each product variation. This table helps you monitor your stock levels at a glance.
Understanding the Inventory Table
- Title: The name of the product or variation.
- Total Stock: The total number of units you have for this item, including those available, on hold, or delivered.
- Available: The number of units currently available for customers to purchase.
- On hold: Units that are part of a pending order but have not yet been shipped.
- Delivered: The total number of units that have been successfully sold and fulfilled.
Downloadable Asset(s)
FluentCart allows you to attach digital files to your physical products, which is perfect for selling hybrid items (like a textbook that comes with a PDF guide, or a piece of hardware with its software drivers).
At the very bottom of the product editing page, you will see a checkbox for Downloadable Asset(s).
Check this box to enable the feature. Once enabled, a new section will appear where you can upload and manage the files that customers will be able to download after purchasing the product.
How to Adjust Stock Levels
To manually update your stock count for any variation:
- Click the adjustment icon located inside the Total Stock field.
- A small window will pop up.
- Adjust by: Enter a number to change the current stock. Use a positive number (like
50) to add inventory or a negative number (like-10) to remove it. - New Stock: This field automatically previews the final stock total after your adjustment.
- Adjust by: Enter a number to change the current stock. Use a positive number (like
- Click the Apply button to save the new stock level.
Shipping Class
You can assign a Shipping Class to any product to apply location-based shipping costs.
To add a shipping class:
- Scroll to the Shipping Class section (right side of the product edit screen).
- Select or create a shipping class (e.g., NYC Zone).
- The defined shipping cost will automatically apply at checkout for that region.
Shipping classes work with Shipping Zones and Shipping Methods to control how and where you deliver products.
INFO
To learn more about how shipping classes work, see the Understanding Shipping Classes guide.
Tax Class
The Tax Class allows you to apply specific tax rules to your product.
To assign a tax class:
- Locate the Tax Class section on the right side of the screen.
- Select a pre-configured tax class from the dropdown menu, or click + Add to create a new one. The corresponding tax rate will then be automatically applied to this product during checkout. To learn more about Tax, read this Documentation.
Publishing Settings
This section on the right side of the product edit page controls your product's visibility and key purchasing rules.
- Status: This sets whether your product is live on your store (Publish) or saved as a hidden Draft.
- URL Slug: This is the unique, URL-friendly part of the web address for this product. FluentCart automatically creates one from the title, but you can click it to make edits.
- Default Variant: If your product has options (like different sizes or subscription plans), this setting pre-selects one for the customer when they visit the page.
- Group By: This organizes how your product variations are displayed. For example, you can group subscription plans by their billing interval (e.g., "Monthly" and "Yearly") to make them easier for customers to compare.
- Limit purchases to 1 item per order: Check this box to prevent customers from buying more than one of this specific item in a single transaction. This is useful for things like event tickets or exclusive items.
Once you have configured all the necessary details, click the "Update" (or "Save") button on the top right to make your product live in your store. You can also click "Preview" to see how the product page will look before publishing.