Appearance
Configuring Product Pricing & Variations
Pricing is one of the most powerful tools in your store — and FluentCart gives you the flexibility to set it up exactly the way your business needs. Whether you're selling a single digital download for a flat fee, a physical hoodie in five colors, or a software subscription with a free trial and installment plan, the Pricing section has you covered.
This guide walks you through every field, toggle, and option you'll encounter — from simple one-time pricing to complex subscription variations with per-variation inventory and packaging details. You'll also learn how to configure shipping packages right from the product level, so your carrier rates are always accurate at checkout.
Let's walk through it together, step by step.
Choosing Your Pricing Method
To get started, open any product in edit mode and scroll down to the Pricing section. In the top right corner of that panel, you'll find a dropdown that lets you choose your pricing method:
- Simple — For products sold as a single item with no variations (one price fits all)
- Simple Variations — For products that come in multiple versions, like different colors, sizes, or license tiers, each with its own unique price
- Advanced Variations — For products built from reusable attributes (Color, Size, Material), where FluentCart generates every combination automatically. See the Advanced Variations guide.
Option 1: Simple Pricing
Choose Simple when your product has one version and one price. A single ebook, a standard service, a fixed-rate subscription plan — this is the right mode for all of them.
Once you're in Simple mode, you'll notice a Subscription toggle at the top right of the Pricing panel. This is how you switch between the two payment modes:
- Toggle OFF → One-time purchase
- Toggle ON → Recurring subscription
A. One-Time Payment
When the Subscription toggle is off, you're setting up a standard single-payment product. Here's what every field does:
Pricing Fields
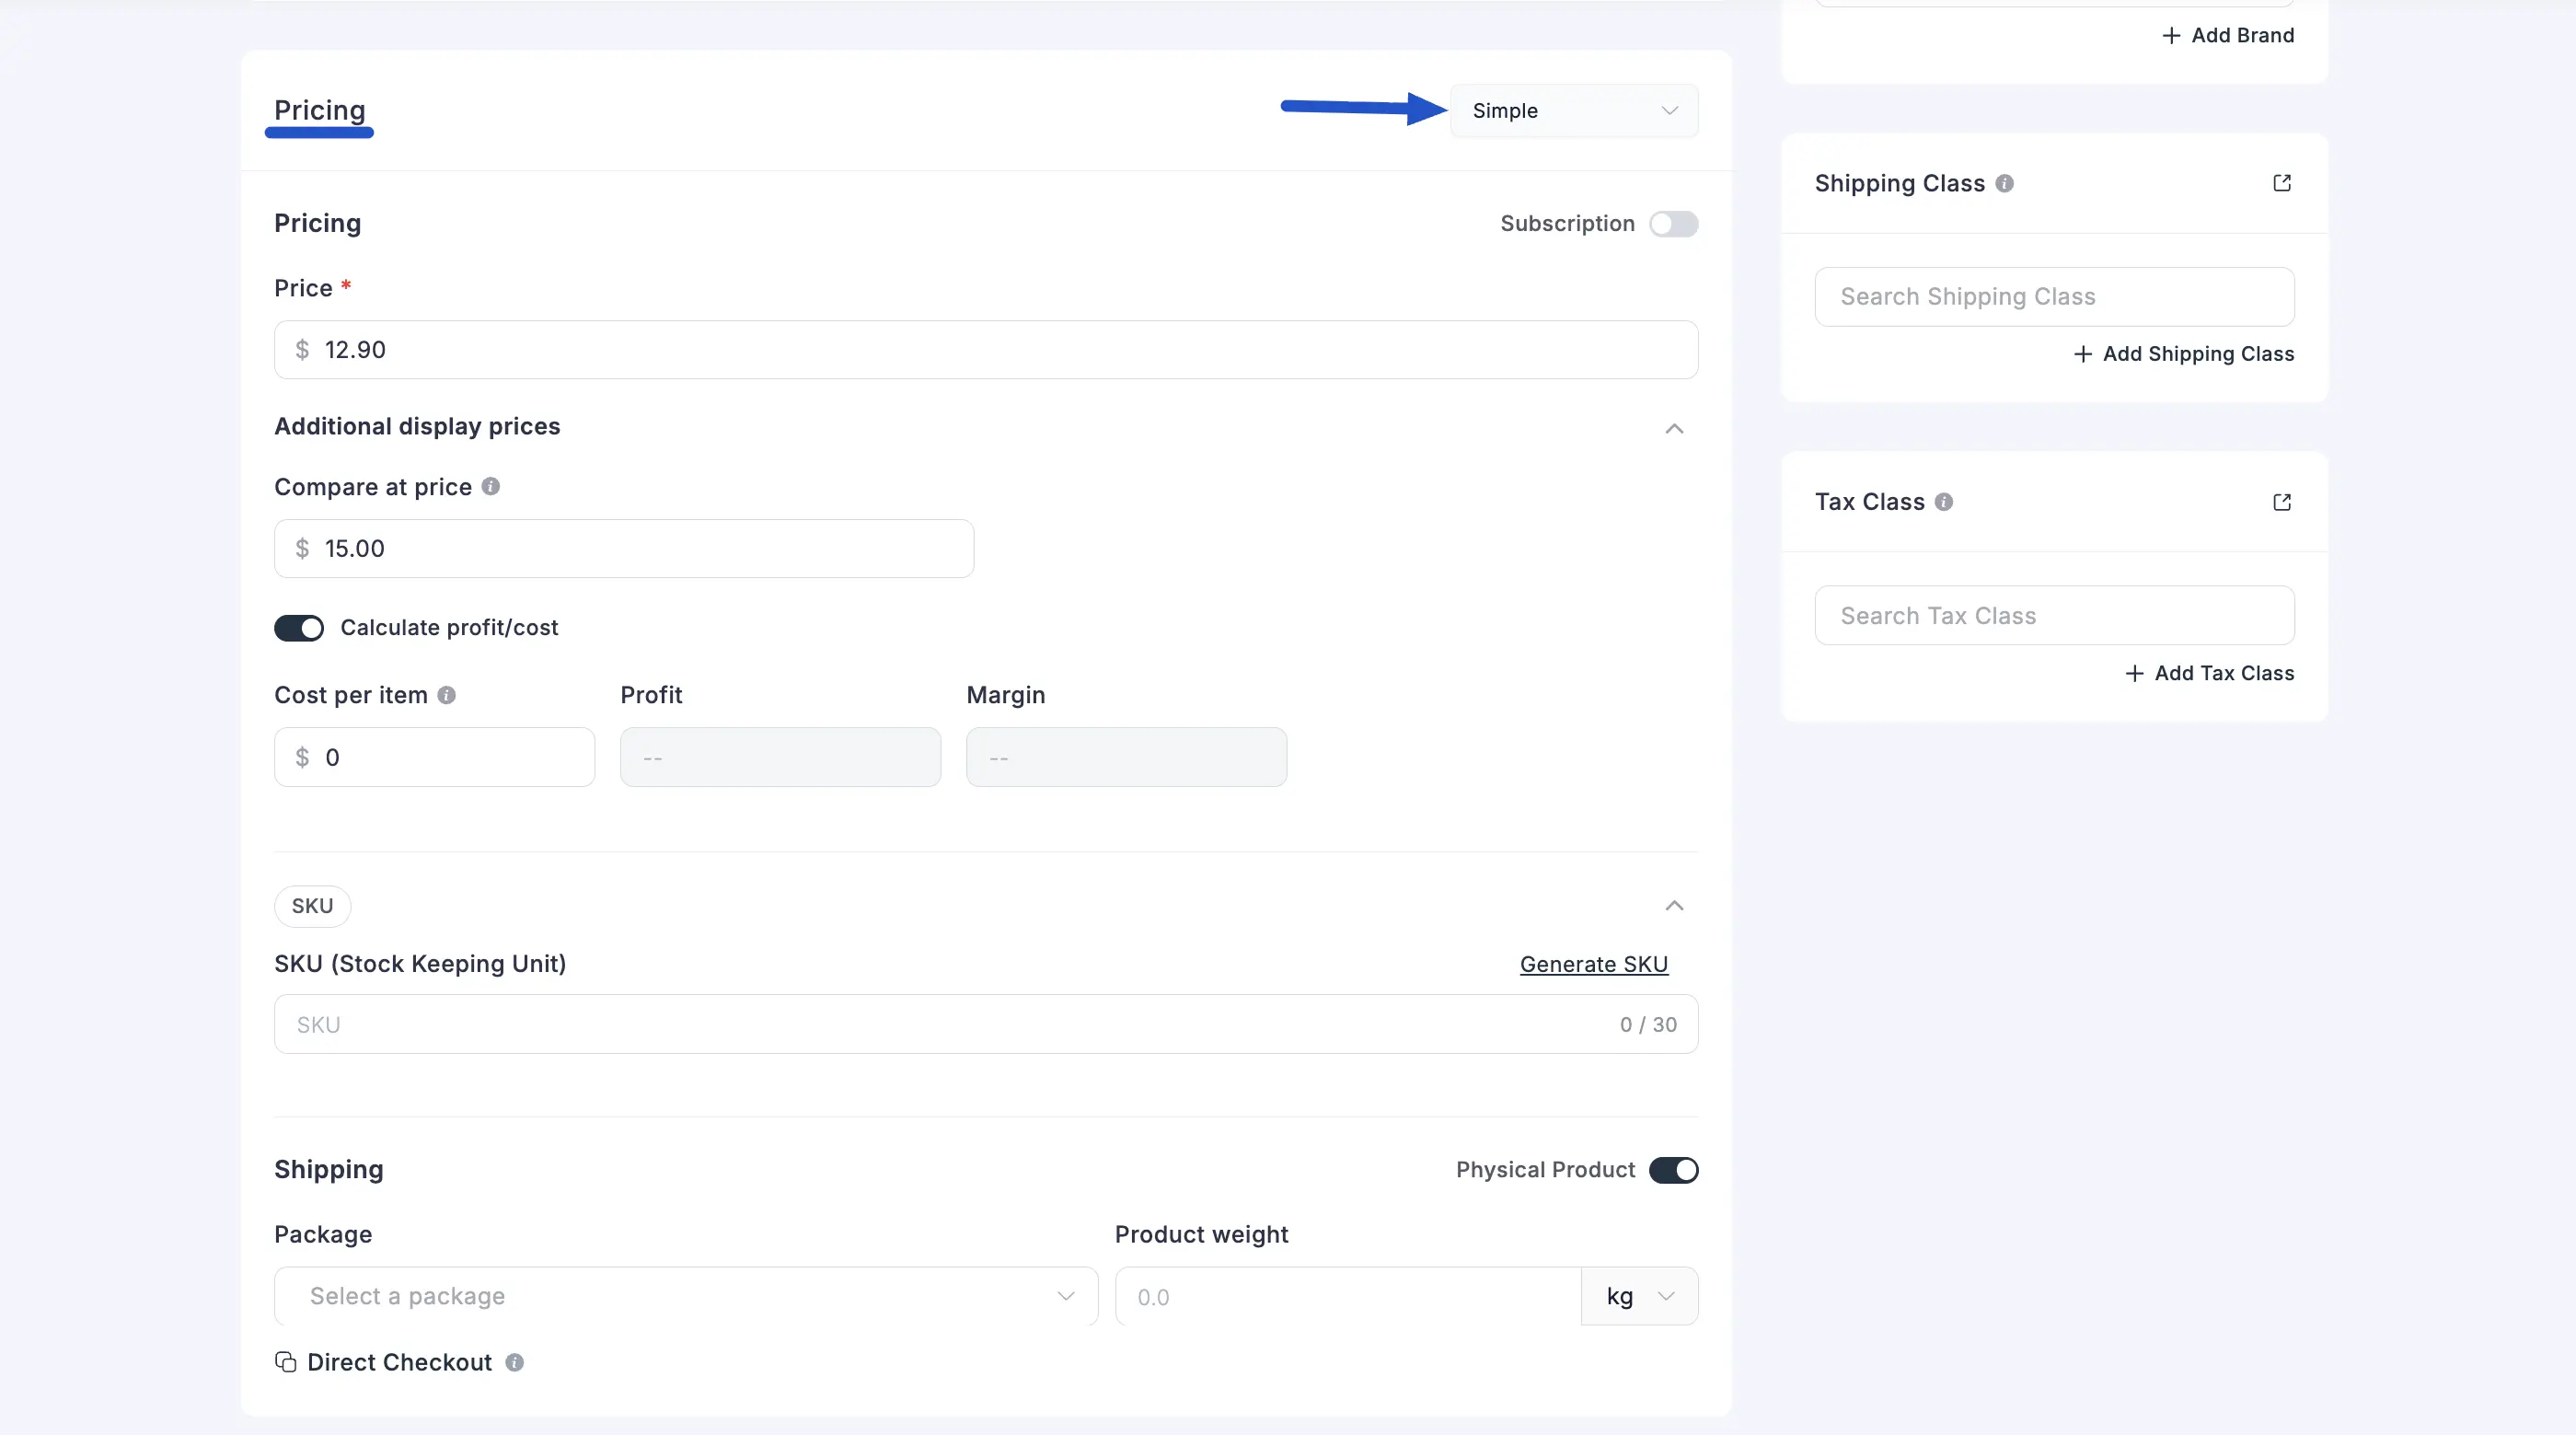
Price (Required) The selling price your customers will pay. This is the number that shows up on your store page, in the cart, and at checkout. Always set this before publishing.
Additional display prices (Collapsible section) Click the chevron to expand this section and access the optional display price settings:
Compare at price (Optional) — Enter a higher "original" price here and FluentCart will display it with a strikethrough next to your actual selling price. For example, setting Price to
$12.90and Compare at price to$15.00gives customers a clear visual that they're saving money — a small detail that can meaningfully boost conversions.Calculate profit/cost (Toggle — Optional) — Toggle this on to track your internal profitability. Three fields will appear:
- Cost per item — What it actually costs you to produce or source this product
- Profit — Automatically calculated (Price minus Cost)
- Margin — Your profit as a percentage, also auto-calculated
💡 Pro Tip: The profit and cost fields are completely internal — your customers never see them. They're a smart way to make sure you're pricing for actual profit, not just revenue.
SKU
The SKU section is collapsible — click it to expand and reveal the tracking field.
SKU (Stock Keeping Unit) Enter a short, unique code for tracking this product in your inventory (e.g., HOO-ZIP-RED). You can type your own or click Generate SKU to have FluentCart create one for you automatically. The field accepts up to 30 characters.
📝 Note: Assigning SKUs makes inventory tracking, reporting, and order fulfillment significantly easier — especially if you manage stock across multiple platforms or warehouses.
Shipping
The Shipping section at the bottom of the pricing panel is where you define how this product gets packaged and weighed for delivery. Getting this right means accurate carrier rates at checkout.
Physical Product (Toggle) Turn this on if this is a tangible item that needs to be physically shipped to the customer. If it's a digital product, leave this off — FluentCart will skip shipping calculations entirely for that order.
Package Select a pre-configured package from the dropdown. This is the box, envelope, or mailer your product ships in, and it helps FluentCart (and your connected shipping carriers) calculate accurate delivery rates based on real dimensions and weight. If no packages have been created yet, you can add one directly from here — see Adding a New Package below.
Product weight Enter the weight of this product and choose the unit (kg or lb) from the dropdown next to the field. Accurate weights are essential for carrier-calculated shipping rates to work correctly.
Copy Variation ID (Action) Click Copy Variation ID to copy the simple product's underlying variant ID to your clipboard. This is the value you'll need when wiring the product into custom code, REST endpoints, automations, or shortcodes that expect a specific variant reference.
Direct Checkout (Link) This generates a unique URL that takes customers straight to the checkout page with this product pre-loaded — bypassing the product page and cart entirely. It's perfect for email campaigns, social media promotions, or any landing page where you want to reduce the number of steps to purchase.
Adding a New Package
If you haven't set up any packages yet, click the Package dropdown and choose the option to add a new one. The Add package modal will appear.
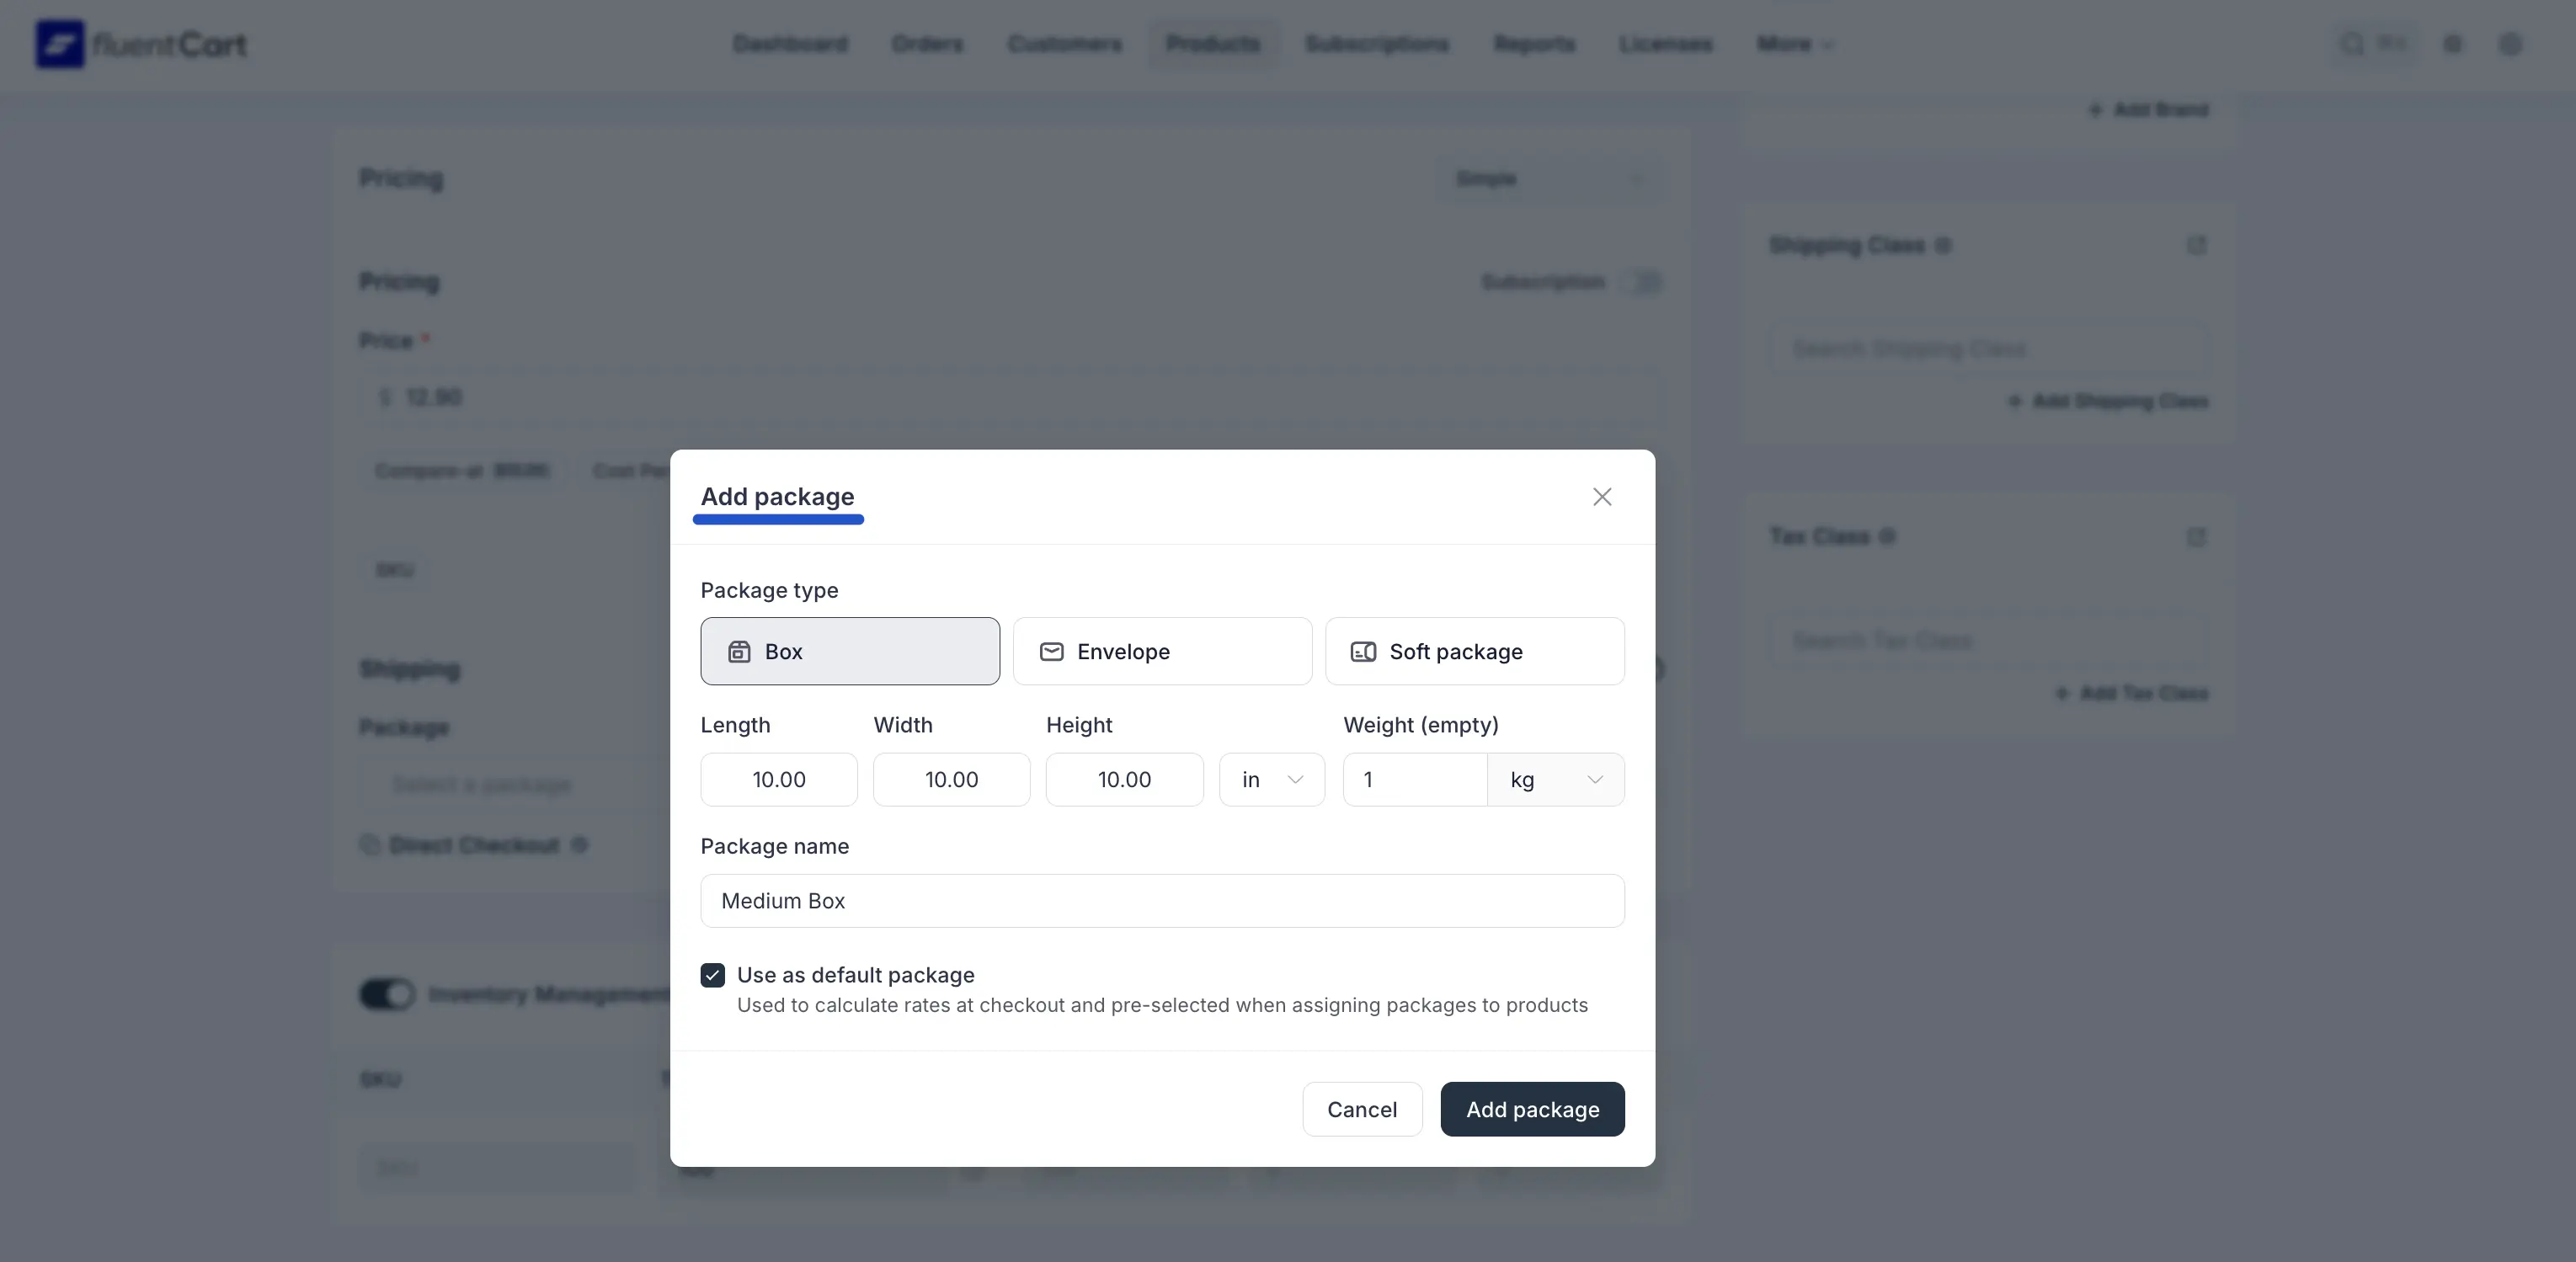
Here's what to fill in:
Package type Choose the shape that best matches how you ship this product:
- Box — A standard rigid rectangular box
- Envelope — A flat mailer, padded envelope, or document sleeve
- Soft package — A poly mailer, bubble wrap, or any flexible pouch
Dimensions Enter the Length, Width, and Height of the package, then select the measurement unit — in (inches) or cm (centimetres) — from the dropdown next to the fields.
Weight (empty) The weight of the empty packaging itself. Enter the value and choose the unit (kg or lb). This gets added to your product's weight to give carriers an accurate total shipment weight.
Package name Give your package a name you'll recognise later (e.g., Medium Box, Small Mailer). This is what appears in the Package dropdown across all your product pages.
Use as default package (Checkbox) Check this box to make this package the automatic default when assigning packages to new products. It also becomes the fallback package used in checkout rate calculations.
Once everything looks correct, click Add package to save it. Your new package will immediately appear in the Package dropdown.
B. Subscription Payment
Toggle the Subscription switch to the on position and the pricing fields transform to everything you need for a recurring billing setup.
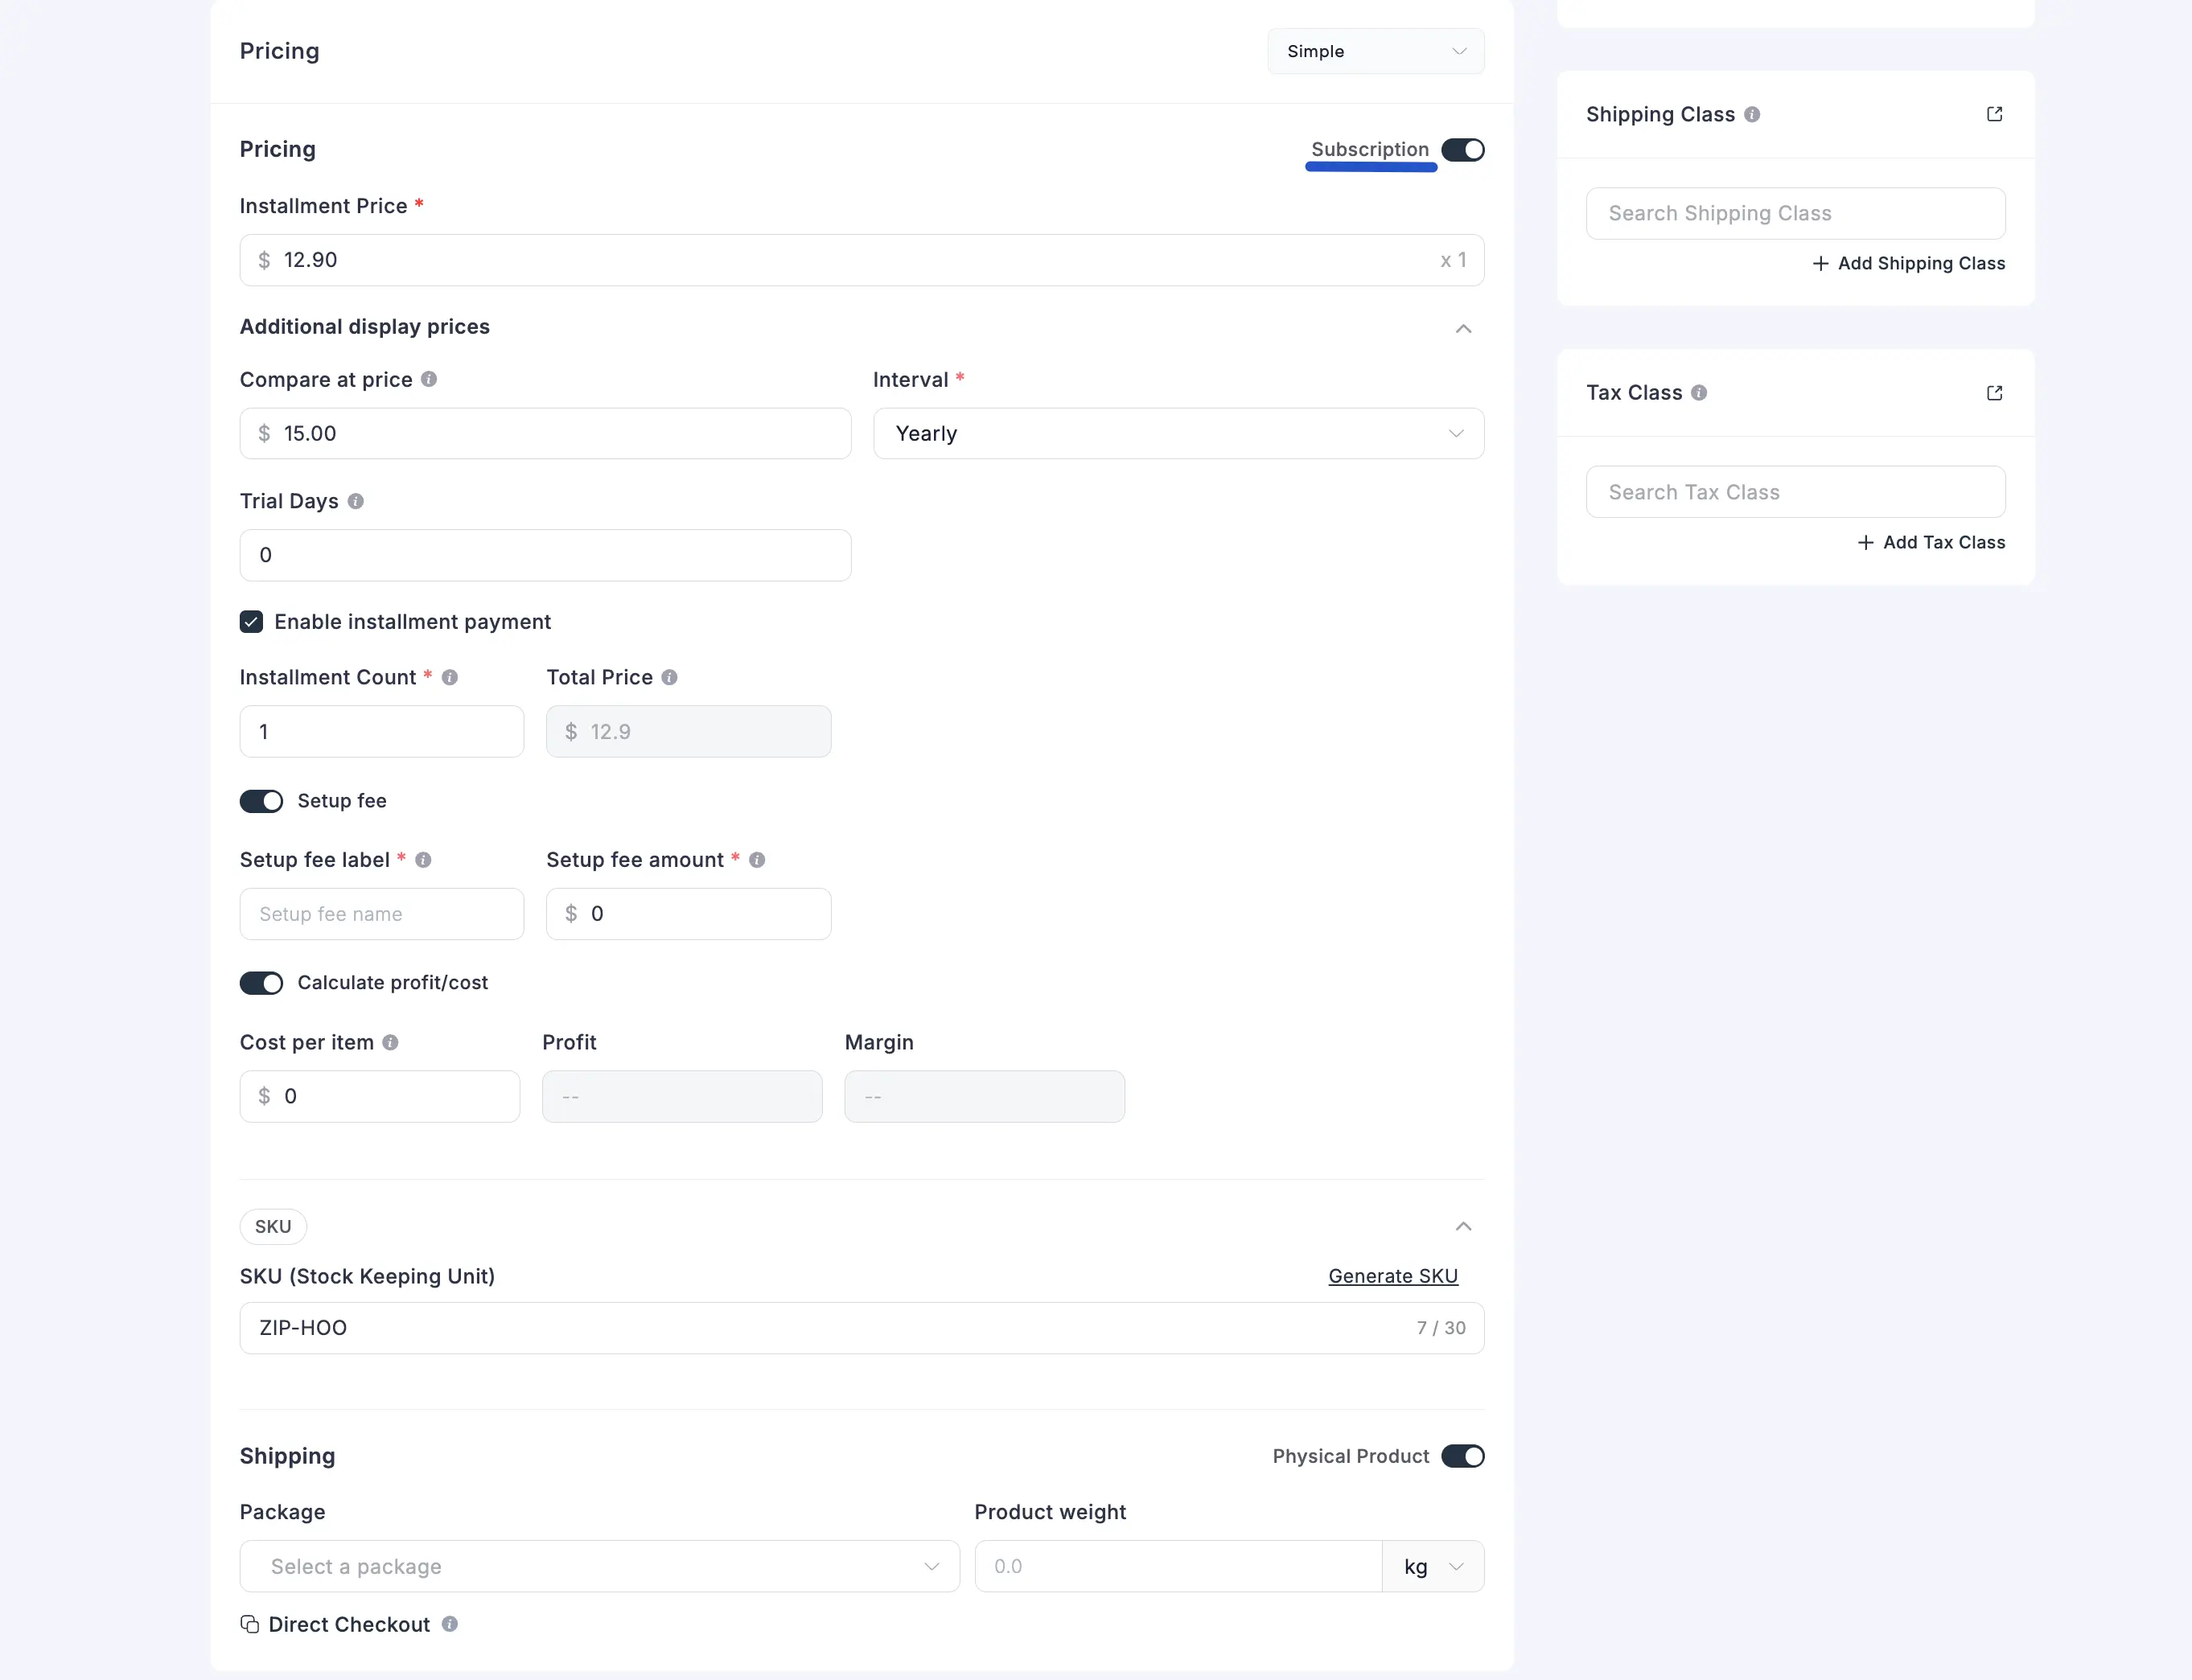
Installment Price (Required) The amount charged to the customer on each billing cycle. The x1 indicator next to the field reflects how many times this price is charged per interval — this updates automatically when you configure installments.
Additional display prices (Collapsible section) Expand this section to access the subscription-specific display and billing options:
Compare at price (Optional) — A higher price displayed with a strikethrough, showing customers the value of the subscription rate.
Interval (Required) — How frequently the customer is billed. Choose from:
- Daily
- Weekly
- Monthly
- Quarterly
- Half Yearly (Six Month)
- Yearly
Trial Days (Optional) — Enter the number of free days before the first billing cycle begins. Set to
0if you don't want a trial period. For example,14gives customers a two-week free trial — a powerful conversion tool for subscription products.
Enable installment payment (Checkbox — Optional) Check this box if you want to offer the subscription for a fixed number of payments instead of recurring indefinitely. Once checked, two fields appear:
- Installment Count — The total number of payments the customer will make (e.g.,
3for a three-month payment plan) - Total Price — Auto-calculated by multiplying Installment Price by Installment Count
💡 Pro Tip: Installment plans are ideal for online courses, coaching programs, or any product where you want customers to pay over time with a clear end date — no cancellation anxiety for them, guaranteed revenue for you.
Setup fee (Toggle — Optional) Enable this to charge a one-time fee at the very start of the subscription, in addition to the recurring price. When toggled on, two sub-fields appear:
- Setup fee label — The name customers see for this charge at checkout (e.g.,
Activation Fee,Enrollment Fee,One-Time Setup) - Setup fee amount — The dollar amount charged once at signup
📝 Note: The setup fee is automatically included as a separate line item on the customer's purchase confirmation page, invoice receipt (PDF), and order confirmation email — so customers always see exactly what they were charged at signup, separate from their recurring subscription amount.
Calculate profit/cost (Toggle — Optional) Toggle on to track Cost per item, Profit, and Margin for internal reporting on this subscription product.
📝 Note: The SKU and Shipping sections work exactly the same way in subscription mode as they do for one-time payments. Enter your product's SKU, select a package, and add the product weight — those details don't change based on billing type.
Option 2: Simple Variations
When your product comes in multiple versions — different colors, sizes, storage capacities, or license tiers — Simple Variations is the right choice. Instead of one price, you get a table of variations, and each one can have its own price, image, inventory level, SKU, and shipping details.
Select Simple Variations from the pricing dropdown to activate this mode.
The Variations Table
Once you're in Simple Variations mode, you'll see a clean table listing all your current variations. Each row represents one version of your product.
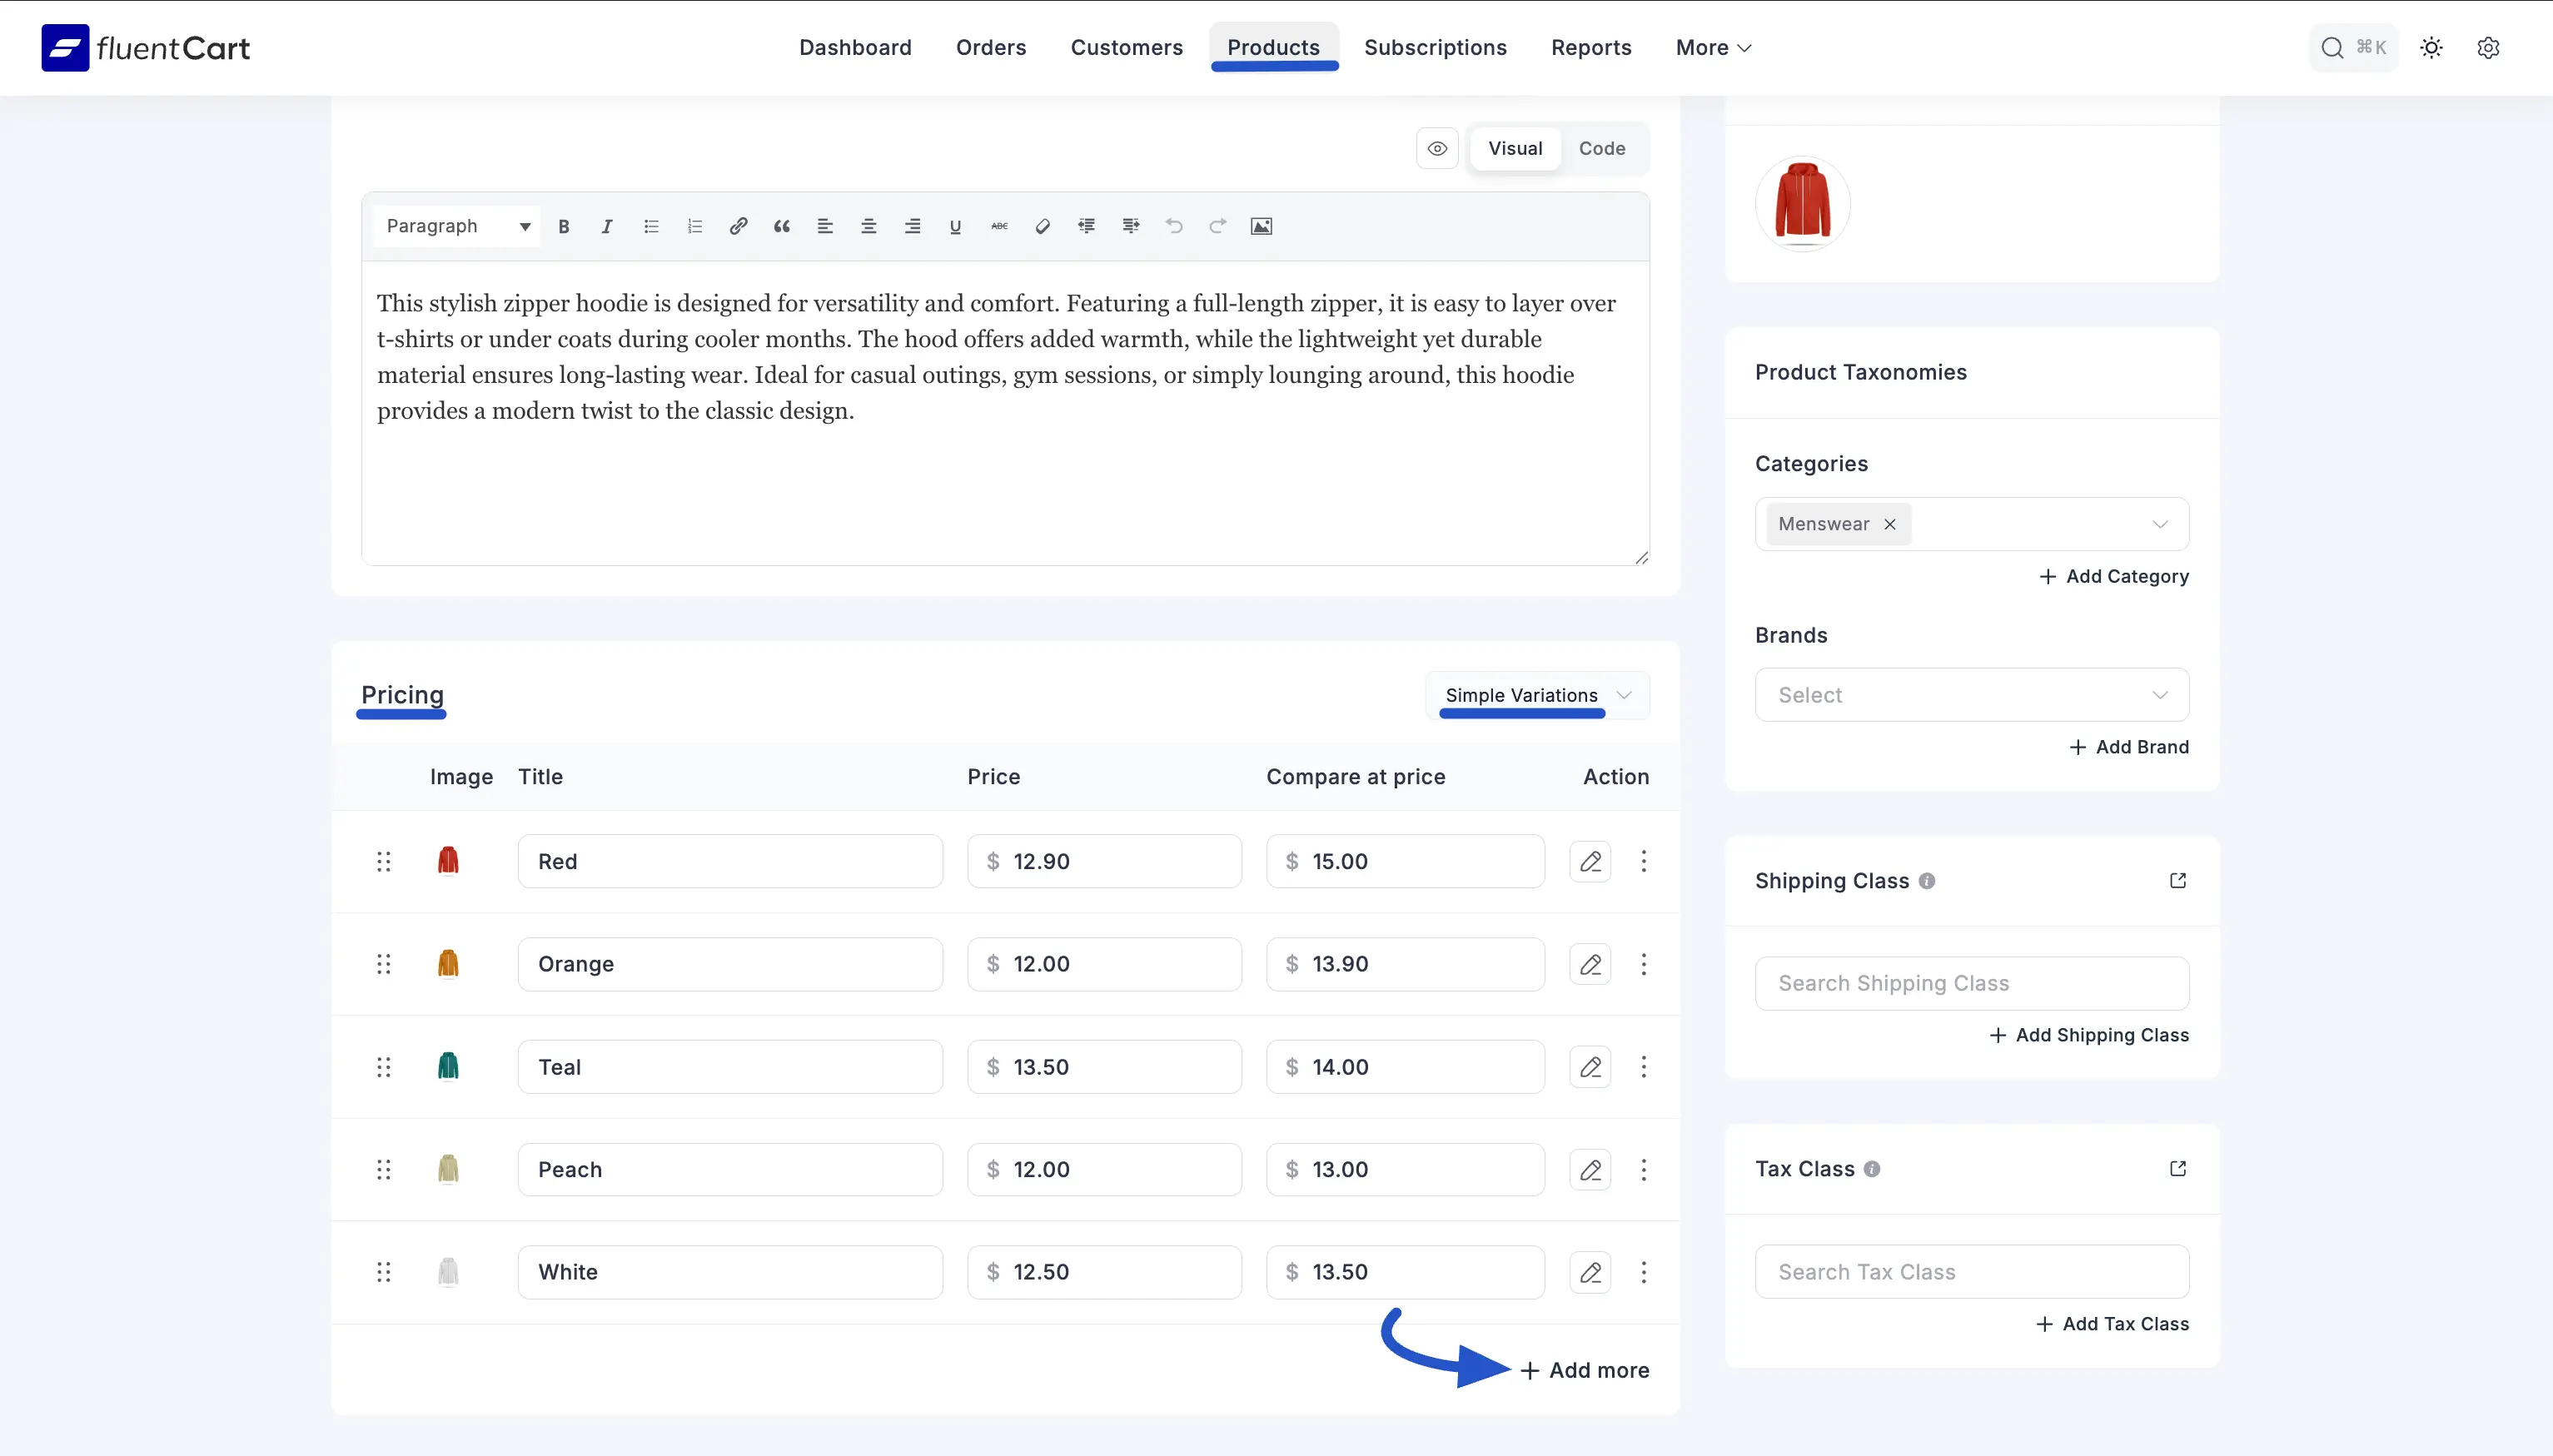
Here's what each column means:
- ⠿ (Drag handle) — Click and drag any row to reorder your variations. The order here directly controls how options appear on your product page — put your most popular first.
- Image — A thumbnail of this variation's unique photo. Click the image cell to upload or swap it.
- Title — The variation name (e.g.,
Red,Large,Pro License). You can edit this directly in the table. - Price — The selling price for this variation. Editable directly in the table row.
- Compare at price — The original "was" price for this variation. Also editable inline.
- Action — Two icons: a pencil icon to open the full variation editor, and a three-dot icon for quick actions.
To add a new variation, click the + Add more button at the bottom of the table. A new blank row will appear — fill in the title and price inline, then click the pencil icon to configure the rest.
The three-dot icon gives you these quick options:
- Duplicate — Instantly copy this variation to use as a starting point for a new one
- Direct Checkout — Generate a unique buy-now link for this specific variation
- Delete — Permanently remove this variation from the product
- Skip inventory — Exclude this variation from stock tracking if needed
📝 Note: You can make quick edits to Title, Price, and Compare at price directly in the table rows. For everything else — images, inventory, subscriptions, SKU, and shipping — click the pencil icon to open the full editor.
Editing a Variation
Click the pencil icon in the Action column of any variation to open the full variation editor. This opens a full-screen panel with two sections:
- Left panel — Displays all your variations in a scrollable list, showing the product name, its published status, and the total variant count. Click any variation in this list to jump to editing it without closing the panel — great for quickly moving between variations.
- Right panel — The complete configuration area for the currently selected variation (highlighted with a green dot in the left list).
At the bottom of the panel, you'll find three action buttons: Discard (undo any unsaved changes to this variation), Cancel (close the panel without saving), and Update (save all your changes).
A. One-Time Payment for a Variation (Subscription Toggle OFF)
When the Subscription toggle in the variation editor is off, you're configuring a standard one-time purchase for this specific version.
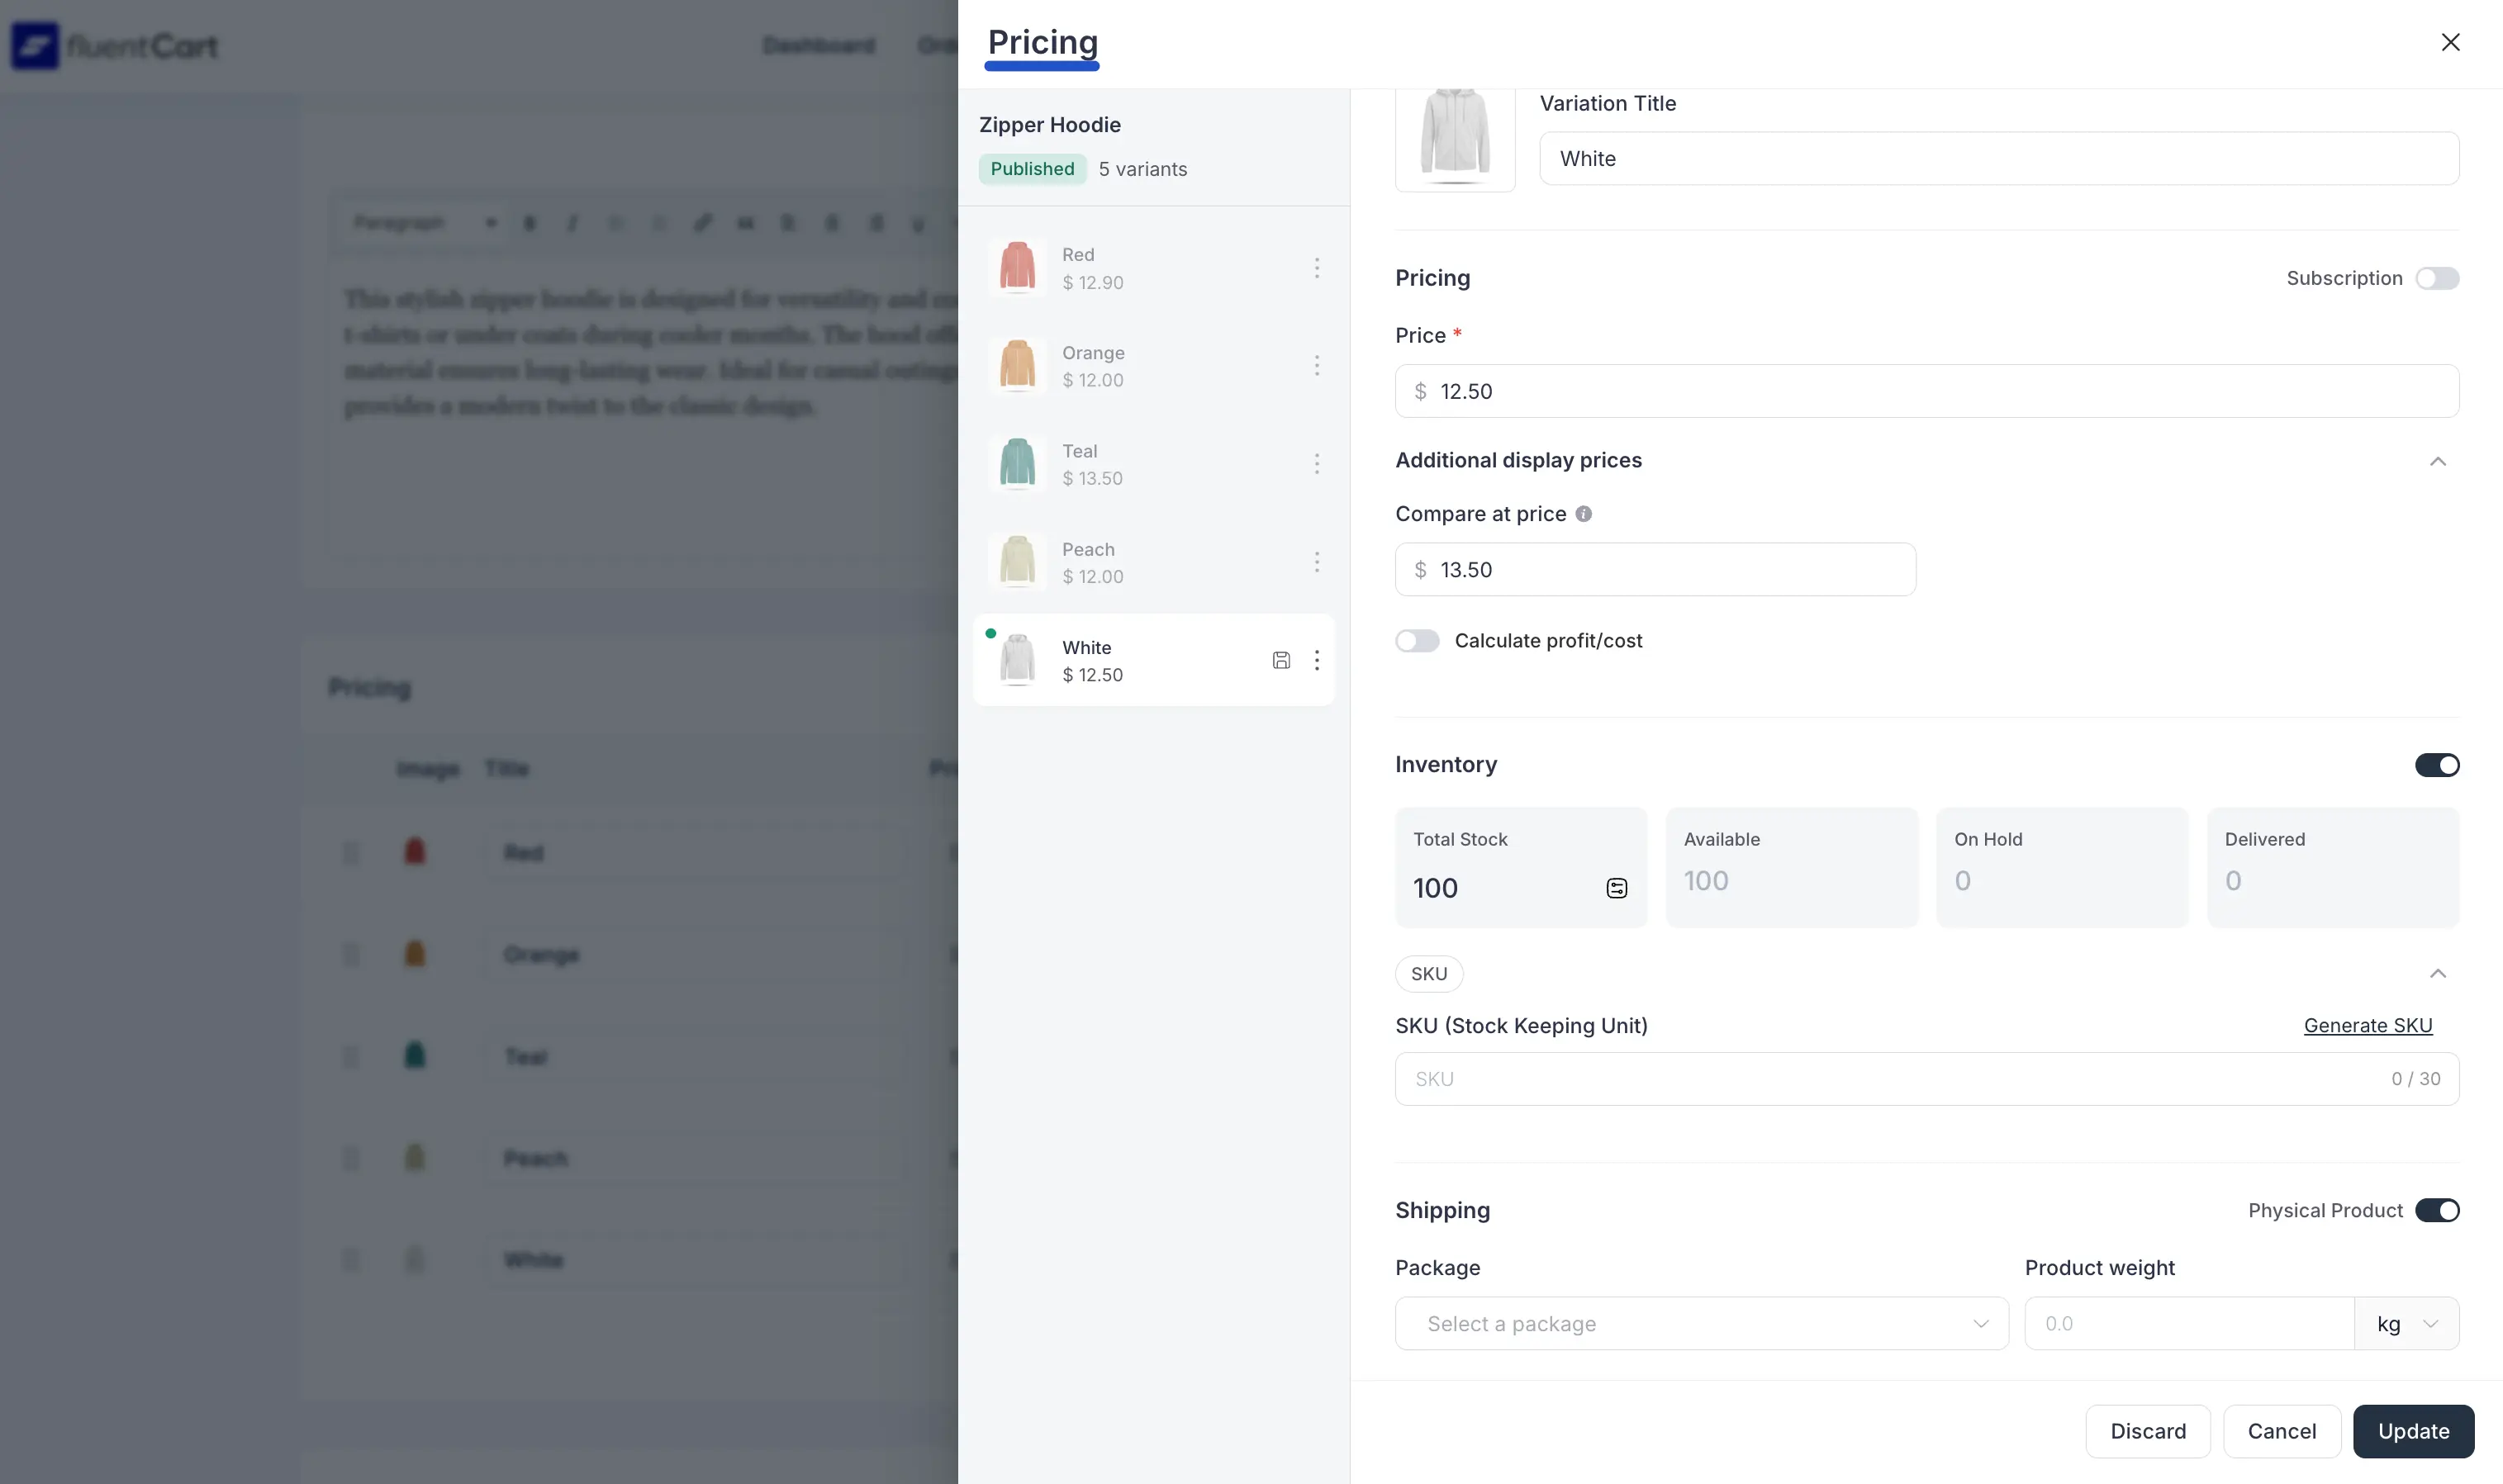
Variation image Click the image thumbnail at the top left of the right panel to upload a photo specific to this variation. Showing customers exactly what color, size, or version they're selecting builds confidence and reduces returns.
Variation Title The name of this specific version (e.g., White, XL, 50 Sites License). This is what customers see when browsing or selecting options on your product page.
Price (Required) The selling price for this specific variation.
Additional display prices
- Compare at price (Optional) — A higher original price displayed with a strikethrough for this variation.
- Calculate profit/cost (Toggle — Optional) — Toggle on to enter the Cost per item and see the auto-calculated Profit and Margin for this variation.
Inventory The Inventory toggle lets you manage stock levels right here inside the variation editor — no need to navigate to a separate screen. When turned on, four fields appear:
- Total Stock — The total number of units you have for this variation. Click the edit icon next to the number to make an adjustment.
- Available — Units currently available for customers to purchase (read-only, auto-calculated)
- On Hold — Units reserved in pending or processing orders (read-only)
- Delivered — Units that have been fulfilled and shipped (read-only)
💡 Pro Tip: Managing inventory at the variation level means you'll never accidentally oversell the Red hoodie just because you still have plenty of Teal ones. Each color stays tracked independently.
SKU Expand the collapsible SKU section to assign a unique tracking code to this specific variation (e.g., HOO-WHT-M). Click Generate SKU to have FluentCart create one automatically. Accepts up to 30 characters.
Shipping Configure the physical shipping details for this specific variation:
- Physical Product — Toggle on if this variation requires physical shipment
- Package — Select the package type for this variation (different variations can use different package sizes)
- Product weight — Enter the weight for this specific variation, with your preferred unit (kg or lb). Since different sizes or configurations often weigh differently, per-variation weight ensures your carrier rates stay accurate
Tax (visible only when store-level tax is enabled) Each variation also has its own tax controls — a Tax Inclusion override in the Pricing section, a Charge-tax checkbox, and a per-variation Tax Class. See Per-Variation Tax Settings for the full walkthrough.
When you've finished configuring this variation, click Update to save all your changes.
B. Subscription Payment for a Variation (Subscription Toggle ON)
Toggle the Subscription switch to the on position inside the variation editor to set this variation up as a recurring subscription — perfect for software license tiers, membership levels, or any product where different versions bill at different rates.
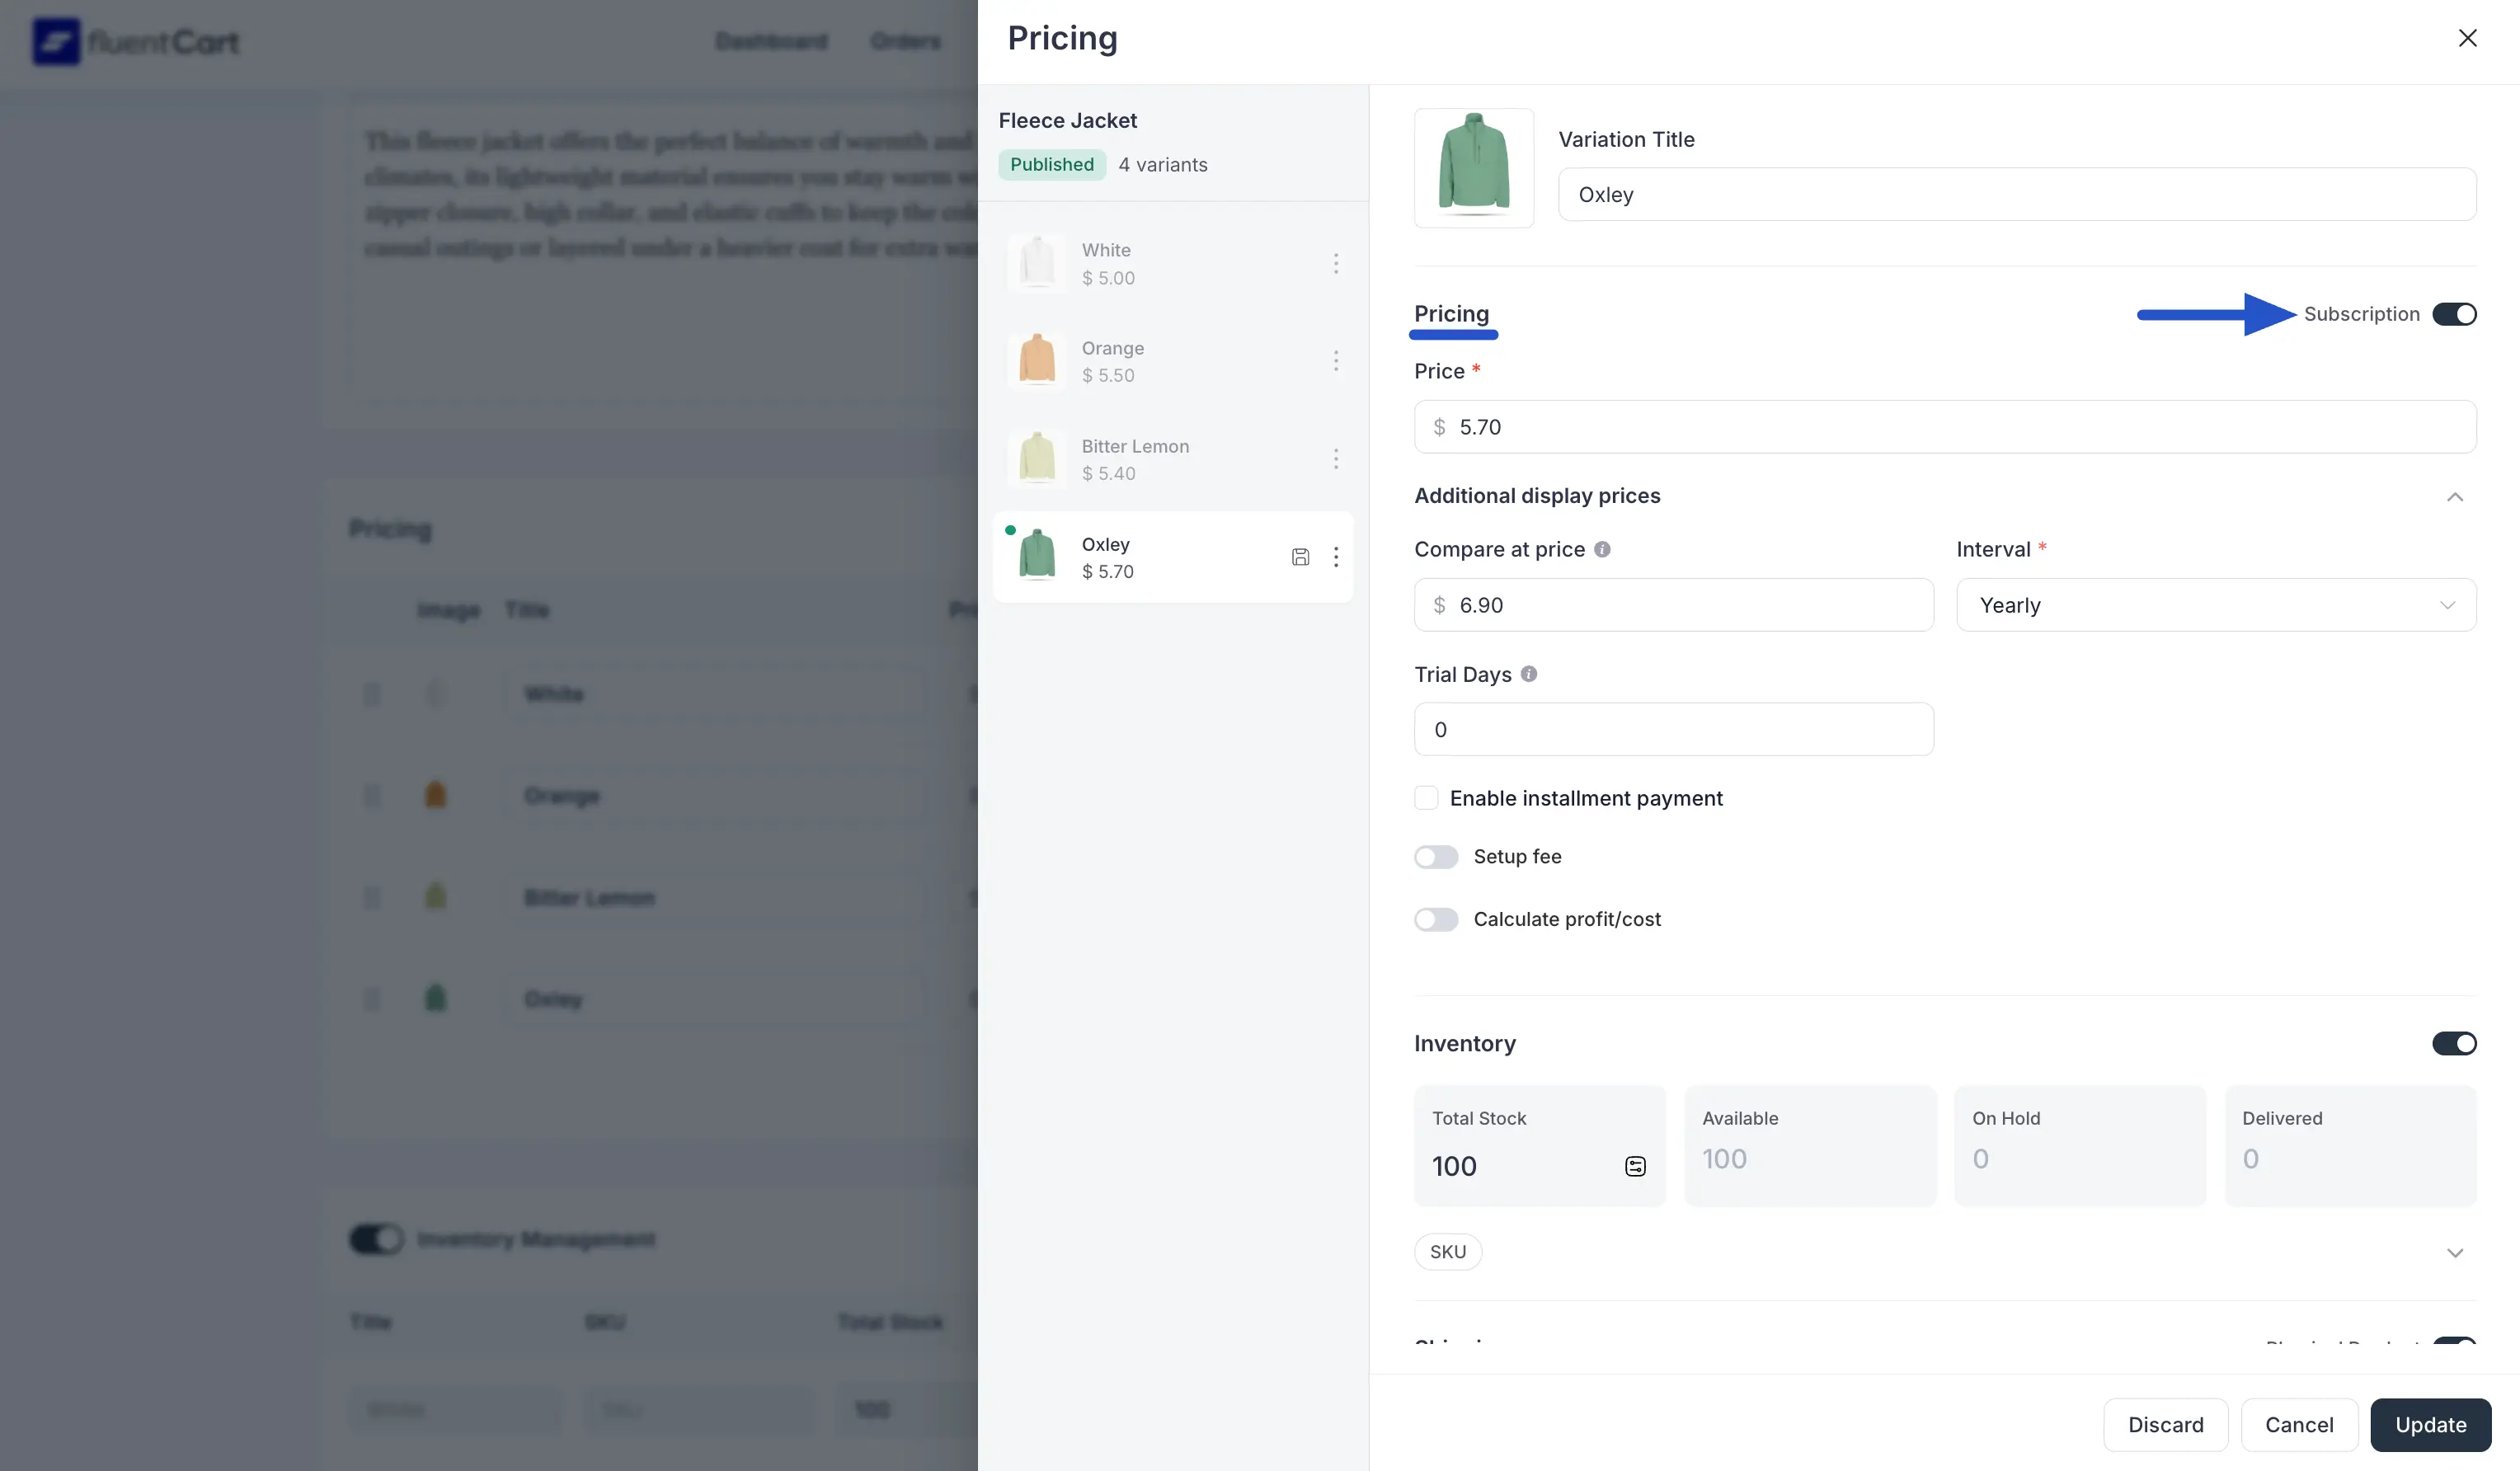
All the same subscription fields are available here as in Simple pricing:
Price (Required) The recurring charge for each billing cycle of this variation.
Compare at price (Optional) A higher price shown with a strikethrough to communicate the subscription's value.
Interval (Required) The billing frequency for this specific variation — choose from Daily, Weekly, Monthly, Quarterly, Half Yearly, or Yearly. Different variations can have different intervals, so you could offer a "Monthly" and a "Yearly" tier side by side.
Trial Days (Optional) The number of free days before the first charge is made. Set to 0 for no trial. Offering even a 7-day trial on higher-priced tiers can meaningfully improve sign-up rates.
Enable installment payment (Checkbox — Optional) Limit this variation's subscription to a fixed number of payments. When checked:
- Installment Count — Total number of billing cycles before the subscription ends automatically
- Total Price — Auto-calculated total (Installment Price × Count)
Setup fee (Toggle — Optional) Charge a one-time fee at signup for this variation. When toggled on:
- Setup fee label — The customer-facing name for this charge (e.g.,
Activation Fee) - Setup fee amount — The one-time charge in dollars
📝 Note: Just like with Simple pricing, the variation's setup fee is rendered as its own line item on the purchase confirmation page, invoice receipt (PDF), and order confirmation email — keeping the one-time charge transparent and clearly separated from the recurring billing amount.
Calculate profit/cost (Toggle — Optional) Track your internal Cost per item, Profit, and Margin for this subscription variation.
Inventory, SKU, and Shipping work exactly the same as described in the one-time variation section — configure stock levels, assign a unique SKU, and set the package and weight specific to this variation.
When everything is set up the way you want, click Update to save your subscription variation.
Option 3: Advanced Variations
When your product comes in combinations of options, like a shirt offered in several colors across several sizes, Advanced Variations saves you from building each version by hand. Instead of naming every variant yourself, you pick reusable attributes (Color, Size, Material) and the values that apply, and FluentCart generates the full variant matrix for you.
This method relies on global Attributes and Terms that you set up once under Products > Attributes, then reuse across any product. Once your options are saved, each generated variant gets its own price, image, inventory, and SKU, exactly like Simple Variations.
Because the setup flow is different, Advanced Variations has its own dedicated walkthrough. See the Advanced Variations guide for the complete step-by-step, from creating attributes to switching an existing product over.
You've now got the complete picture of how pricing and variations work in FluentCart. Whether you're running a simple one-product store or a rich catalog of subscription tiers with per-variation inventory and packaging, every setting is exactly where you need it.