Appearance
Creating Digital Products with Licenses
This guide provides a complete walkthrough for selling digital products that require a license key, such as software, plugins, or premium content.
Licensing helps you protect your digital items by controlling how they are used. By issuing a unique key to each customer, you can manage how many times your product can be activated and for how long the license is valid.
In this guide, you will learn how to:
- Create different license tiers with unique pricing (e.g., "Single Site License" or "50 Sites Lifetime").
- Attach the main downloadable file that your customers will receive.
- Set specific activation limits and license durations (like yearly or lifetime) for each tier.
- Create customer-friendly upgrade paths to allow moving between different license tiers.
Follow these steps to confidently configure all the necessary settings for your licensed digital products.
Steps to Create a New Licensed Digital Product
- From your WordPress dashboard, navigate to FluentCart Pro > Products in the left WordPress sidebar.
- On the Products screen, click the "Add Product" button at the top right.
1. Create a Digital Product
To create a product with a digital license in FluentCart, you must first create a digital product, then attach the downloadable asset to the product, and Finally, generate a license for it.
NOTE
You can learn more about creating a digital product by following the Creating Digital Product guide. The following sections also cover the basic steps.
2. Basic Product Information
- Title: Enter the main name of your licensed digital product (e.g., "Fluent Forms - 50 Sites Yearly License").
- Short description: Provide a brief, concise summary of the product.
- Long Description: Use the rich text editor to write a detailed description of your product, including its features and benefits.
3. Media
This section allows you to manage the visual presentation of your product, ensuring customers get a clear view of what they are buying. You can set a primary image and build a gallery to showcase different angles or use cases.
Featured Image: Set a prominent, high-quality image that acts as the primary visual for your digital product, such as a professional book cover or a clean app icon.
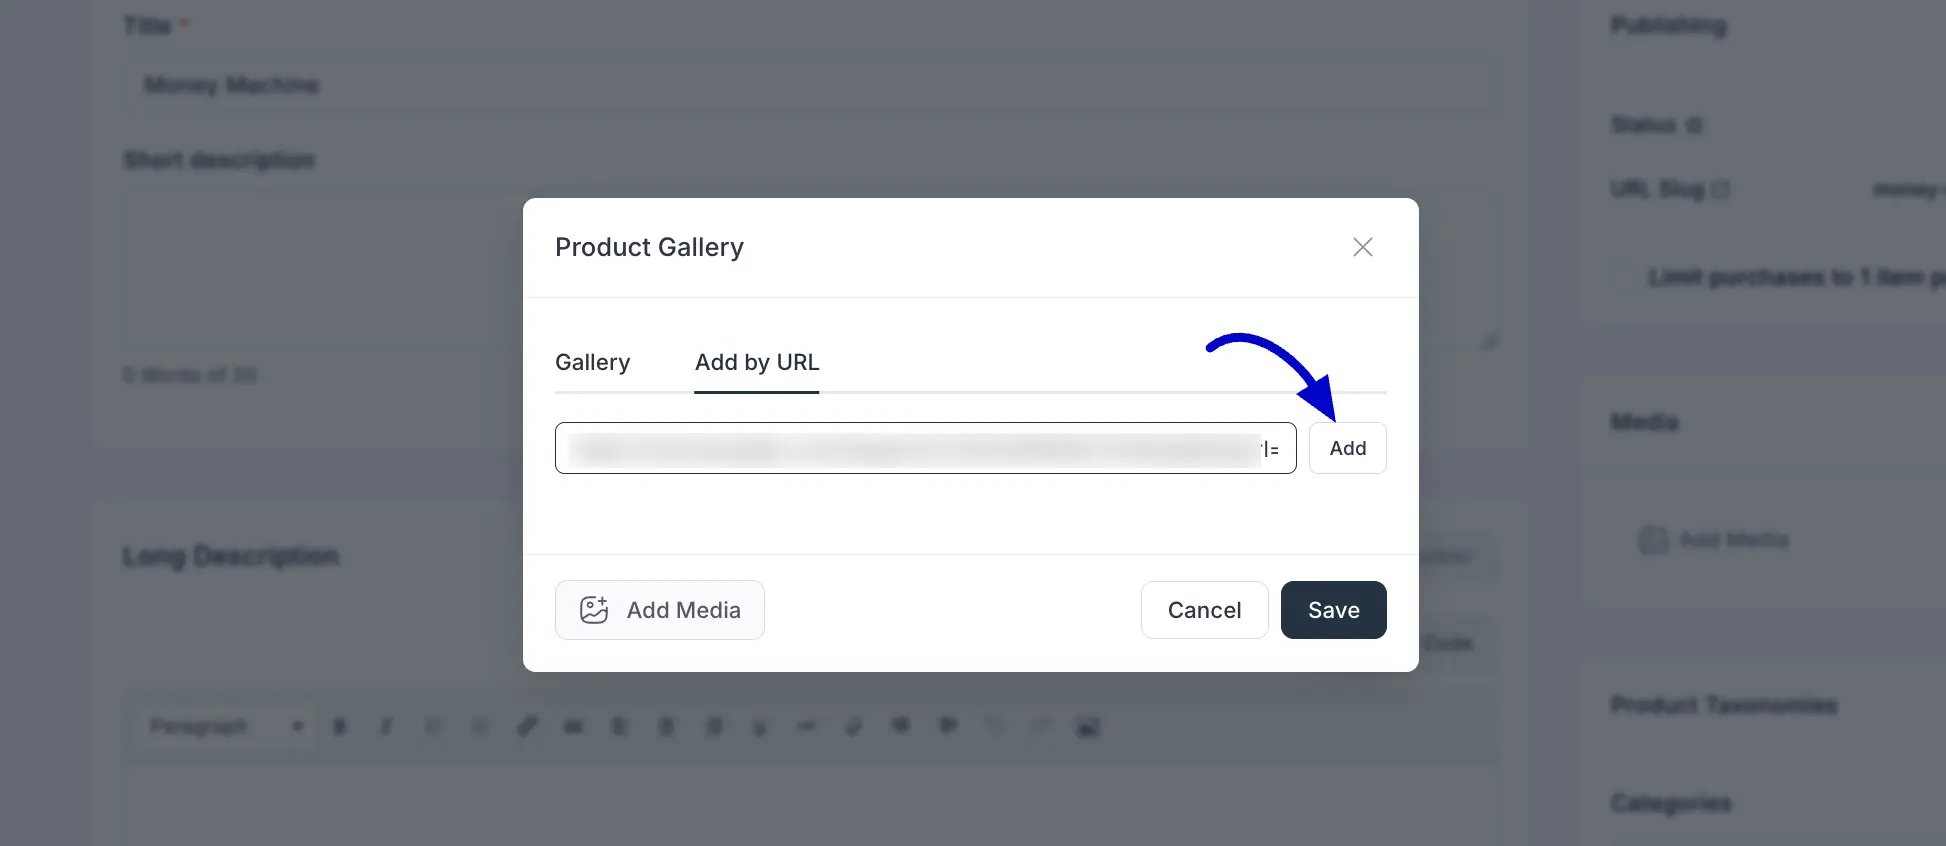
Product Gallery: By clicking the Add Media button, you can build a gallery that gives shoppers a better look at what's inside. You will find two distinct ways to add your visuals:
- Gallery: This is your standard option for picking images or videos that are already saved in your WordPress library, or for uploading fresh screenshots directly from your device.
- Add by URL Tab: If you have high-quality images hosted on a separate server or a dedicated media site, you can simply paste the direct web address here and click Add to bring them into your gallery without taking up space on your own site.
Once you've picked your files or linked your URLs, just click the Save button at the bottom of the modal to update your product's look.
4. Product Taxonomies
Categorize and type your product for better organization.
Product Categories: Assign the product to relevant categories (e.g., "Software"). Click "+ Add More Category" to assign additional categories.
Product Brand: Assign the product to relevant brands. Click to "+Add Brand” to assign additional brands.
5. Pricing & Variations
Licensed products live and breathe through their tiers — and this is the section where you bring that structure to life. Each license tier you offer (Single Site, 5 Sites, 50 Sites, Lifetime, Yearly) is defined as its own variation, complete with its own price, payment model, and optional setup fee. Think of the Variations table as your tier menu: it's what customers see and choose from when they land on your product page.
Select Simple Variations from the pricing dropdown in the top right of the Pricing panel. This is the right mode for virtually all licensed products, since each tier needs independent pricing and billing.
The Variations Table
Once in Simple Variations mode, you'll see a clean table where each row is one license tier. The columns give you a quick overview at a glance:
- ⠿ (Drag handle) — Drag to reorder tiers. The order here is the order customers see — put your most popular or recommended plan first.
- Image — A thumbnail specific to this tier. Click to upload or swap.
- Title — The name of this license tier (e.g.,
Single Site Yearly,5 Sites Lifetime). Editable directly in the table. - Price — The selling price for this tier. Editable inline.
- Compare at price — The "was" price shown with a strikethrough for this tier. Also editable inline.
- Action — A pencil icon to open the full tier editor, and a three-dot icon for quick actions (Duplicate, Direct Checkout, Delete).
Click + Add more at the bottom to add a new tier. Fill in the title and price inline, then click the pencil icon to configure the billing details.
📝 Note: You can make quick edits to Title, Price, and Compare at price directly in the table. For payment term, subscription settings, setup fee, and SKU — you'll need to open the full editor with the pencil icon.
Editing a License Tier (Pencil Icon)
Click the pencil icon on any tier row to open the full variation editor. This is where you define exactly how each license tier is paid for.
Variation image Upload a visual specific to this tier — helpful if your tiers have distinct branding, like a "Pro" badge or different logo treatment.
Variation Title The customer-facing name of this tier (e.g., Single Site Annual License, Agency – 50 Sites, Lifetime Access).
Price (Required) The selling price for this specific tier.
Compare at price (Optional) A higher original price shown with a strikethrough — great for communicating annual savings when customers compare your monthly and yearly plans.
Payment Term — the heart of license pricing This is where you tell FluentCart how this tier is paid for. Your options are:
One Time — For lifetime licenses. The customer pays once and owns access permanently. No recurring billing, no renewal reminders.
Subscription (toggle ON) — For renewable licenses. When you switch to subscription mode, the full recurring billing setup becomes available:
- Interval (Required) — How frequently the license renews: Daily, Weekly, Monthly, Quarterly, Half Yearly, or Yearly. A "Yearly" license renews once per year; a "Monthly" license renews each month.
- Trial Days (Optional) — Free days before the first charge begins. Set to
0for no trial. Even a 7-day trial can meaningfully lift conversion rates for higher-priced tiers. - Enable installment payment (Optional) — Limit the subscription to a fixed number of payments instead of renewing indefinitely:
- Installment Count — Total billing cycles before the license ends automatically
- Total Price — Auto-calculated (Price × Count)
- Setup fee (Toggle — Optional) — A one-time charge at the very start of the subscription, in addition to the recurring price:
- Setup fee label — What customers see at checkout (e.g.,
Activation Fee,Onboarding Fee) - Setup fee amount — The one-time amount
- Setup fee label — What customers see at checkout (e.g.,
Calculate profit/cost (Toggle — Optional) Toggle on to enter the Cost per item for this tier and track your Profit and Margin internally. Useful when you factor in support, hosting, or delivery costs per license.
💡 Pro Tip: For products with both a "Monthly" and a "Yearly" tier, set up two separate variations — each with its own Interval. Customers can then compare both options side by side on your product page. Set the yearly tier as your default variant and watch the upgrade rate improve.
INFO
For the complete, field-by-field reference on every pricing option — including all subscription interval choices, installment configuration, trial days, and setup fees — see the Configuring Product Pricing & Variations guide.
6. Downloadable Asset(s)
This section is where you manage the digital files associated with your licensed product.
- Click "+ Add Asset" to upload or link your software package, documentation, or other digital content.
- You can choose to link assets to specific variants (e.g., a "pro" version download for a higher-tier license) or leave it empty for all variants.
- See Adding & Managing Downloadable Assets for detailed steps.
7. Product-Specific License Settings
This is the most important section for licensed digital products, offering granular control over each license's behavior.
Enable License Add-on
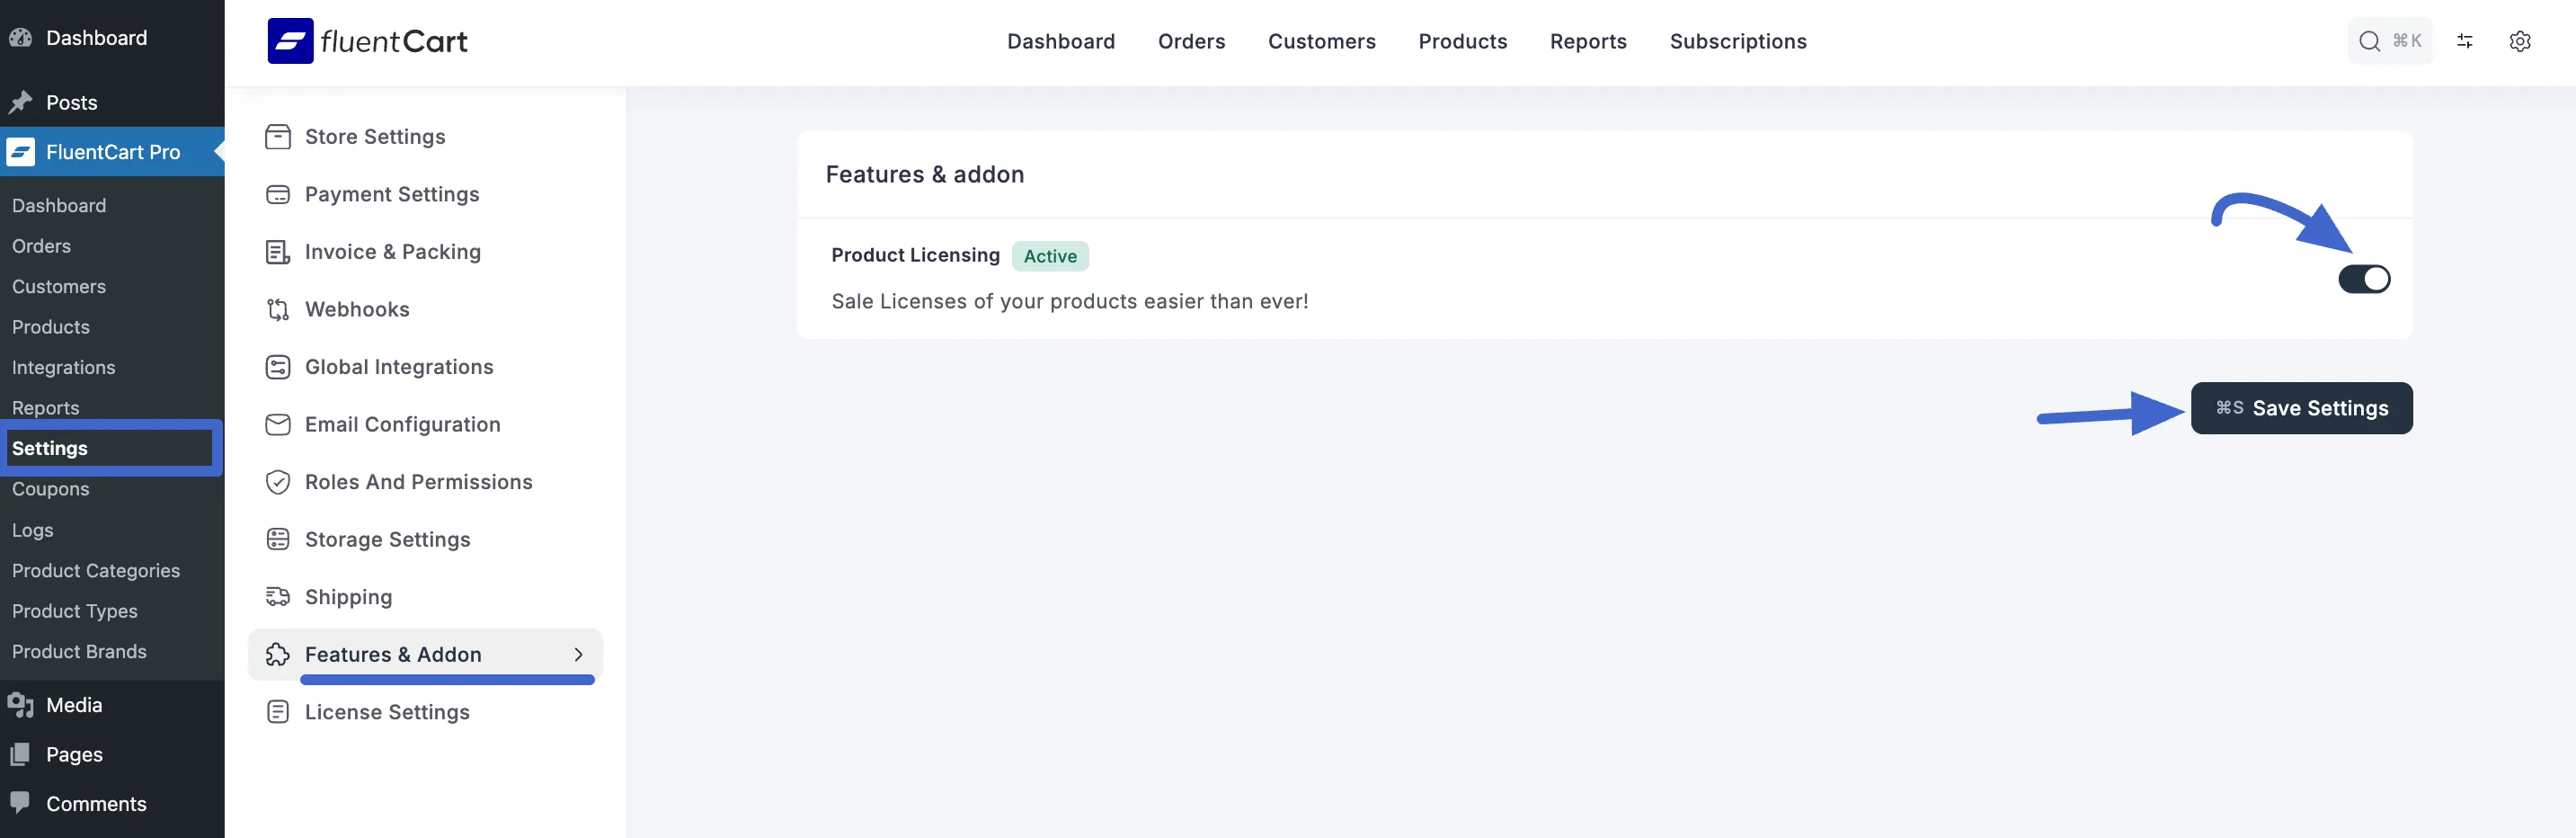
Before you can set up licenses for a specific product, you need to make sure the main licensing feature is turned on for your entire store. This is a quick, one-time step.
Navigate to FluentCart Pro > Settings from the left WordPress sidebar.
Click on the Features & Add-ons tab.
Locate the Product Licensing option and click the toggle button to enable it.
Click the Save Settings button to apply the change.
Configure Product License Settings
Once the add-on is enabled, you can configure the license settings for each product. On the Product Edit screen, click the License Settings tab.
On the Product Edit screen, click the "License Settings" tab.
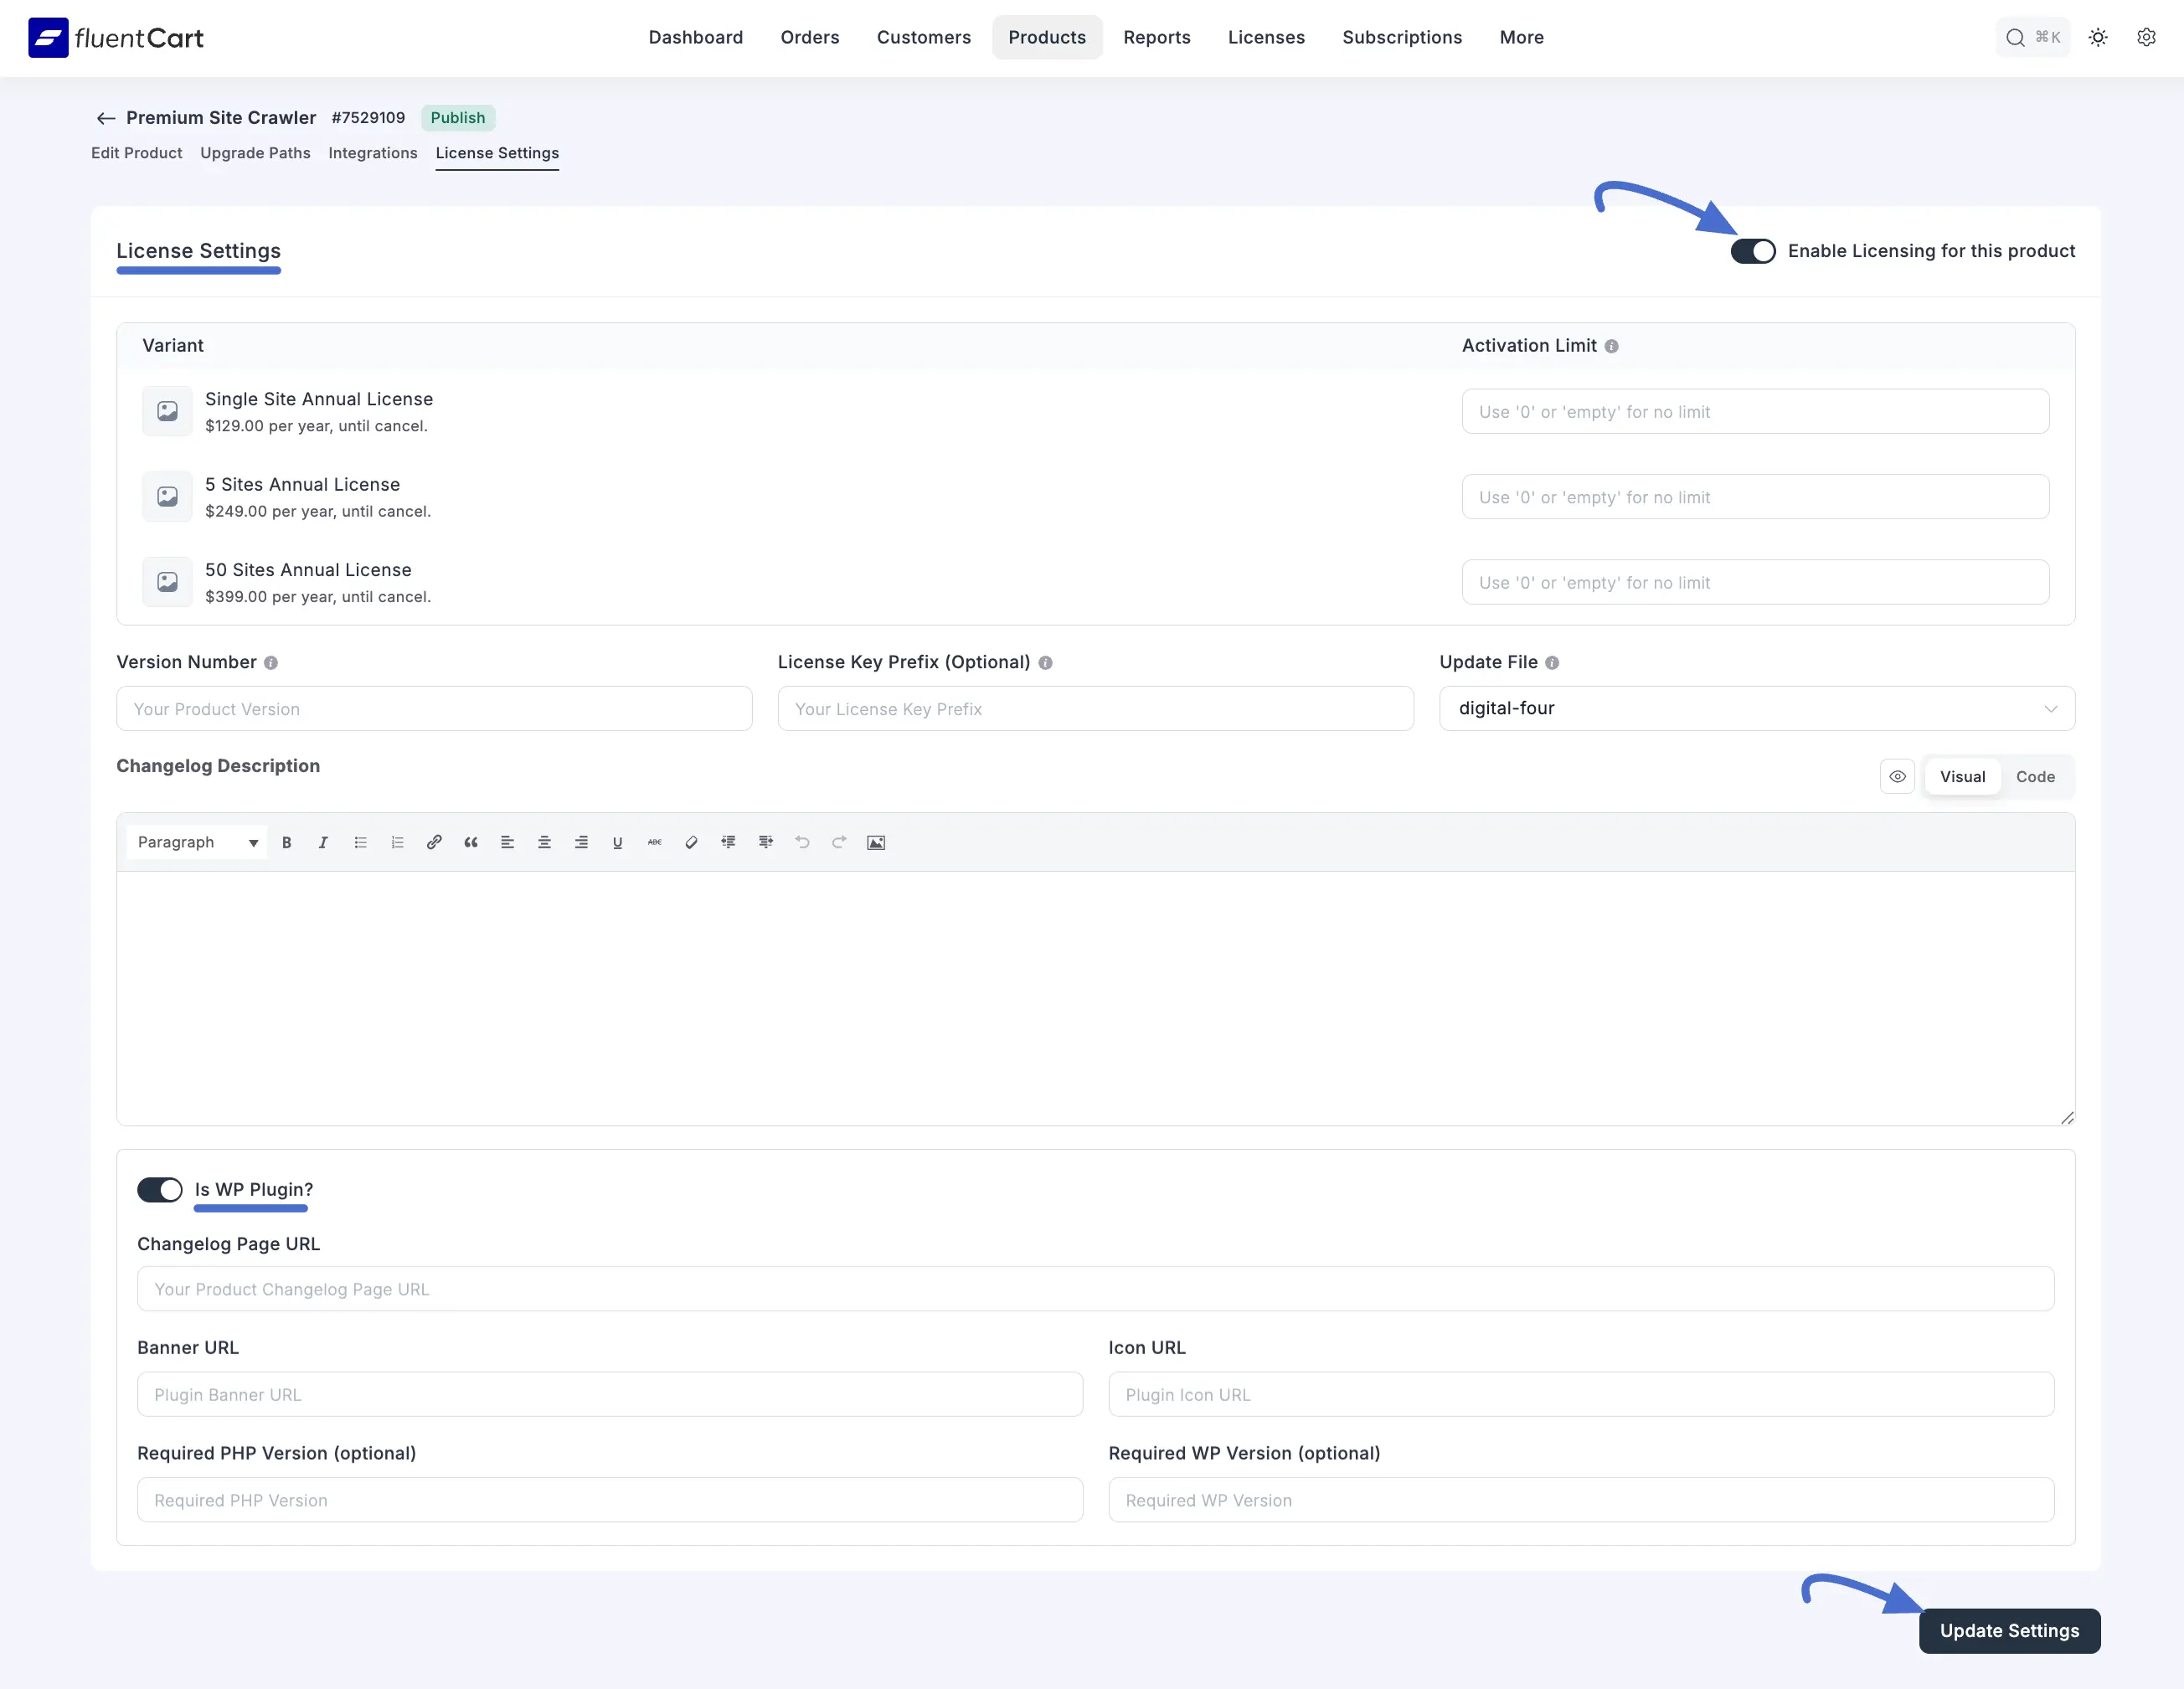
Enable Licensing for this product: Ensure this checkbox is enabled to activate licensing for this product.
License Configuration Table (Per Variant):
- Activation Limit: For each license variant (e.g., "Single Site Annual License"), set the number of times the license key can be activated (e.g., 50, 100).
Software/Plugin Specific Information:
- Version Number: Enter the current version of your digital product (e.g., "1.0.1").
- License Key Prefix: This adds a short prefix to every license key generated for this product. It's a great way to quickly identify keys from different products. For example, you could use ff- for Fluent Forms.
- Update File: This field shows the main downloadable file that will be used for software updates.
- Changelog Description: Here, you can write down what's new or what has changed in the latest version of your product. This information will be visible to your users.
Is WP Plugin?: If the digital product you're selling is a WordPress plugin, check this box. This will reveal a few more fields specific to WordPress plugins.
- Changelog Page URL: Enter the web address for your plugin's changelog.
- Banner URL: Provide a link to a banner image for your plugin.
- Icon URL: Provide a link to an icon image for your plugin.
- Required PHP Version (optional): If your plugin needs a minimum version of PHP to work, you can specify it here.
- Required WP Version (optional): Similarly, if your plugin requires a minimum WordPress version, enter it here.
After you've configured these settings, just click the Update Settings button to save your changes.
8. Managing Product Integrations (Product-Specific)
On the Product Edit screen, click the "Integrations" tab.
- Here you can connect this specific product to other FluentCart modules or third-party services that have a direct impact on its functionality, sales, or fulfillment.
- For example, you might integrate a specific product with FluentCRM to add customers who purchase this product to a particular list, or with FluentForms if product purchase triggers a form submission.
To learn more about managing product integrations, see the Managing Product Integrations guide.
9. Defining Upgrade Paths
On the Product Edit screen, click the "Upgrade Paths" tab.
- This powerful feature allows you to create seamless upgrade options for customers holding a license for this product.
- You can define paths from a "From Plan" (e.g., "Single Site Yearly License") to a "To Plan" (e.g., "5 Sites Yearly License" or "Single Site Lifetime License").
- Specify a "Discount Amount" and whether the upgrade is "Prorated" (meaning the customer gets credit for unused time on their old plan).
To learn more about upgrade paths, see the Defining Upgrade Paths guide.
Publishing Your Licensed Digital Product
Once you have configured all the necessary details:
- Set the Status to "Published" in the "Publishing" section.
- Click the "Update" (or "Save") button on the top right to make your product live in your store.