Appearance
Creating Digital Products
This guide provides step-by-step instructions for adding a digital product to your FluentCart store.
A digital product is any file that customers can download after purchase, such as an e-book, software, music, or design template. FluentCart gives you all the tools to set up these items correctly.
In this guide, you will learn how to:
- Add product details and set a price.
- Upload the downloadable file for your customers.
- Manage different product variations if needed.
By the end, you will be able to confidently sell and manage any downloadable item.
Steps to Create a New Digital Product
From your WordPress dashboard, navigate to FluentCart Pro > Products in the left WordPress sidebar.
On the Products screen, click the "Add Product" button at the top right.
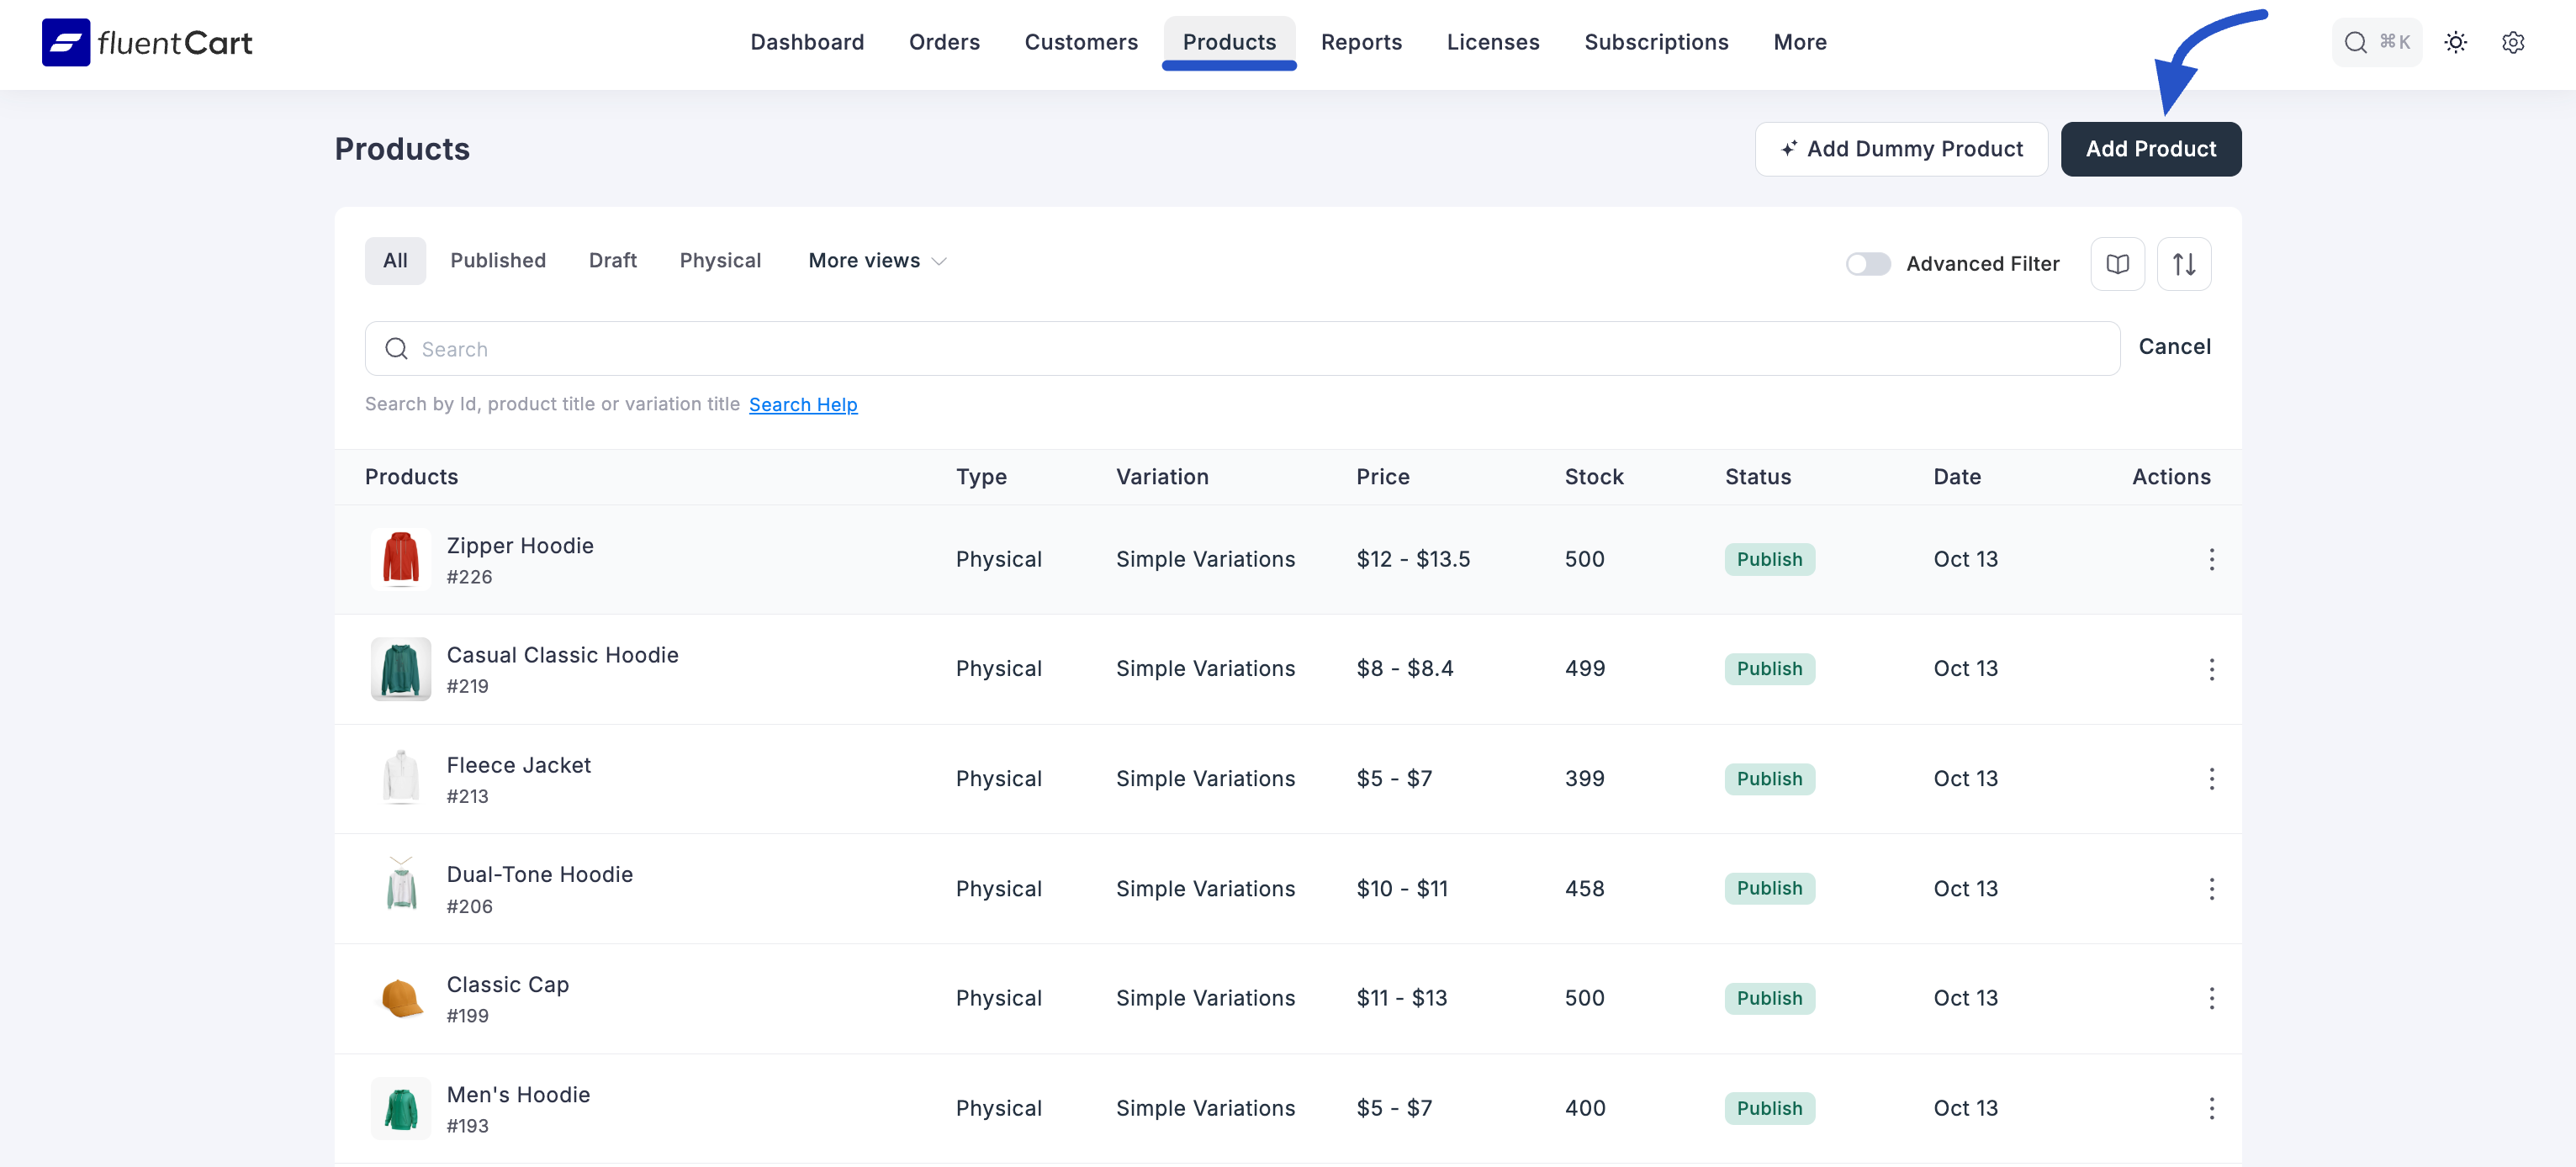
This will open the Add New Product popup from where you have to give the product name and select the product type Digital Product then the Edit Product page will come.
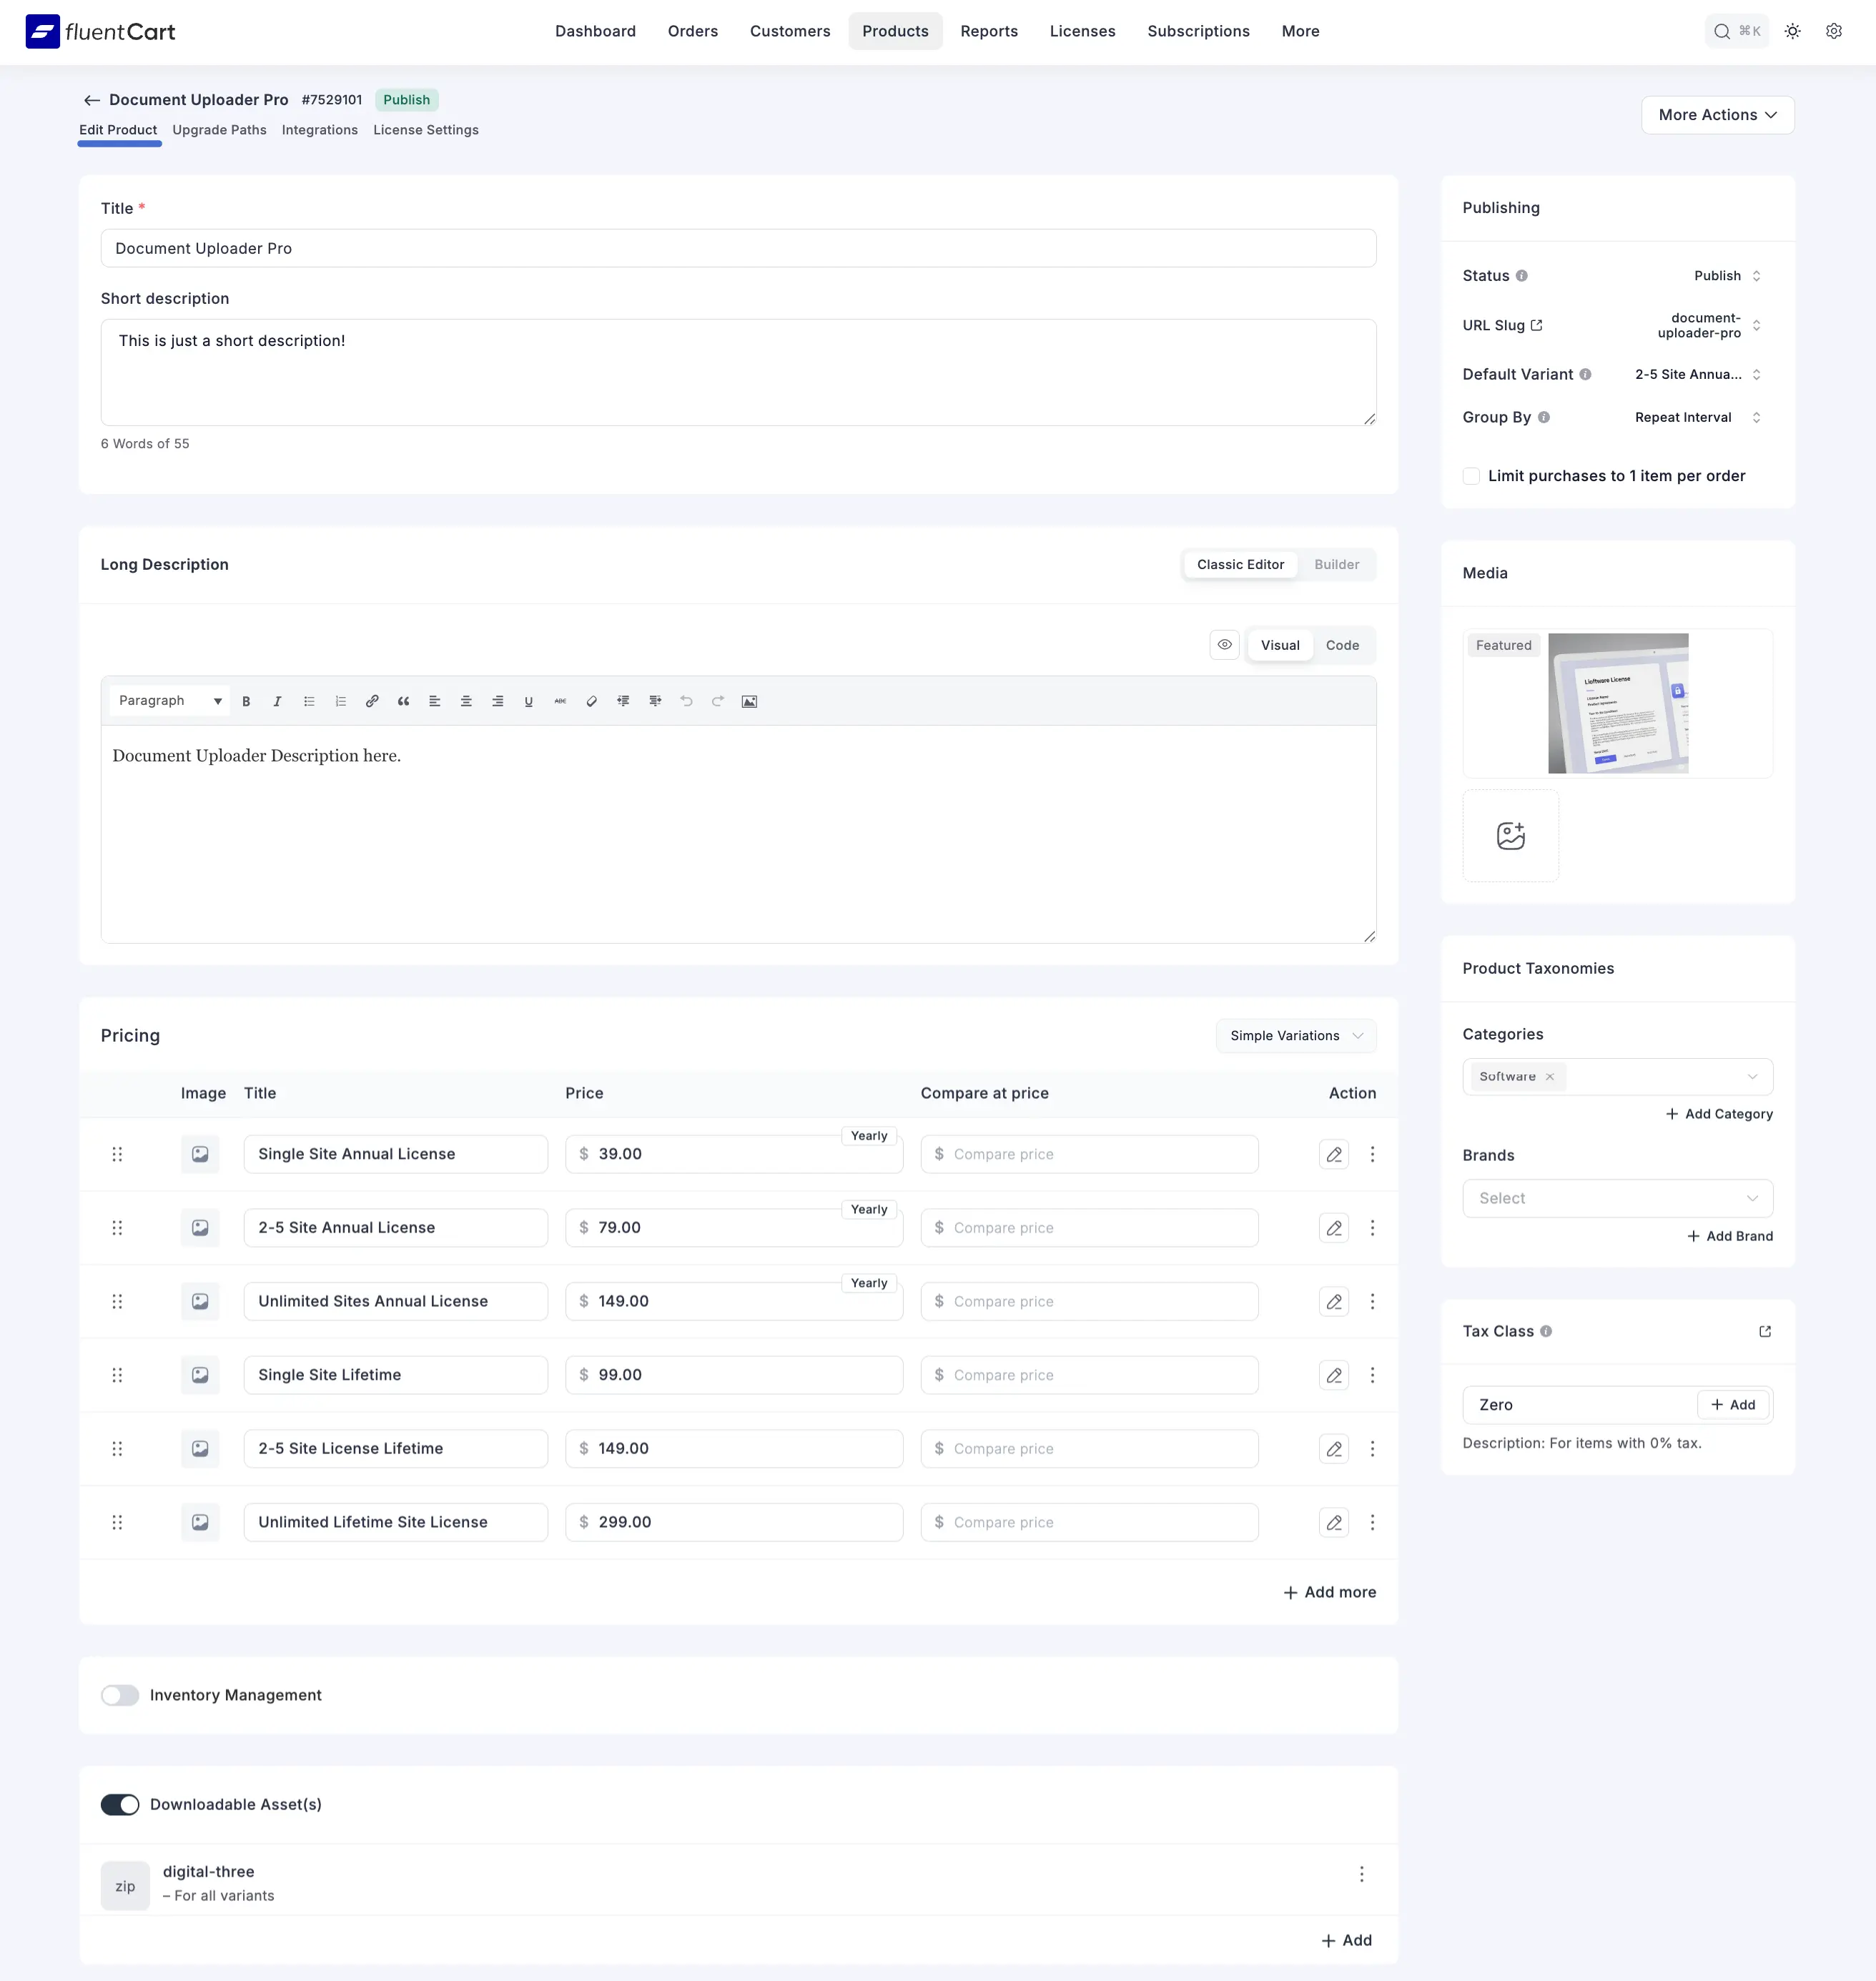
1. Basic Product Information
- Title: Enter the main name of your digital product (e.g., "E-Book: Mastering FluentCart").
- Short description: Provide a brief, concise summary of the digital product.
- Long Description: Use the rich text editor to write a detailed description of your product, including its benefits and content.
2. Media
This section allows you to manage the visual presentation of your product, ensuring customers get a clear view of what they are buying. You can set a primary image and build a gallery to showcase different angles or use cases.
Featured Image: Set a prominent, high-quality image that acts as the primary visual for your digital product, such as a professional book cover or a clean app icon.
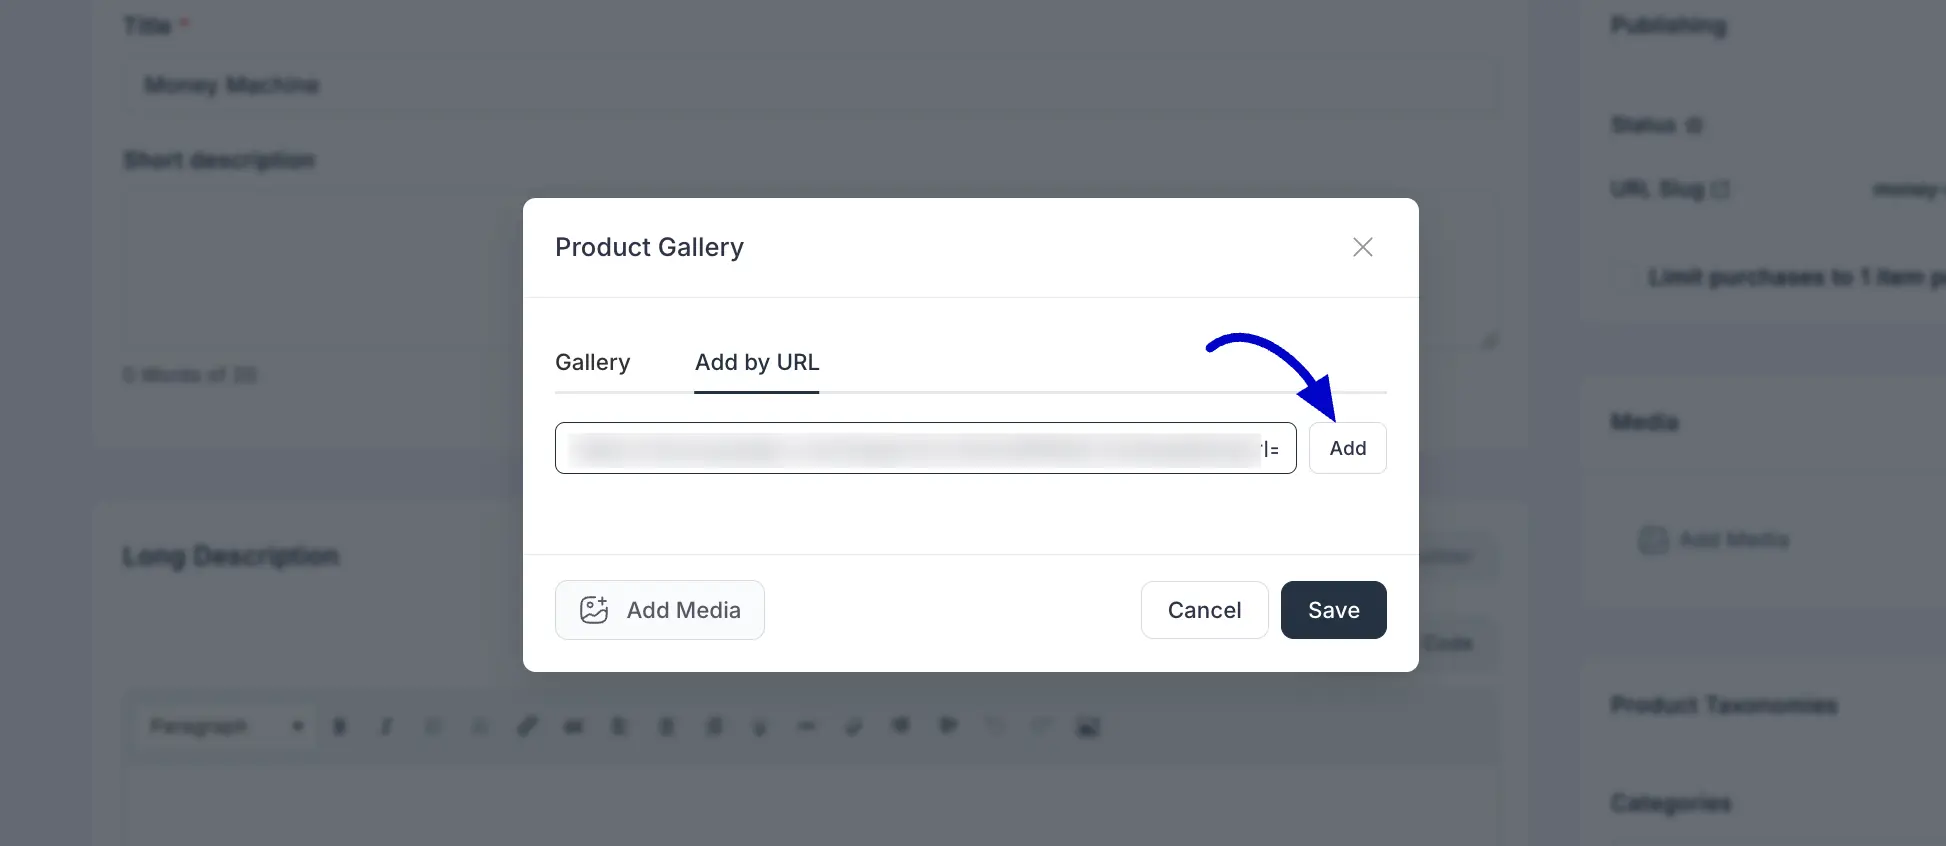
Product Gallery: By clicking the Add Media button, you can build a gallery that gives shoppers a better look at what's inside. You will find two distinct ways to add your visuals:
- Gallery: This is your standard option for picking images or videos that are already saved in your WordPress library, or for uploading fresh screenshots directly from your device.
- Add by URL Tab: If you have high-quality images hosted on a separate server or a dedicated media site, you can simply paste the direct web address here and click Add to bring them into your gallery without taking up space on your own site.
Once you've picked your files or linked your URLs, just click the Save button at the bottom of the modal to update your product's look.
3. Product Taxonomies
Categorize and type your digital product for better structured organization.
- Product Categories: Assign the product to relevant categories (e.g., "E-Books", "Software"). Click "+ Add More Category" to assign additional categories.
- Product Brand: Assign the product to relevant brands. Click to "+Add Brand” to assign additional brands.
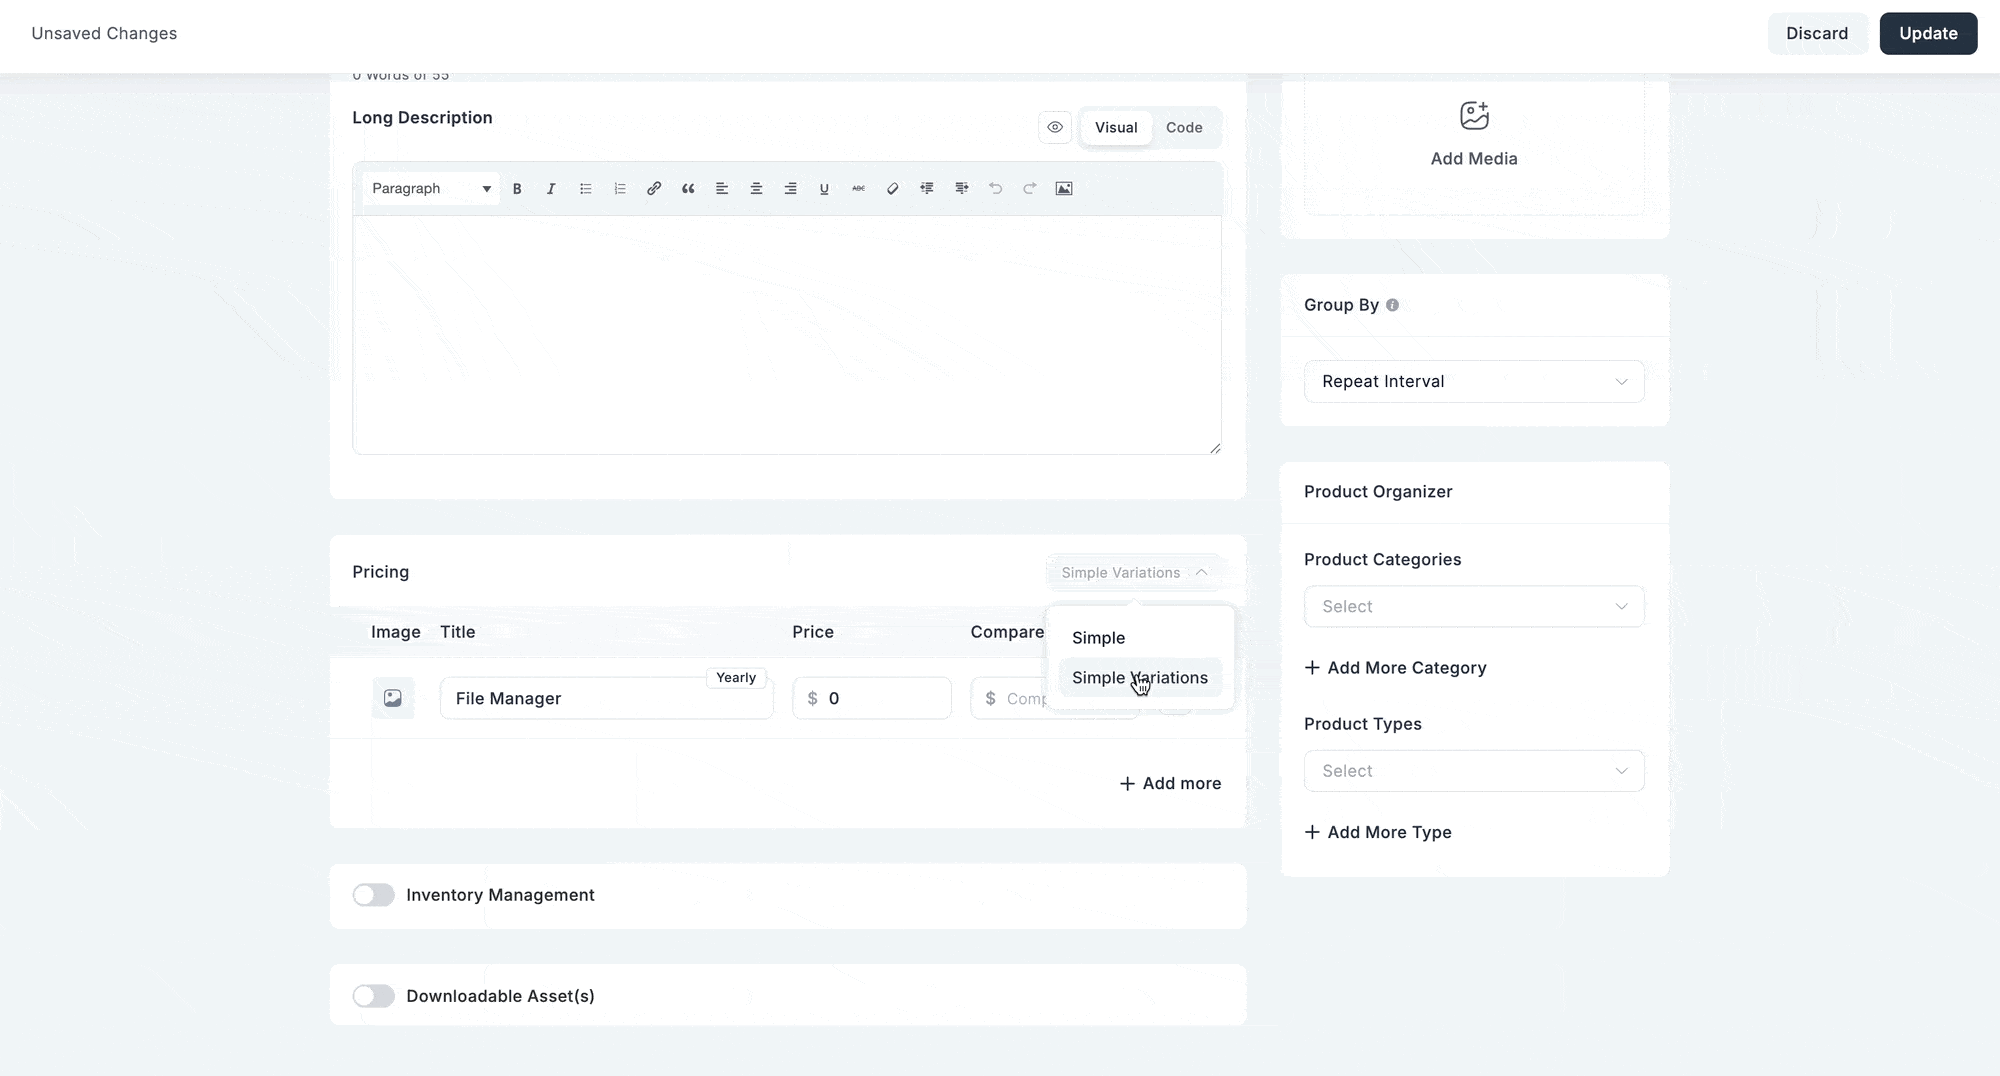
4. Pricing & Variations
Pricing is where your digital product becomes a real offer — and FluentCart gives you the flexibility to sell it exactly the way your business works. A single ebook for a flat fee, a software tool with a free trial period, or a tiered product with a monthly plan and a discounted yearly plan side by side — this section handles all of it.
Open the Pricing panel and look at the dropdown in the top right corner. That's your first decision:
- Simple — One product, one price. The right choice for a single item with no variations.
- Simple Variations — Multiple versions of the same product (e.g., Standard, Pro, Agency), each with its own price and billing structure.
- Advanced Variations — Versions built from reusable attributes like License Tier or Format, where FluentCart generates every combination automatically. See the Advanced Variations guide.
Pick the method that matches your product, and the fields below will adapt.
Option A: Simple Pricing
Choose Simple when your digital product is a single item — one version, one price. A single ebook, a one-off template pack, a fixed-fee service download — this is the mode for all of them.
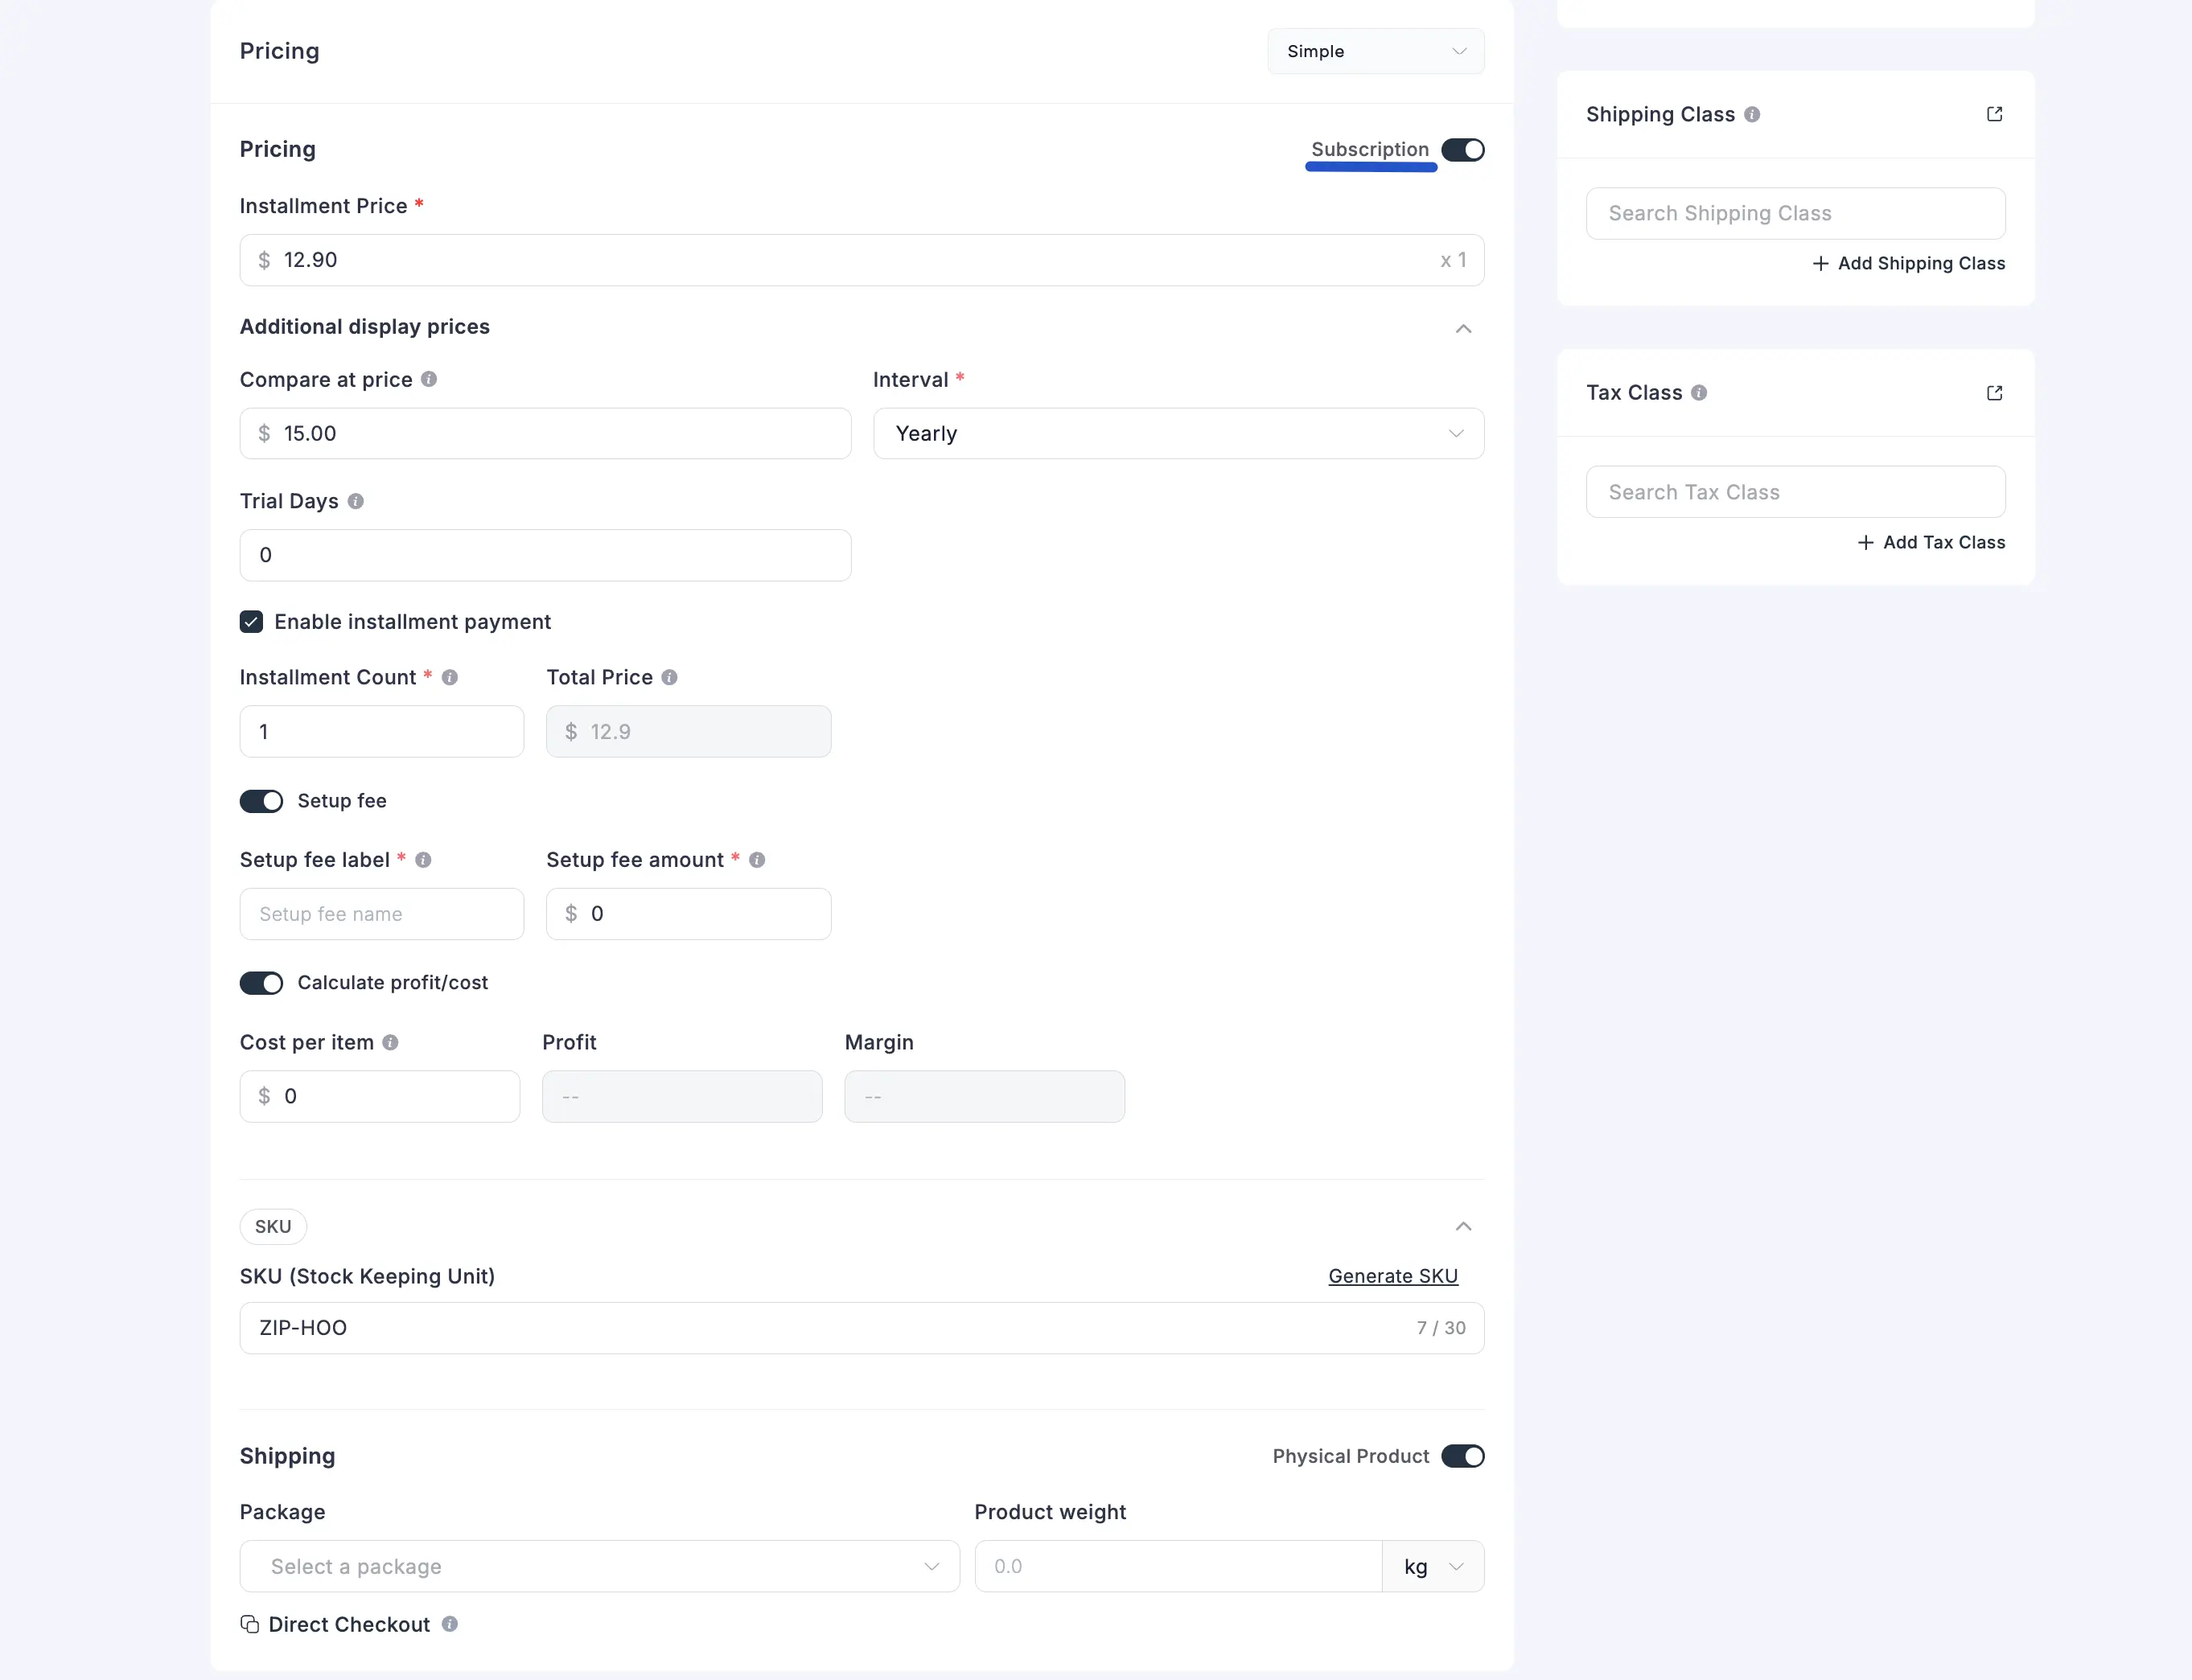
Inside the Pricing panel you'll notice a Subscription toggle in the top right. This is how you switch between the two payment modes:
- Toggle OFF → One-time purchase
- Toggle ON → Recurring subscription
1. One-Time Payment
When the Subscription toggle is off, you're setting up a standard single-payment digital product.
Price (Required) The selling price your customers will pay. This is the number that shows on your store page, in the cart, and at checkout.
Additional display prices (Collapsible section) Click the chevron to expand this section:
Compare at price (Optional) — Enter a higher "original" price here and FluentCart will display it with a strikethrough next to your actual price. Setting Price to
$12.90and Compare at price to$20.00gives customers a clear visual that they're saving — a reliable conversion boost for digital products.Calculate profit/cost (Toggle — Optional) — Toggle this on to track internal margins. Three fields appear:
- Cost per item — What it costs you to create or license this product
- Profit — Auto-calculated (Price minus Cost)
- Margin — Your profit as a percentage, also auto-calculated
💡 Pro Tip: These profit fields are completely invisible to customers. They're a smart way to know whether your pricing is sustainable before you hit publish.
SKU (Collapsible section) Expand the SKU section and enter a unique tracking code (e.g., EBOOK-MKT-01). Click Generate SKU to have FluentCart create one automatically. Accepts up to 30 characters.
2. Subscription Payment
Toggle the Subscription switch on and the pricing fields transform into everything you need for recurring billing — ideal for software tools, membership content, course access, or any digital product your customers return to over time.
Installment Price (Required) The amount charged on each billing cycle. The x1 indicator next to the field reflects how many times this price is charged per interval — it updates automatically when you configure installments.
Additional display prices (Collapsible section)
Compare at price (Optional) — A higher price displayed with a strikethrough, helping customers see the value of your subscription rate.
Interval (Required) — How frequently the customer is billed. Choose from:
- Daily
- Weekly
- Monthly
- Quarterly
- Half Yearly (Six Month)
- Yearly
Trial Days (Optional) — The number of free days before the first charge. Set to
0for no trial. Even a 7-day trial on a higher-priced plan can meaningfully improve sign-up rates — it lowers the barrier to committing.
Enable installment payment (Checkbox — Optional) Check this box to limit the subscription to a fixed number of payments instead of running indefinitely. Two fields appear:
- Installment Count — The total number of payments (e.g.,
12for a year-long payment plan) - Total Price — Auto-calculated (Installment Price × Count)
💡 Pro Tip: Installment plans work brilliantly for online courses or coaching programs — customers pay over time with a clear end date, eliminating cancellation anxiety while guaranteeing your revenue.
Setup fee (Toggle — Optional) Enable this to charge a one-time fee at the very start of the subscription, in addition to the recurring price. Two sub-fields appear:
- Setup fee label — The name customers see for this charge at checkout (e.g.,
Activation Fee,Enrollment Fee) - Setup fee amount — The one-time amount charged at signup
Calculate profit/cost (Toggle — Optional) Toggle on to track Cost per item, Profit, and Margin for this subscription for internal reporting.
📝 Note: The SKU section works exactly the same in subscription mode as it does for one-time payments. Digital products don't need a shipping package or physical weight — so those fields don't appear here.
Option B: Simple Variations
When your digital product comes in multiple versions — a Standard and a Pro, different license tiers, or a monthly plan alongside a discounted yearly plan — Simple Variations is the right choice. Each variation gets its own price, image, and billing structure, completely independent from the others.
Select Simple Variations from the pricing dropdown to activate this mode.
The Variations Table
You'll see a clean table where each row is one version of your product:
- ⠿ (Drag handle) — Click and drag to reorder. The order here controls how options appear on your product page — put your most compelling tier first.
- Image — A thumbnail for this variation. Click to upload or swap.
- Title — The variation name (e.g.,
Standard,Pro,Agency). Editable directly in the table. - Price — The selling price for this variation. Editable inline.
- Compare at price — The "was" price for this variation, shown with a strikethrough. Also editable inline.
- Action — A pencil icon to open the full variation editor, and a three-dot icon for quick options.
Click + Add more at the bottom to add a new variation. A blank row appears — fill in the title and price, then use the pencil icon for everything else.
The three-dot icon gives you:
- Duplicate — Copy this variation as a starting point for a new one
- Copy Variation ID — Get the unique ID for developers or shortcode use
- Direct Checkout — Generate a buy-now link for this specific version
- Delete — Remove this variation permanently
- Skip inventory — Exclude this variation from stock tracking
📝 Note: Quick edits to Title, Price, and Compare at price can be made directly in the table rows. For images, subscription configuration, and everything else — click the pencil icon.
Editing a Variation (Pencil Icon)
Click the pencil icon to open the full variation editor — a full-screen panel with two sides:
- Left panel — A scrollable list of all your variations. Click any item to jump to editing it without closing the panel.
- Right panel — The complete configuration for the currently selected variation, highlighted with a green dot in the left list.
At the bottom: Discard (undo unsaved changes), Cancel (close without saving), and Update (save all changes).
A. One-Time Payment for a Variation
When the Subscription toggle in the editor is off, you're setting up a standard single-payment tier.
Variation image Click the thumbnail to upload a photo specific to this version — helpful for visually distinguishing tiers on your product page.
Variation Title The name of this specific version (e.g., Standard, Pro License, Lifetime Access).
Price (Required) The selling price for this specific variation.
Additional display prices
- Compare at price (Optional) — A higher "was" price shown with a strikethrough for this variation.
- Calculate profit/cost (Toggle — Optional) — Track Cost per item, Profit, and Margin for this variation internally.
B. Subscription Payment for a Variation
Toggle the Subscription switch on inside the variation editor to configure this tier as a recurring plan — perfect for software license tiers or membership levels where different versions bill at different rates.
Price (Required) The recurring charge for each billing cycle of this variation.
Compare at price (Optional) A higher price shown with a strikethrough to communicate value.
Interval (Required) The billing frequency for this specific variation — choose from Daily, Weekly, Monthly, Quarterly, Half Yearly, or Yearly. Different variations can have different intervals, so you can offer a "Monthly" and a "Yearly" tier side by side on the same product page.
Trial Days (Optional) Free days before the first charge. Set to 0 for no trial. Offering even a short trial on a higher-priced tier can meaningfully improve sign-up rates.
Enable installment payment (Checkbox — Optional) Limit this variation to a fixed number of billing cycles:
- Installment Count — Total payments before the subscription ends automatically
- Total Price — Auto-calculated total (Installment Price × Count)
Setup fee (Toggle — Optional) Charge a one-time fee at signup for this variation:
- Setup fee label — The customer-facing name (e.g.,
Activation Fee) - Setup fee amount — The one-time amount
Calculate profit/cost (Toggle — Optional) Track your internal Cost per item, Profit, and Margin for this subscription variation.
INFO
For the complete, field-by-field reference on every pricing option — including the full breakdown of all interval choices, installment plans, setup fees, trial periods, and the Add Package walkthrough — see the Configuring Product Pricing & Variations guide.
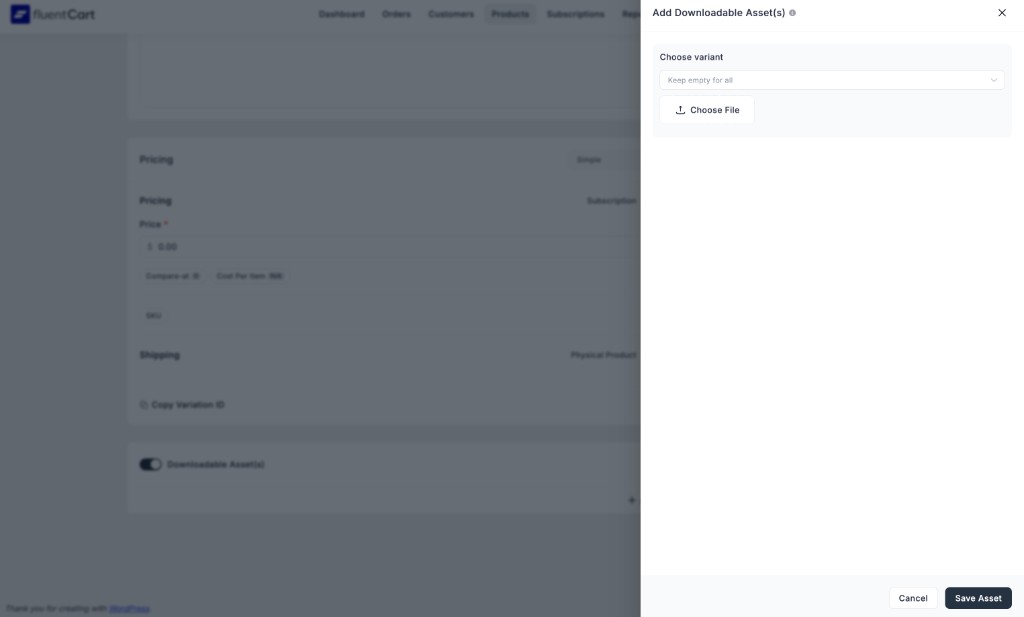
5. Downloadable Asset(s)
This is where you attach the actual files your customers will receive after purchase. Toggle the Downloadable Asset(s) switch on to enable the section, then click + Add to attach your first file.

The Add Downloadable Asset(s) modal opens with the following options:
- Choose variant (Optional) — If your product has multiple variations, select the specific variant this file belongs to. Leave it empty to make the asset available across all variants.
- Choose File — Click this button to open the Storage Providers modal and pick or upload your file.
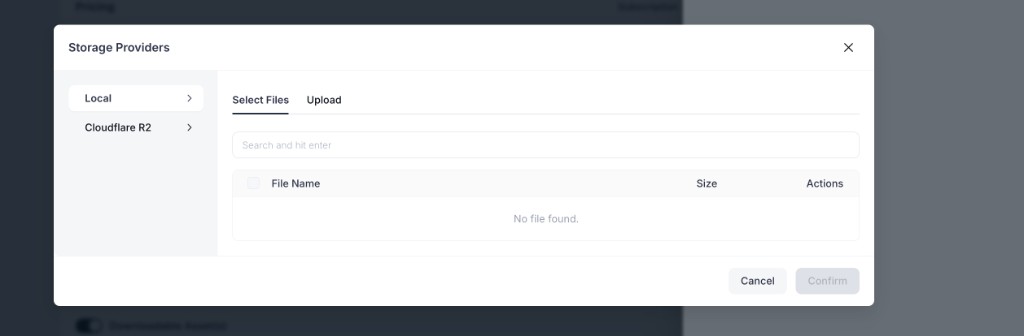
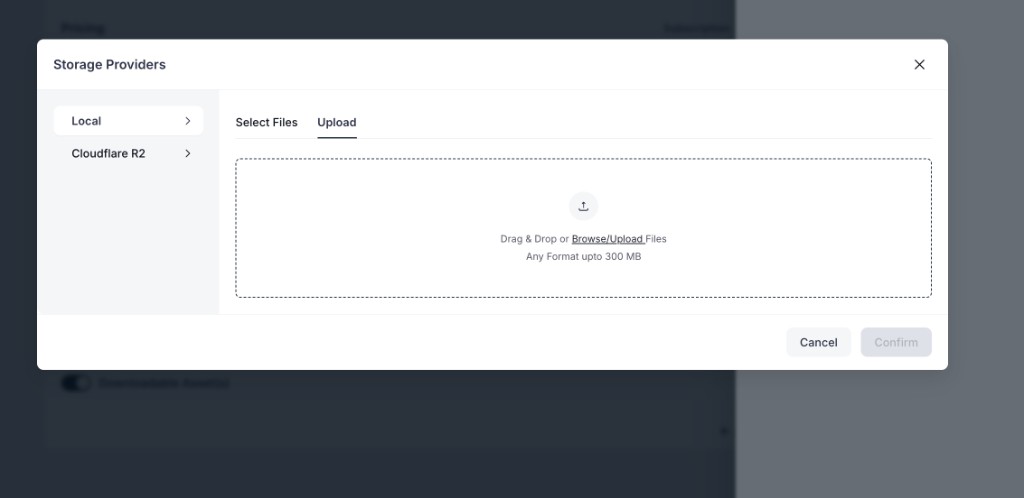
Storage Providers modal
The Storage Providers modal is where you manage and select the file to attach. The left panel lists your configured providers — Local (your WordPress server) and Cloudflare R2 if you have it connected. Select a provider to load its contents on the right.
Each provider offers two tabs:
Select Files — Browse files already uploaded to that provider. Use the search bar to find a file by name, check the box next to it, and click Confirm to attach it.
Upload — Drag and drop a new file directly onto the upload area, or click Browse/Upload Files to pick one from your computer. Any file format is accepted, up to 300 MB per file.
Once you've selected or uploaded your file, click Confirm to return to the asset modal, then click Save Asset to attach it to your product.
6. Digital Product Licensed
This is one of the most important features for your store if you sell products like software, plugins, or themes that need a license key for activation. By adding a digital license, you can control how your product is used, how many times it can be activated, and for how long it remains valid. This helps protect your hard work and manage customer access properly.
To learn more, read this documentation of the Digital Product License
Shipping Class
You can assign a Shipping Class to any product to apply location-based shipping costs.
To add a shipping class:
- Scroll to the Shipping Class section (right side of the product edit screen).
- Select or create a shipping class (e.g., NYC Zone).
- The defined shipping cost will automatically apply at checkout for that region.
Shipping classes work with Shipping Zones and Shipping Methods to control how and where you deliver products.
Note: Digital products typically don’t require shipping, but you can still assign a class if needed for special handling or hybrid products.
INFO
To learn more about how shipping classes work, see the Understanding Shipping Classes guide.
Publishing Your Digital Product
Once you have configured all the necessary details:
- Set the Status to "Published" in the "Publishing" section.
- Click the "Update" (or "Save") button on the top right to make your digital product live in your store.