Appearance
Fluent Support Integration
Connecting FluentCart with Fluent Support links your e-commerce store to your helpdesk system. This integration provides crucial purchase information directly to your support agents and creates a unified experience for your customers, making your support process faster and more efficient.
This guide will walk you through setting up the integration and explain how to use its key features step-by-step.
Step 1: Enabling the Integration in FluentCart
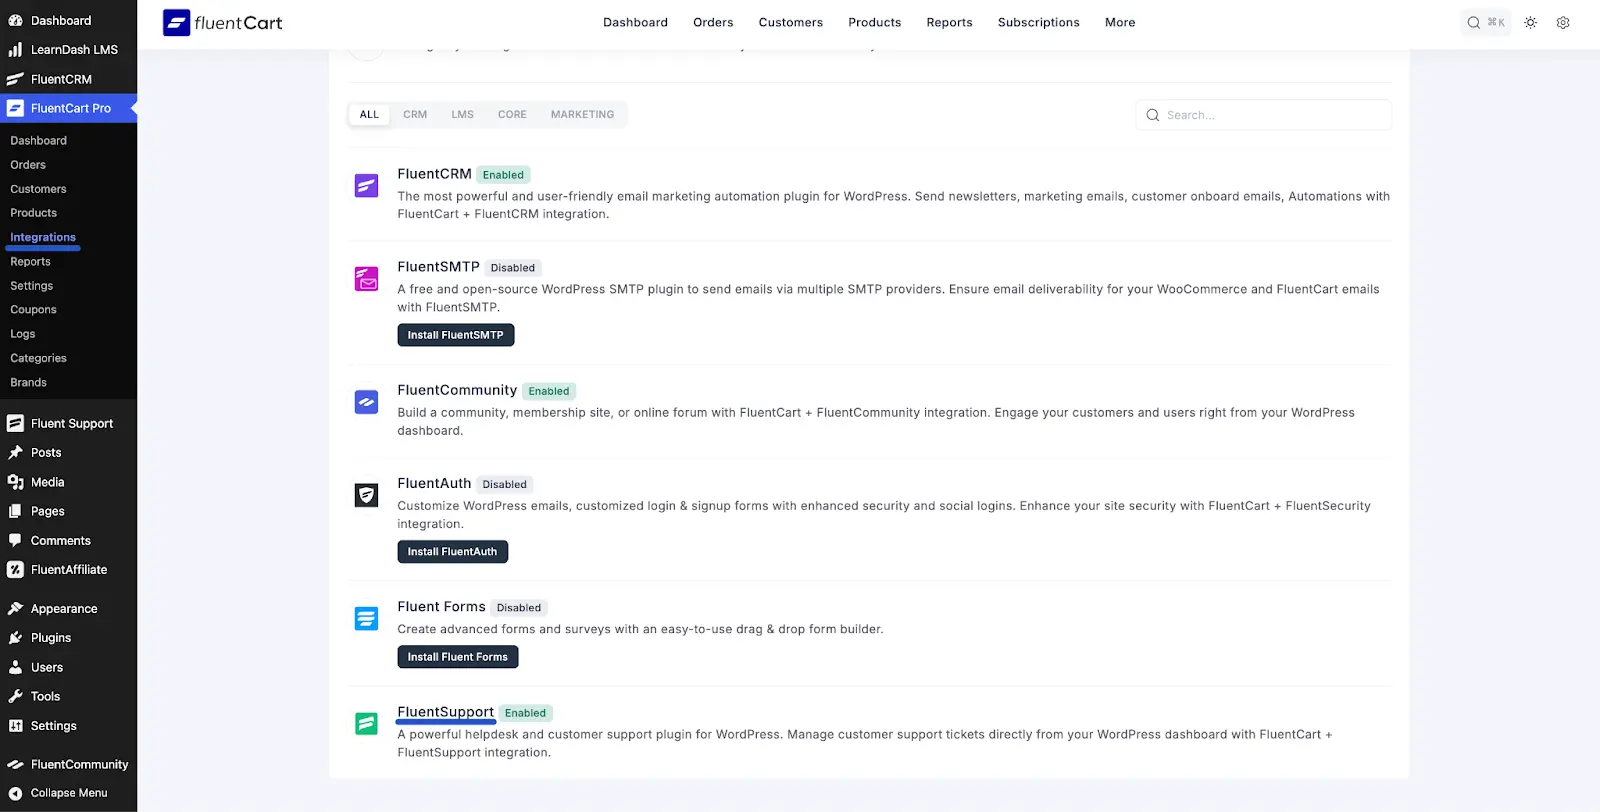
First, ensure both FluentCart and Fluent Support are installed and active on your WordPress site. The core connection happens automatically. To confirm it's active:
- From your WordPress dashboard, navigate to FluentCart Pro > Integrations.
- Scroll down to the Integration Modules section.
- Locate the Fluent Support module.
- You should see a green Enabled status badge. This means FluentCart recognizes Fluent Support, and the basic connection is active. No further action is needed here.
Step 2: Creating Custom Fields in Fluent Support
To get the most out of the integration, you can create special "Custom Fields" in Fluent Support. These fields allow you (or your customers) to link a support ticket directly to a specific FluentCart Product or Order. Also, you can create Workflows in Fluent Support with these custom fields.
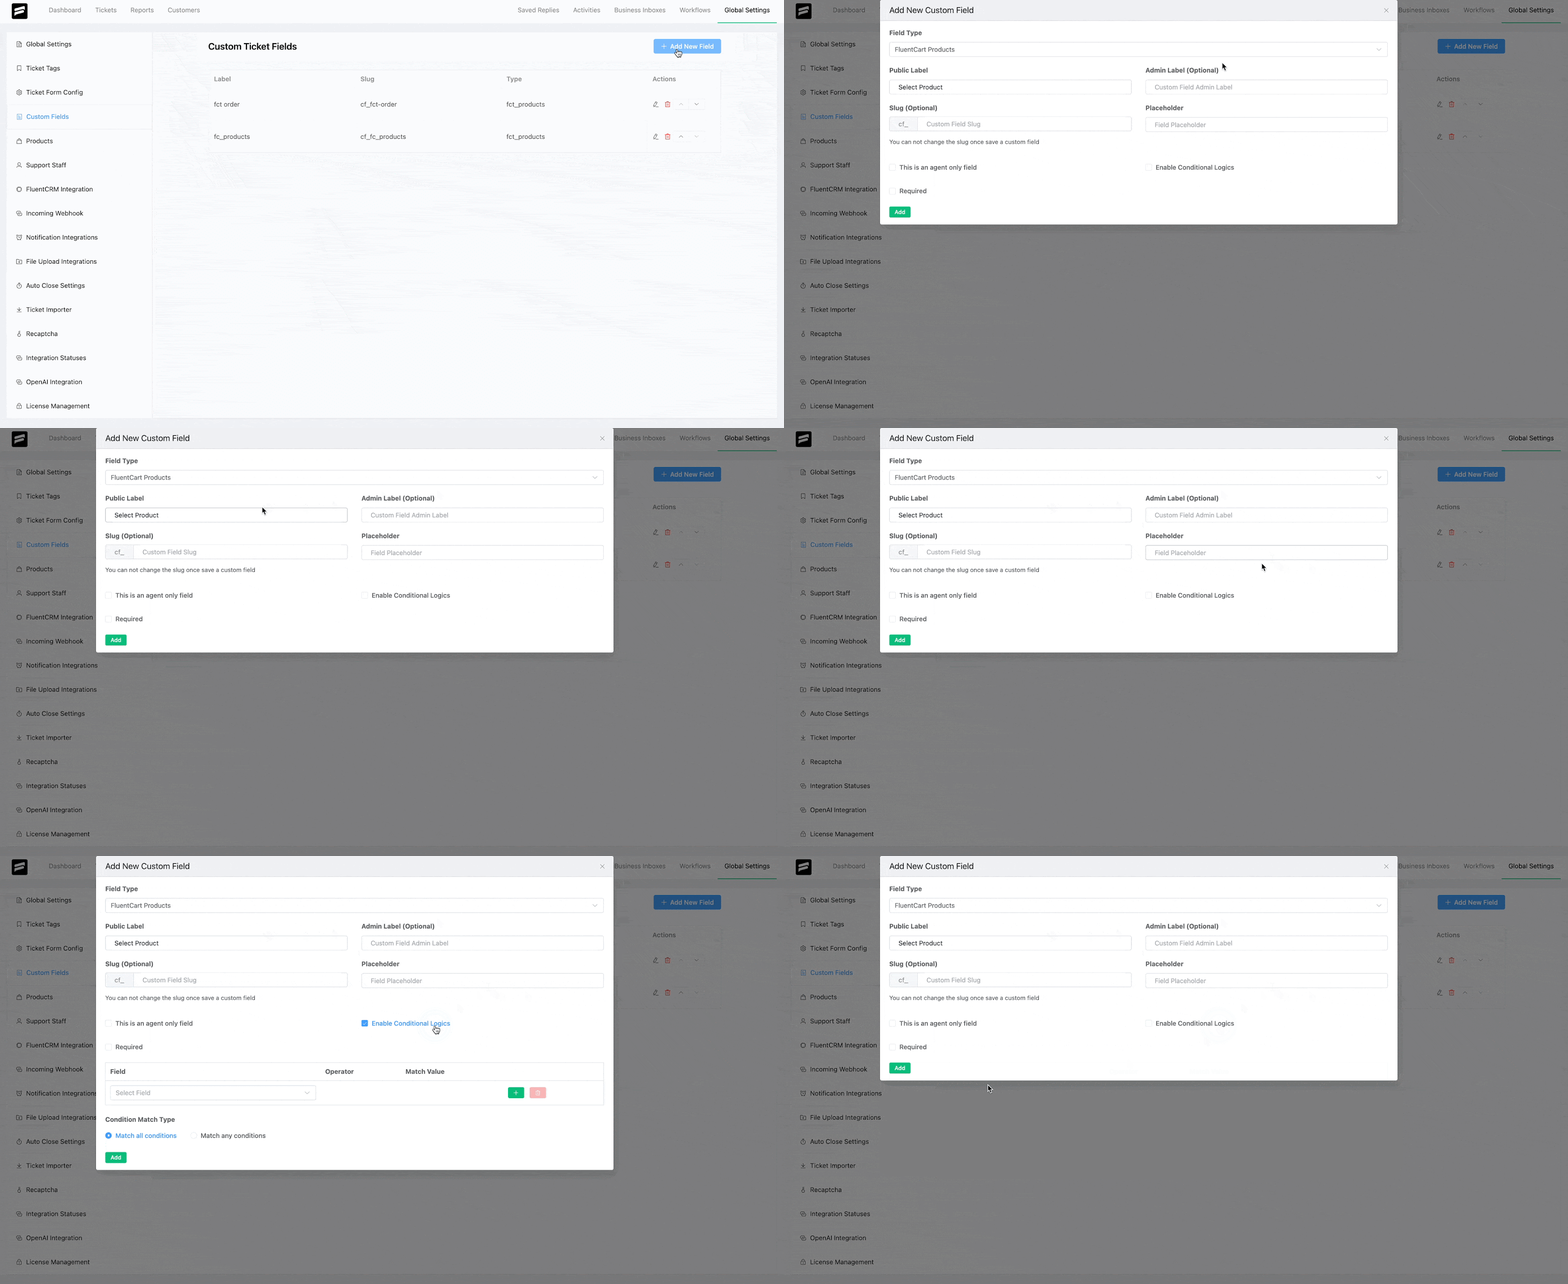
- From your WordPress dashboard, navigate to Fluent Support > Custom Fields.
- Click the + Add New Field button at the top right.
- A pop-up window will appear. Configure the field:
- Field Type: This is the most important setting. Choose either FluentCart Products or FluentCart Orders from the dropdown list.
- Public Label: Enter the name that customers will see (e.g., "Related Product" or "Order Number").
- Admin Label (Optional): Enter a different name that only your support agents will see internally.
- Slug (Optional): A unique internal identifier (usually generated automatically).
- Placeholder (Optional): Text that appears in the field before the user selects something.
- This is an agent only field: Check this if you want the field to be visible only to your support agents inside the ticket, not on the public submission form.
- Required: Check this if you want to force customers to select a product/order when submitting a ticket.
- Enable Conditional Logics (Optional): Set up rules to show or hide this field based on other selections in the form.
- Click the Add button to save your new custom field.
You can repeat this process to create separate fields for both Products and Orders if needed.
Step 3: Using Workflows
Now that you have created FluentCart custom fields, you can use them to automate tasks in Fluent Support using Automatic Workflows. This allows you to automatically route tickets or apply tags based on the product a customer selects.
- Navigate to Fluent Support > Workflows.
- Click on the + Add New Workflow button.
- Give your workflow a name (e.g., "Assign Product X Tickets") and choose Automatic as the Workflow Type. Click Continue.

- Set Trigger & Conditions:
- Set the Workflow Trigger from the dropdown field, like On Ticket Creation.
- Under Conditions, click + Add Condition.
- Select your custom field you have created for FluentCart products or orders, choose the rule (like Equal), and select the specific FluentCart product or order you want this rule to apply to.
- Set Workflow Actions (Tasks): Choose what should happen automatically when a ticket matches your conditions from the Action dropdown field. For example, select Assign Agent and choose the team or agent who specializes in that product.
- Set the workflow Status to Published and click Update Workflow.
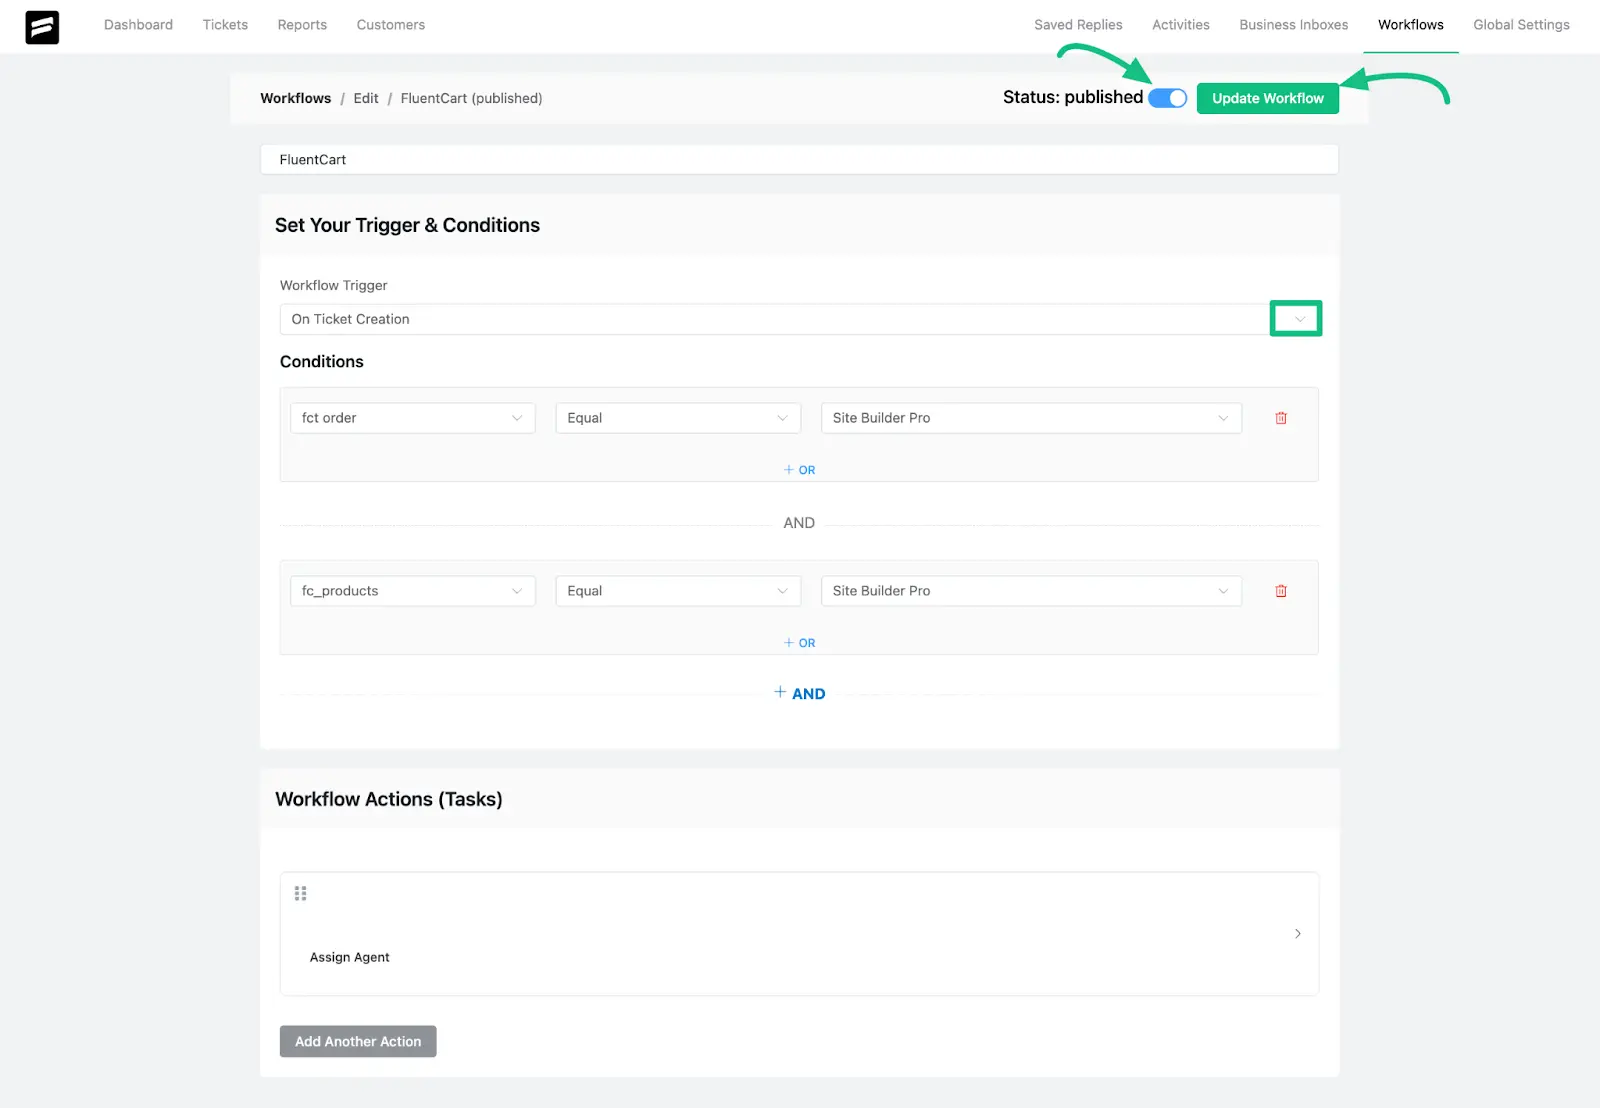
Now, whenever a customer submits a ticket and selects that specific product, the workflow will run automatically!
Step 4: Add Support Portal to the FluentCart User Dashboard
Provide a great experience by adding a dedicated support section directly into the FluentCart customer account area.
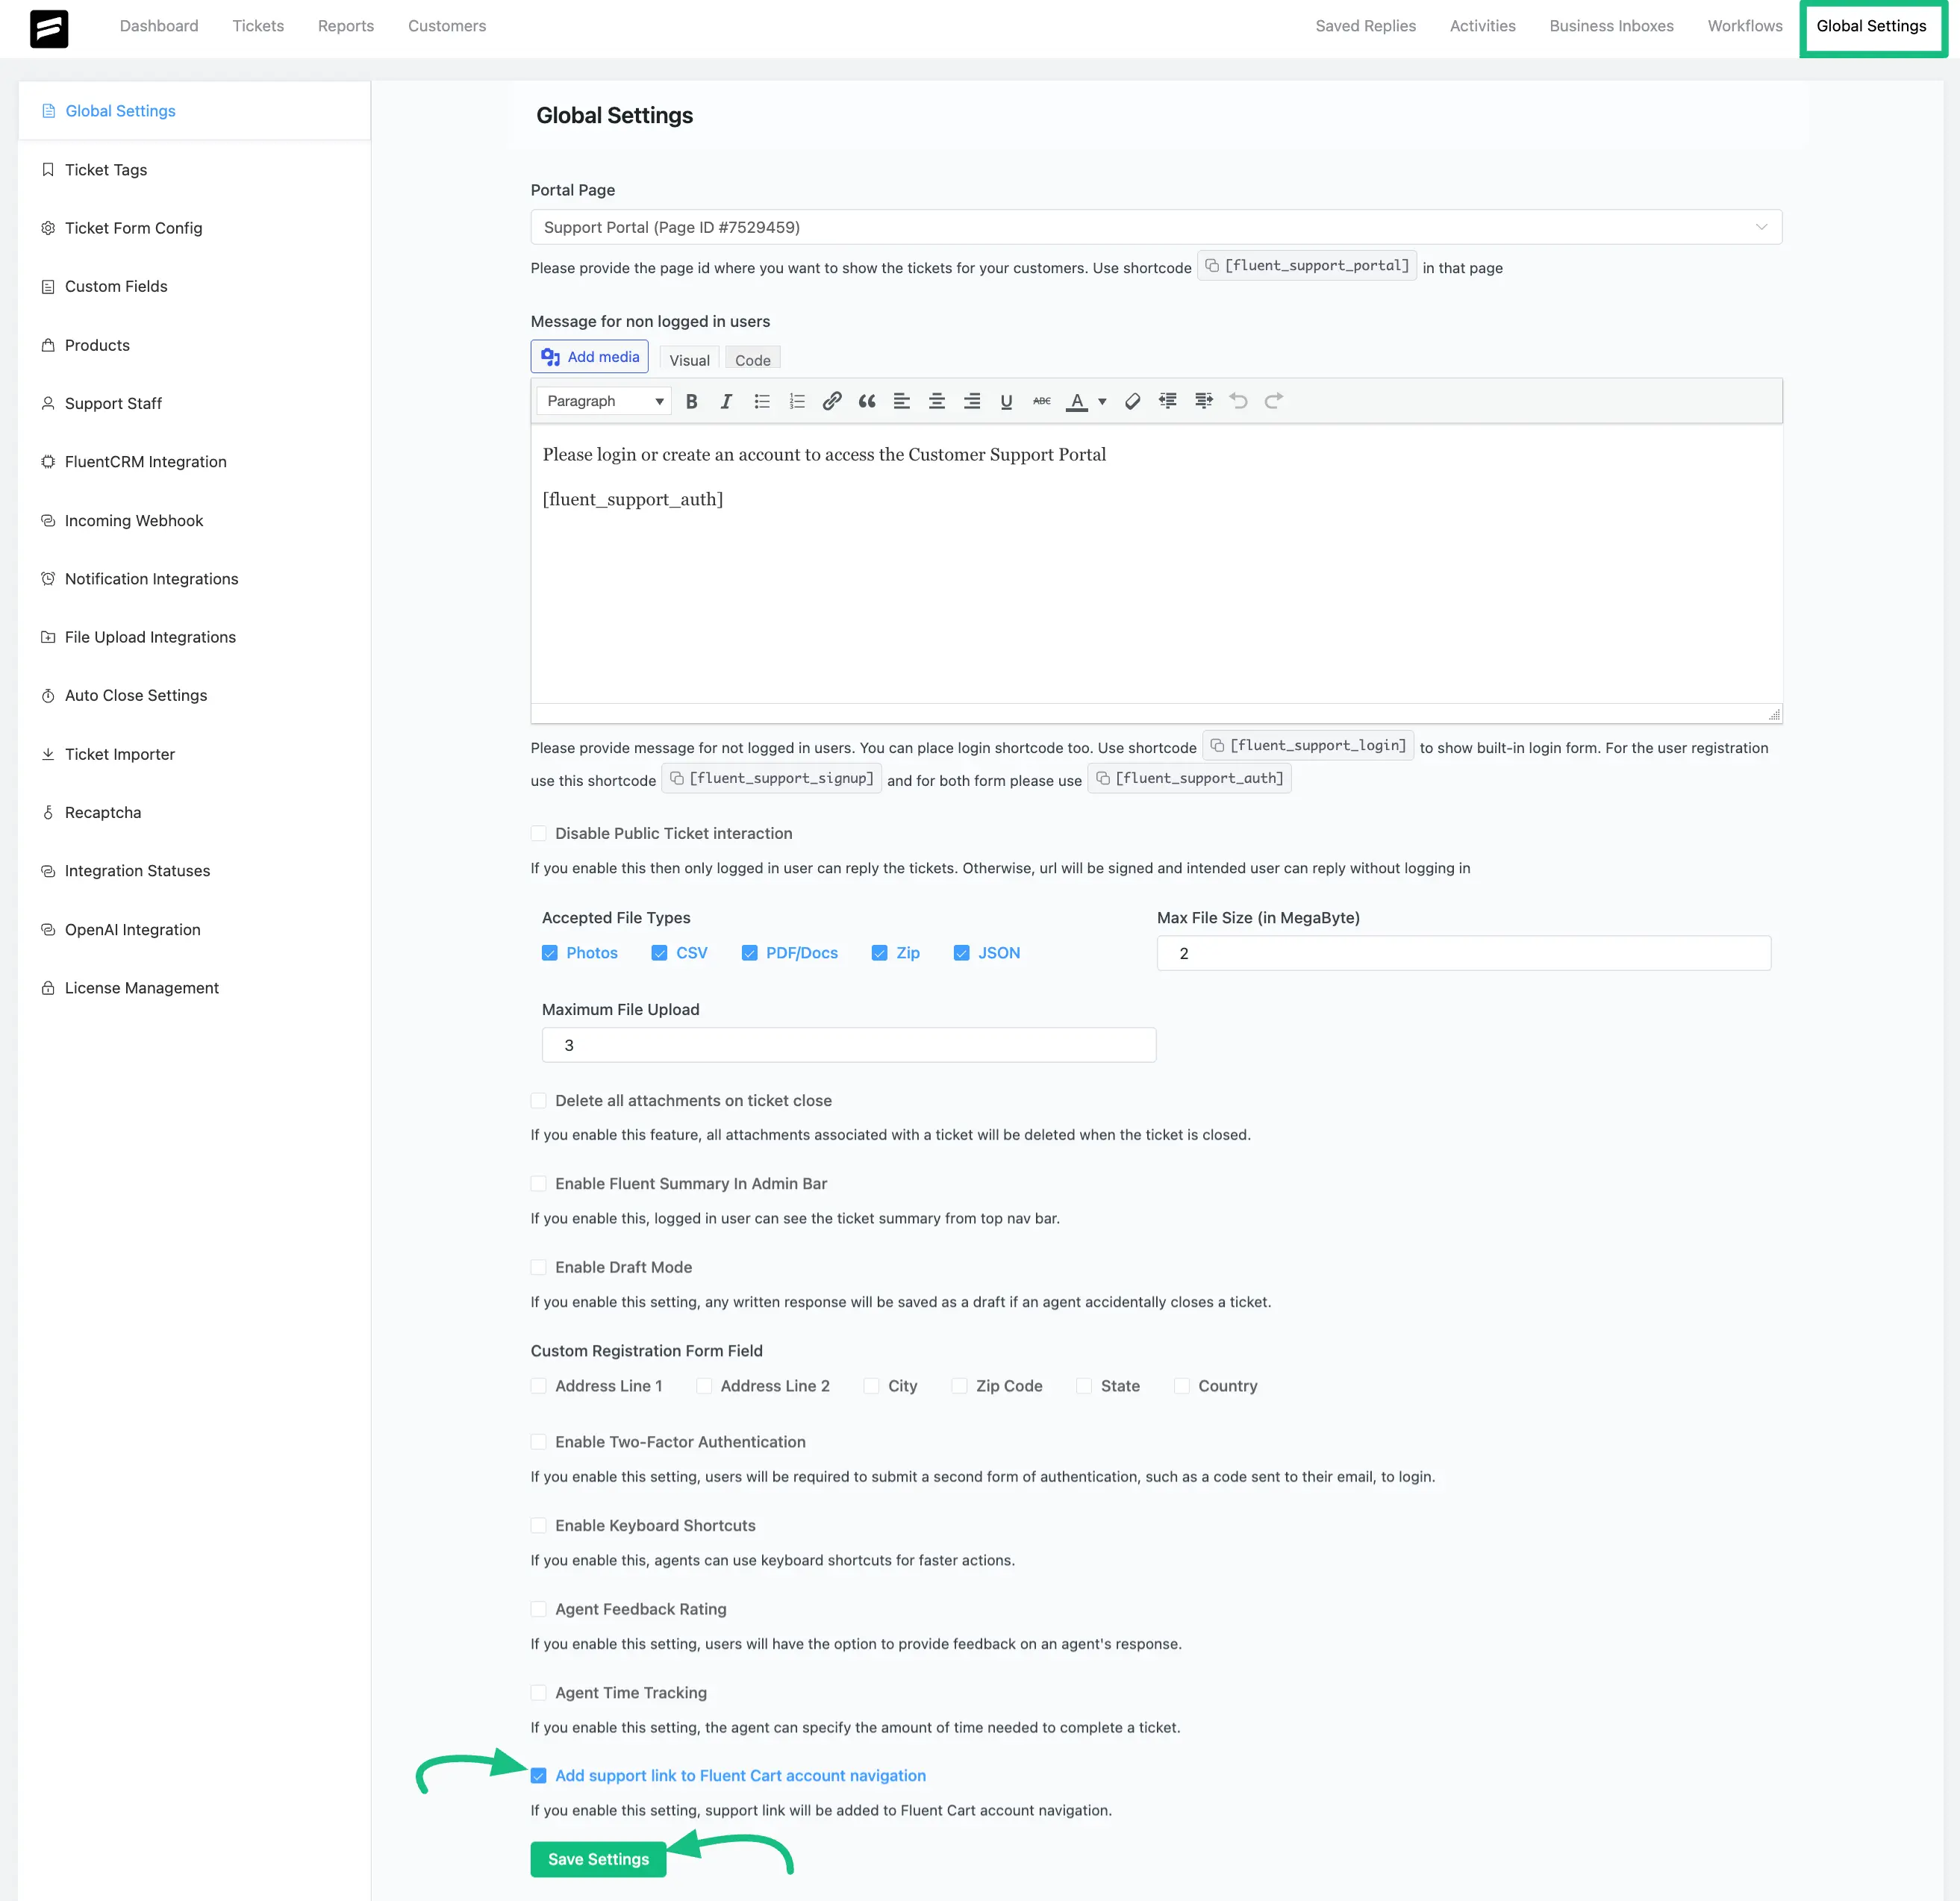
- Navigate to Fluent Support > Global Settings.
- Scroll down to the bottom of the page.
- Check the box labeled Add support link to Fluent Cart account navigation.
- Click Save Settings.
The Result: A new Support tab will now appear in the FluentCart customer dashboard (/account/Support). Customers can click this tab to view their existing support tickets and submit new ones without leaving your store's account area.
Step 5: Linking Tickets to Products/Orders (Customer Experience)
With the custom fields added to your ticket form (Step 2), customers can easily link their support requests to their purchases when submitting a ticket through the portal.
- When a customer navigates to the "Support" tab in their FluentCart dashboard and clicks + Create Ticket (or uses your main support page).
- They will be able to see the custom fields you added (e.g., "Product/Order").
- The dropdown menu for this field will show the products from your FluentCart store.
- The customer selects the relevant product or order from the dropdown list.
- They fill out the rest of the ticket details and click Create Ticket.
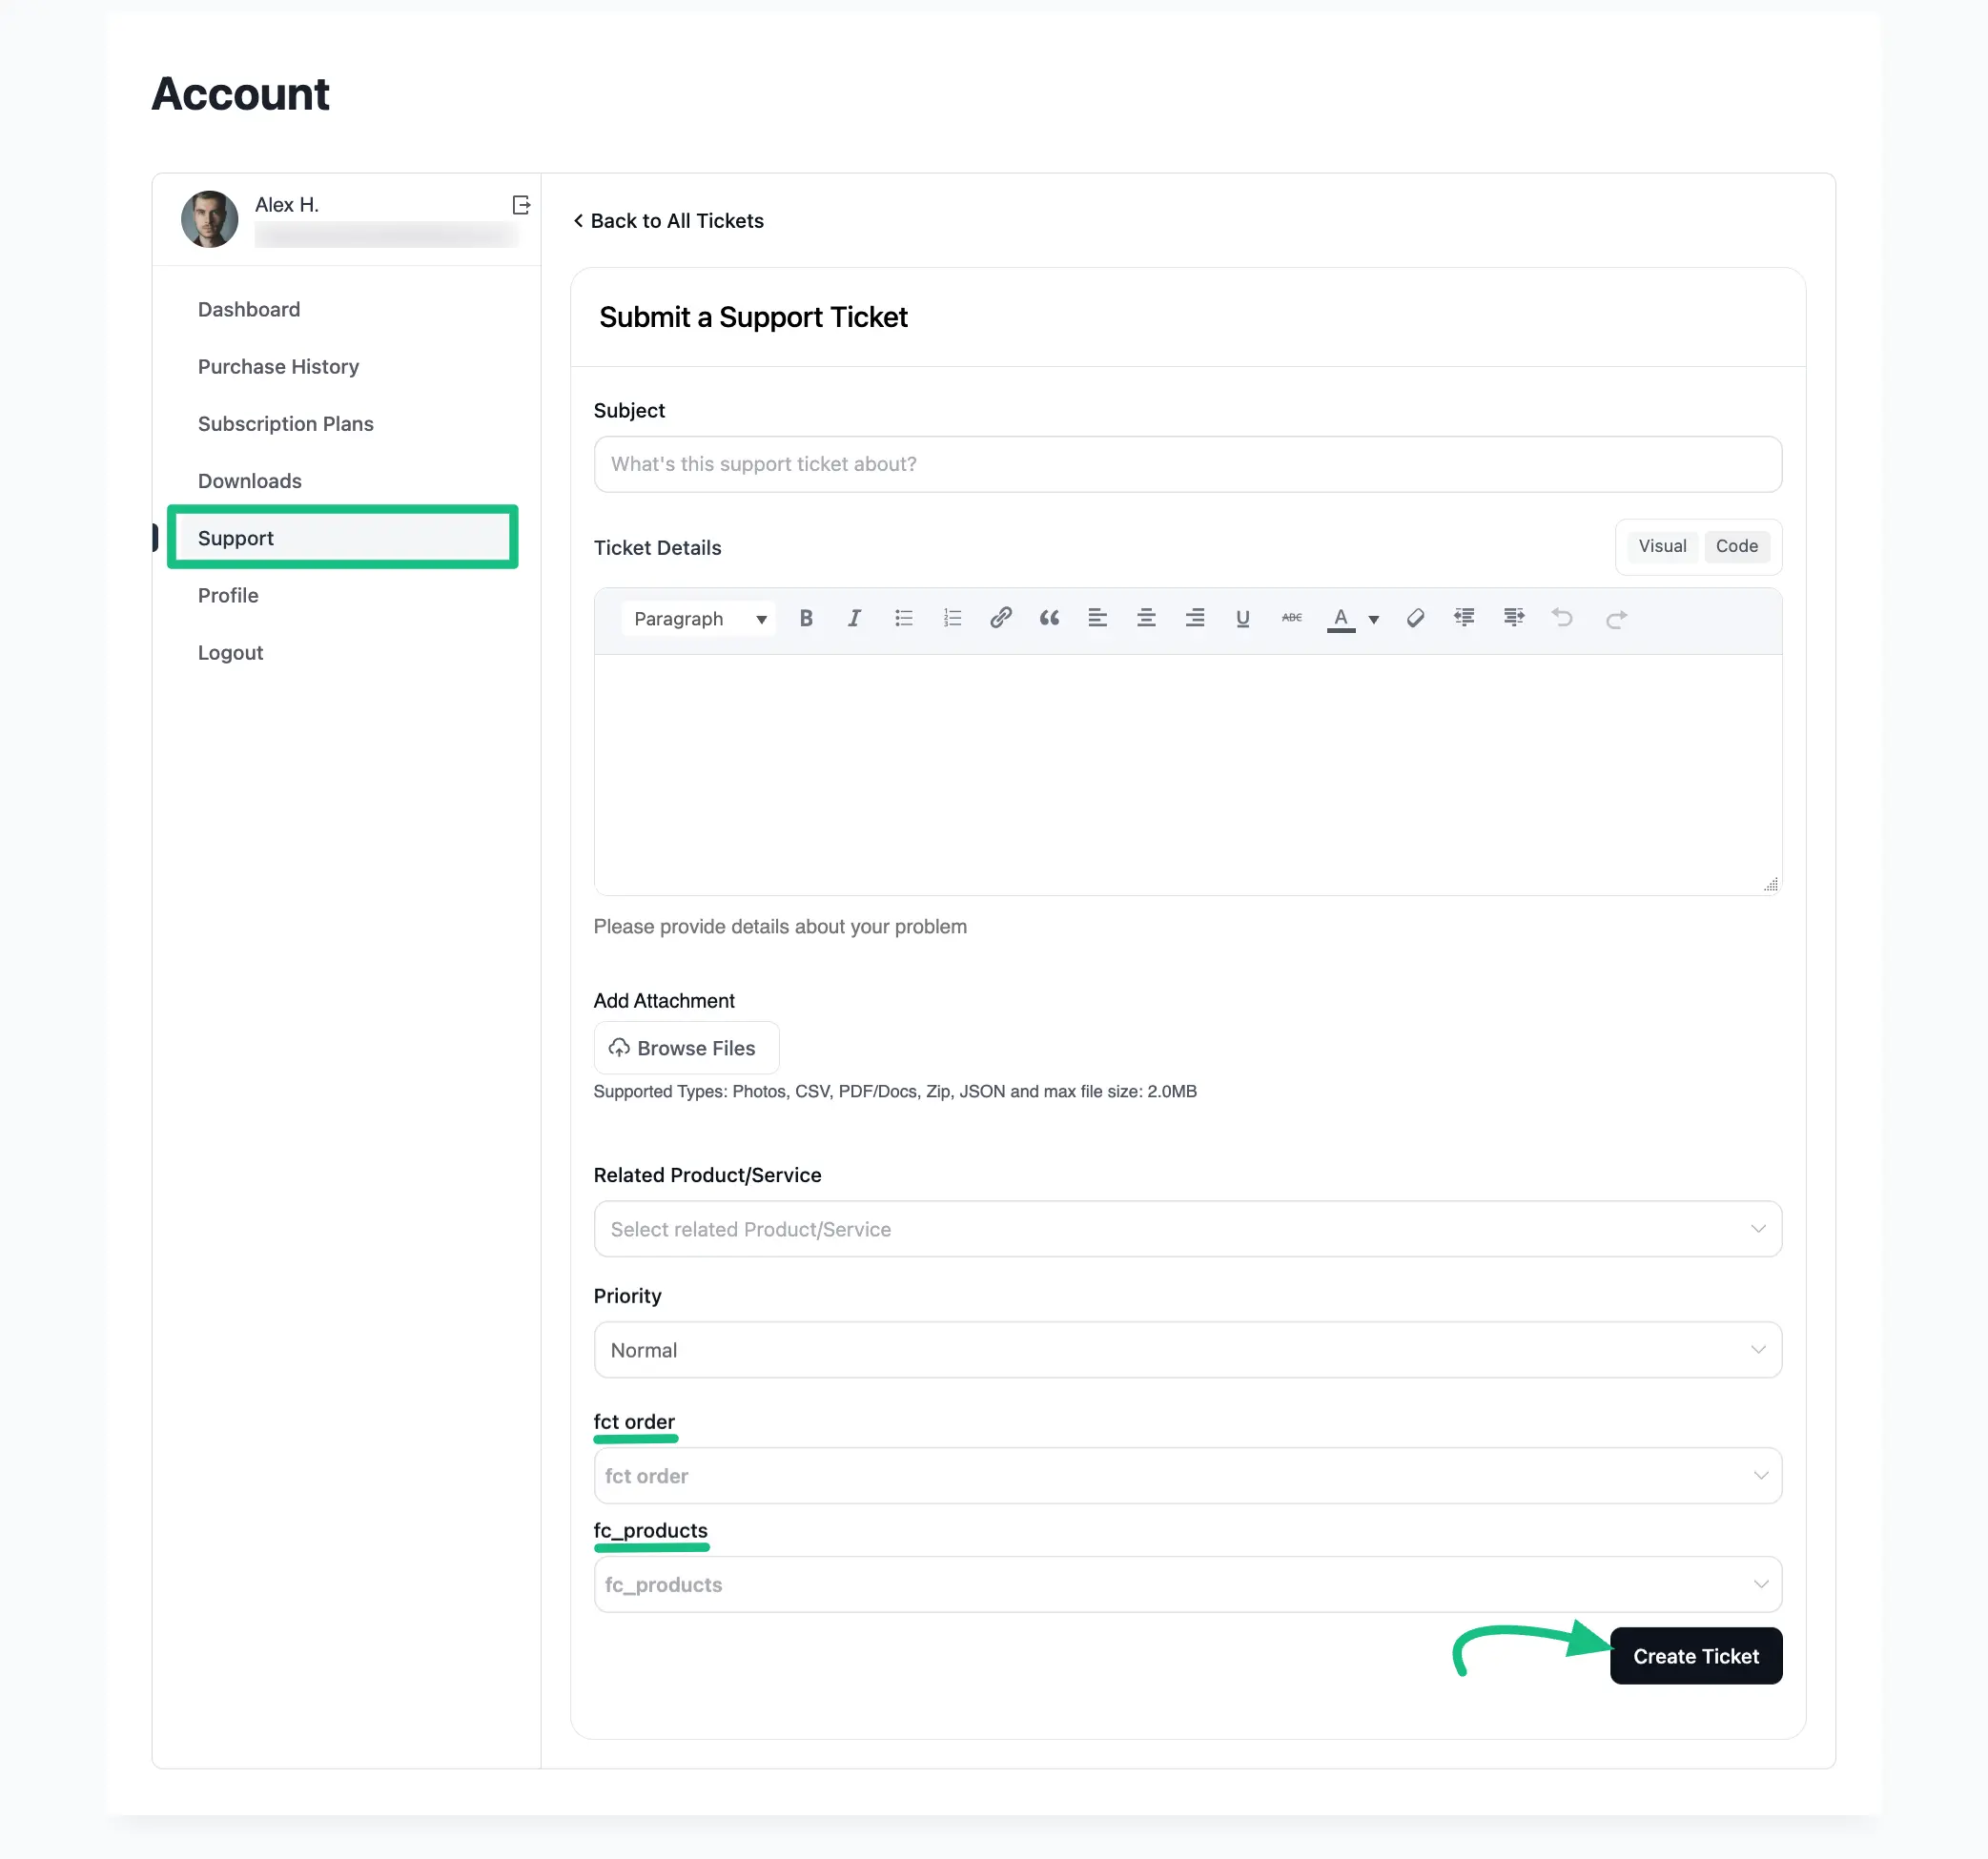
This ensures that when the ticket arrives in your helpdesk, it's already linked to the specific purchase the customer needs help with, providing instant context for your agents.
Step 6: Viewing Purchase History in Tickets (Widget)
This feature requires no extra setup and works automatically thanks to the integration. It provides invaluable context for your support agents.
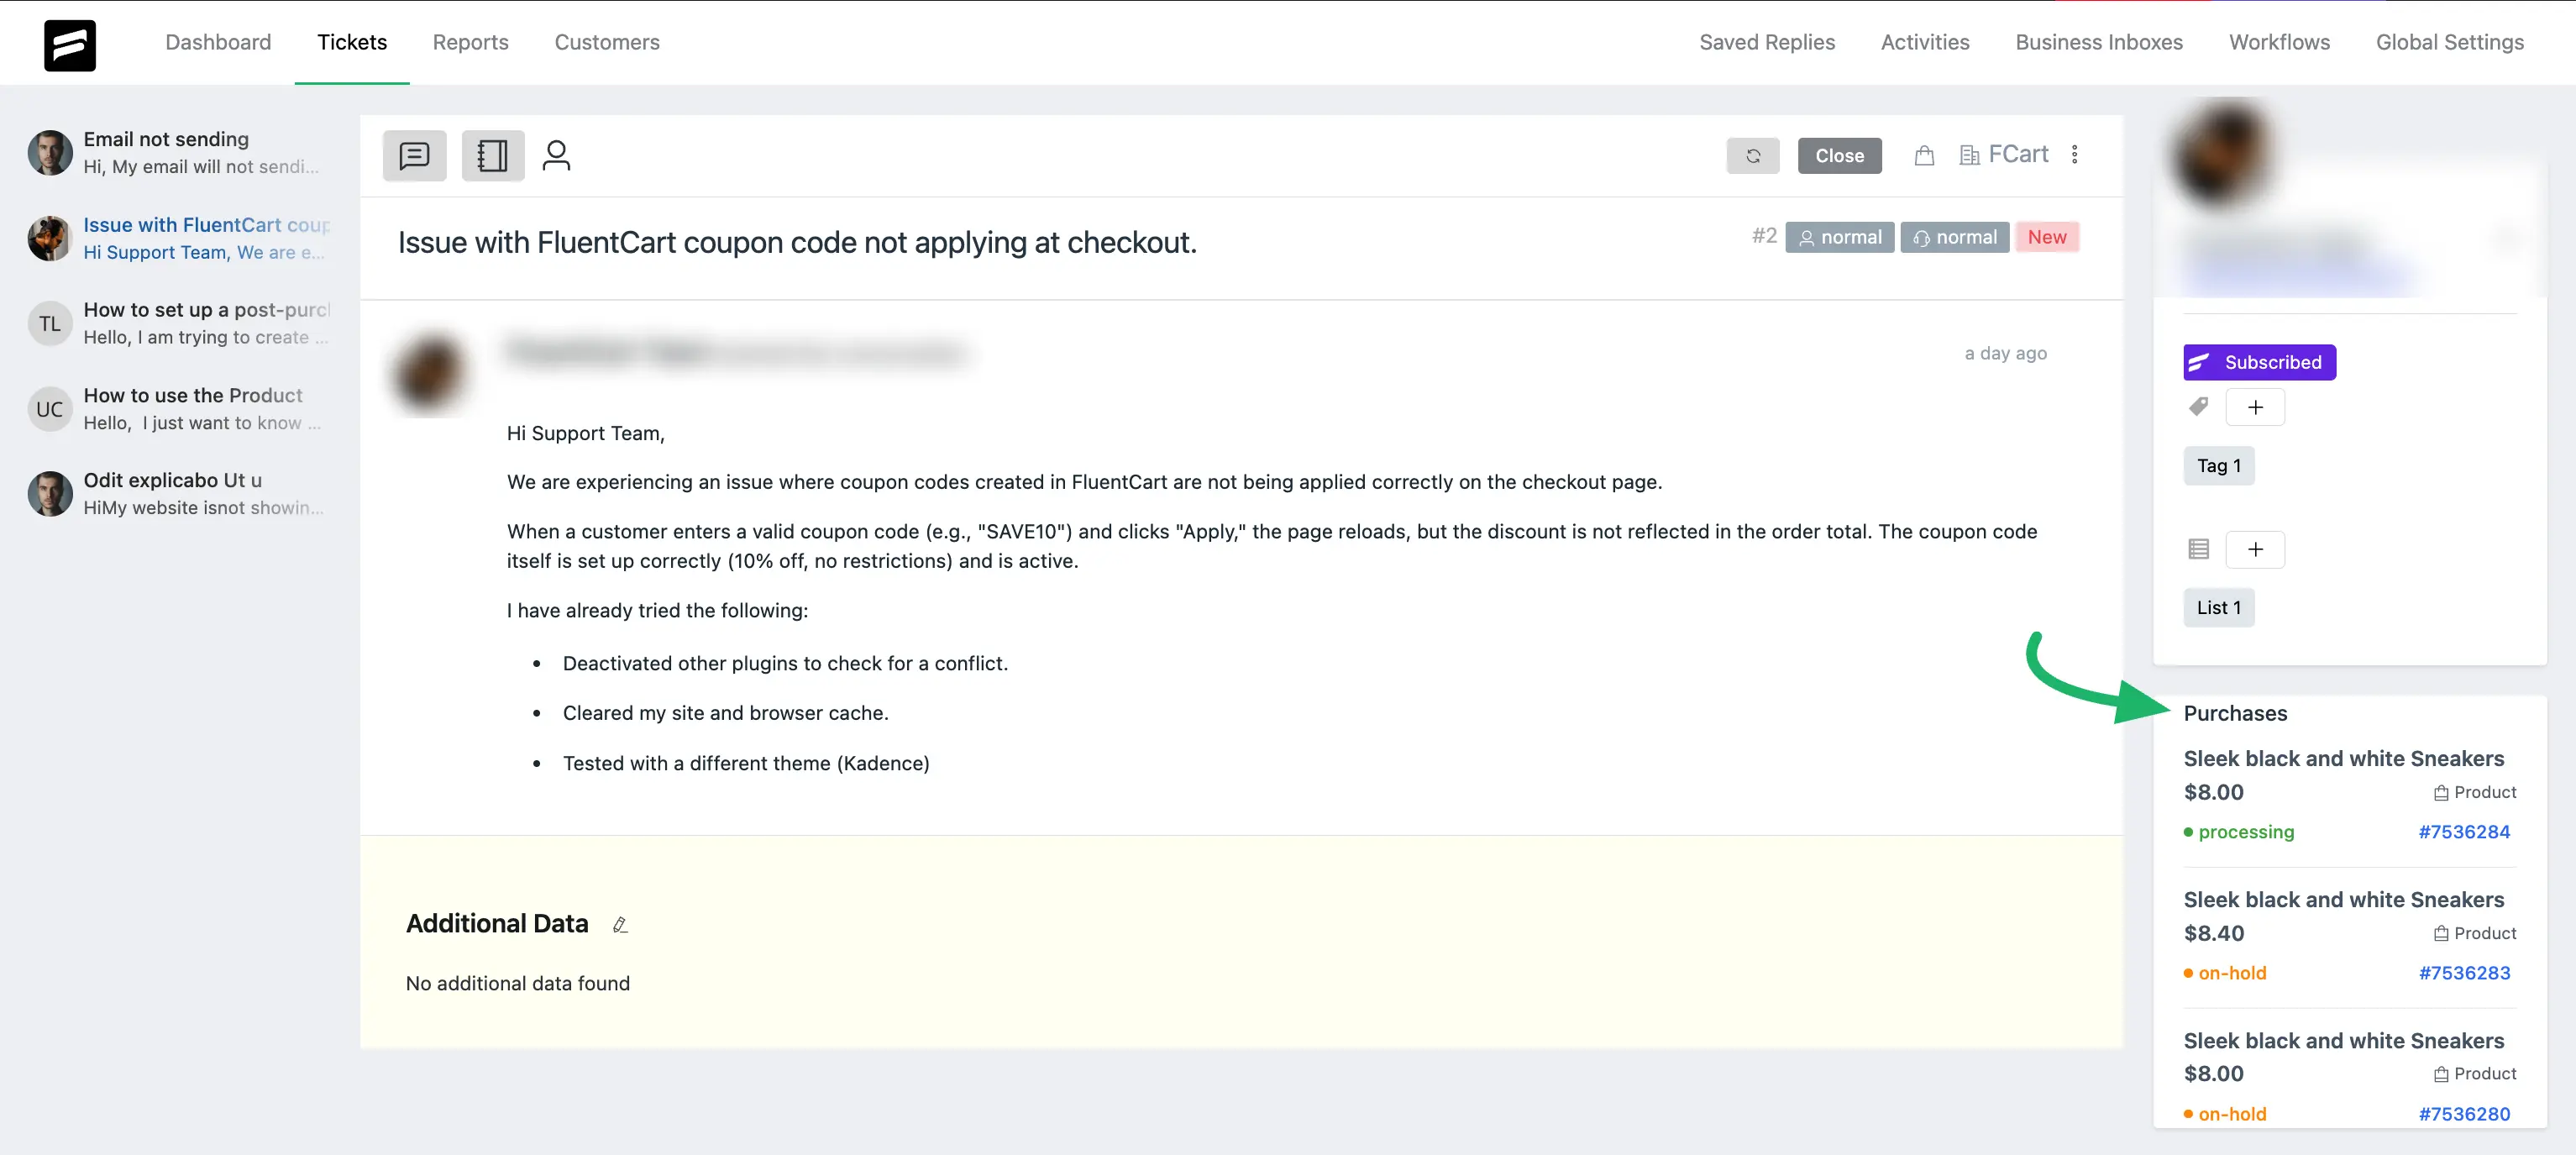
- When a support agent opens any ticket in Fluent Support > Tickets.
- Look at the right-hand sidebar. A Purchases widget will automatically appear if the customer who submitted the ticket has any purchase history in your FluentCart store.
- What it shows: This widget displays key information:
- Customer's Lifetime Value.
- A list of their recent FluentCart purchases, including product names, prices, order statuses, and direct links (#) to the orders in FluentCart.
- Subscription details (if applicable).
- License keys (if applicable).
- Benefit: Your agents get immediate access to the customer's purchase history without needing to ask or switch screens. This allows them to understand the context quickly and provide faster, more accurate support.
By following these steps and understanding these features, you can fully leverage the FluentCart-Fluent Support integration to create a highly efficient support system and a seamless experience for your customers.
