Appearance
Order Bump
The Order Bump feature in FluentCart allows you to present a last-minute, complementary product offer directly on the checkout page. This simple, high-converting technique encourages customers to add an extra item to their cart before completing their purchase, significantly increasing your average order value (AOV).
1. Enabling the Order Bump Feature
Before you can create any order bumps, you must first activate the feature in your store settings.
- Go to FluentCart Pro in your WordPress dashboard.
- Navigate to Settings from the left-hand menu.
- Click on the Features & Addon tab.
- Locate the Order Bump toggle and switch it to Active.
- Click the Save Settings button to confirm the change.

2. Creating a New Order Bump Offer
Once the feature is active, you can create and manage your offers.
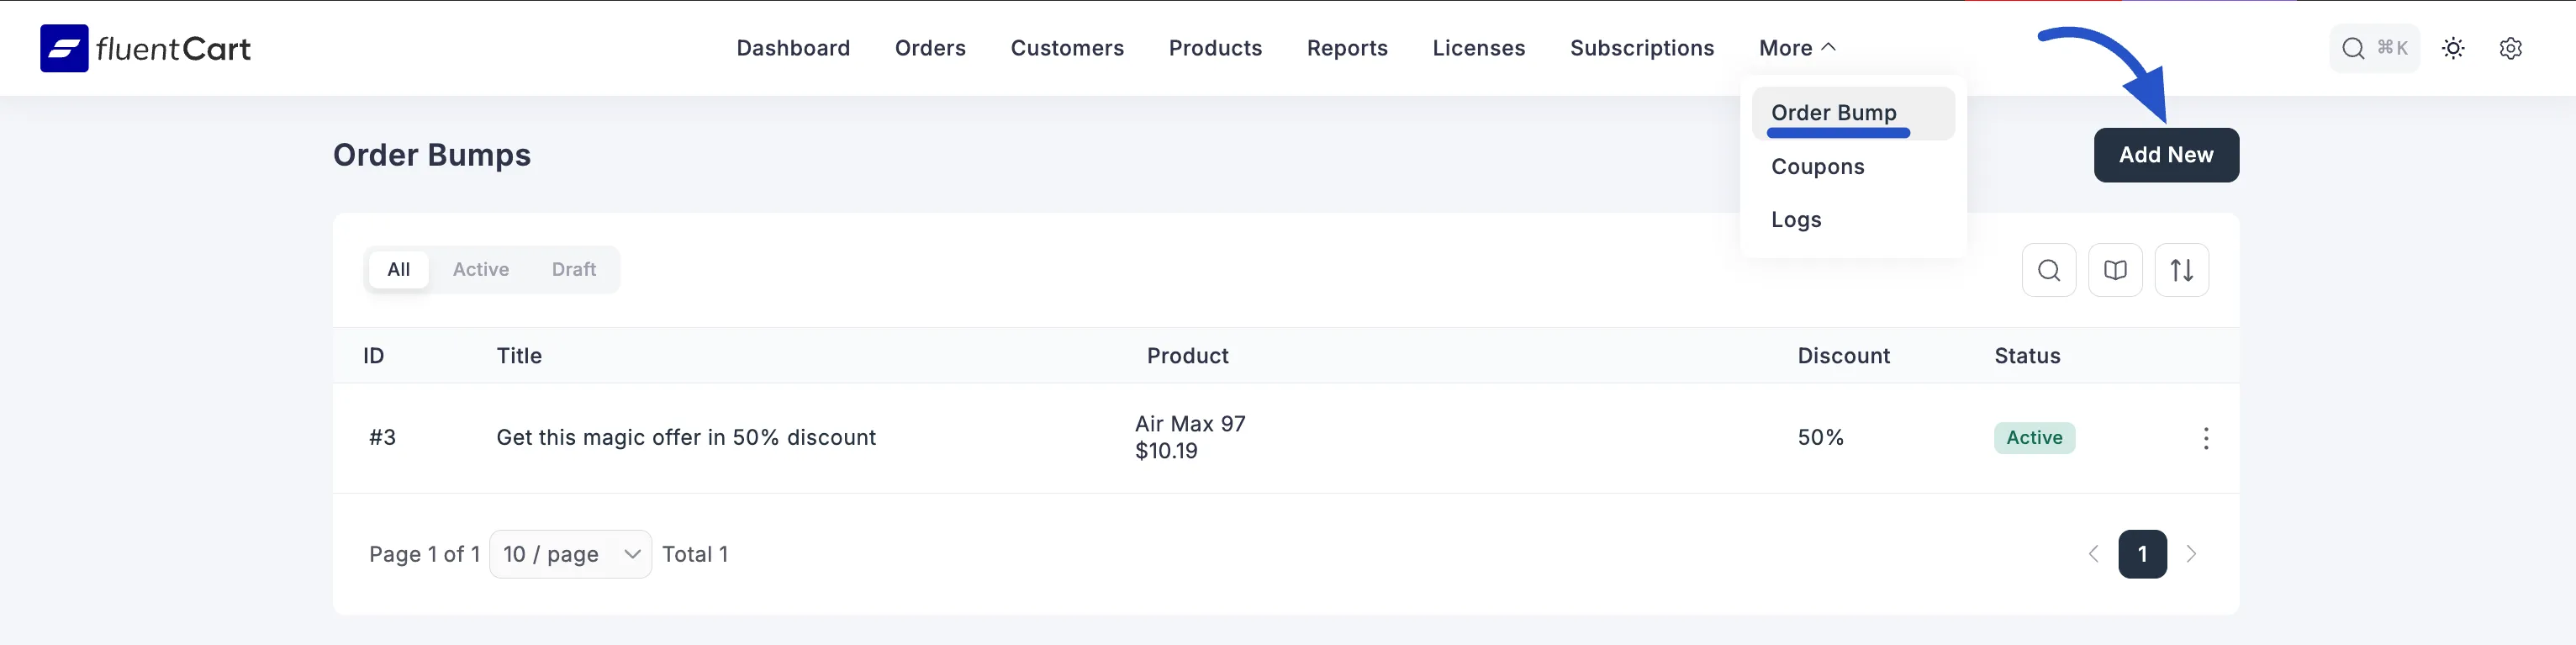
- Navigate to the main FluentCart Pro menu.
- Hover over the More menu item in the top navigation bar.
- Click on Order Bump. This will take you to the Order Bumps management screen.
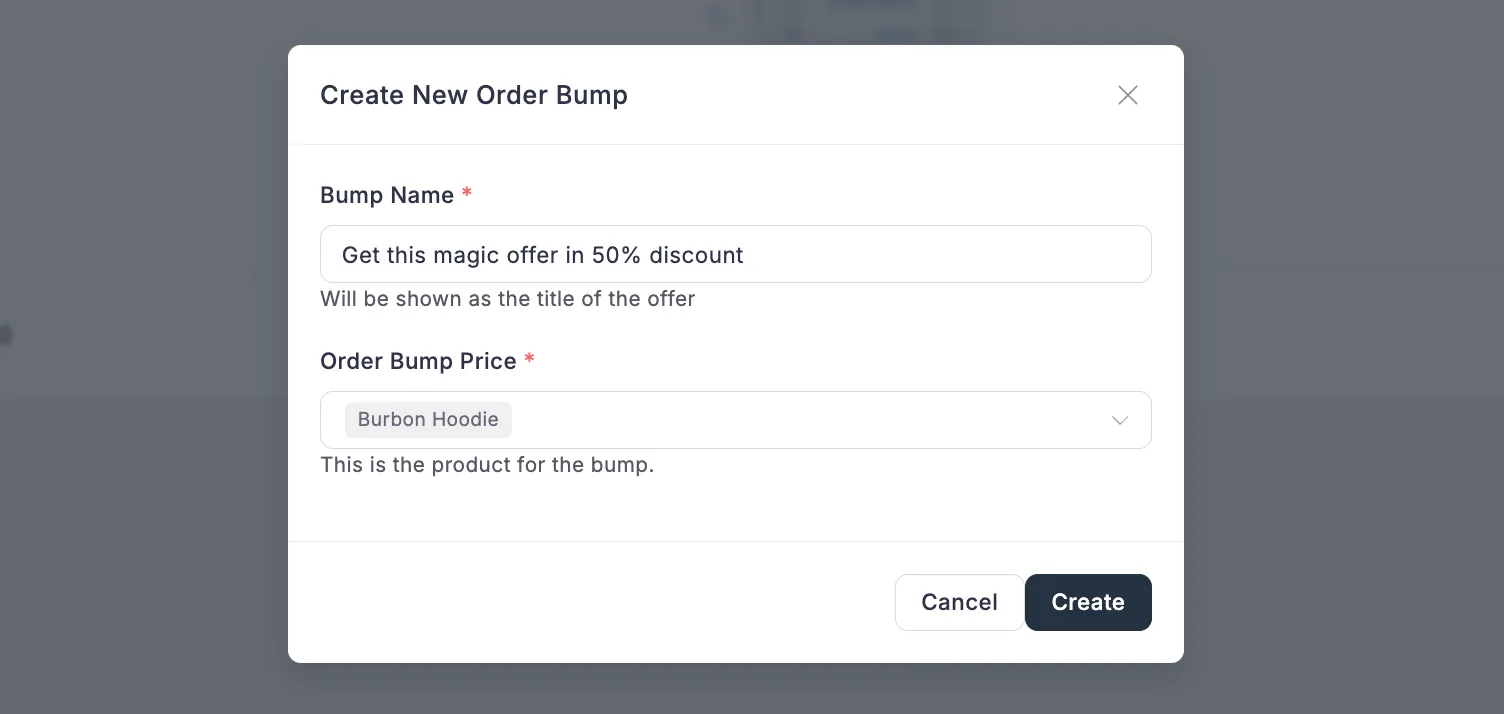
- Click the Add New button on the top right to create a new offer. A pop-up window will appear where you need to define the initial details of your offer.
To start creating your new offer, you must first define its core identity:
- Bump Name: Enter the main title for your offer. This is the compelling headline that customers will see, so make it attractive.
- Order Bump Product: From the dropdown menu, select the product that you want to offer as the order bump.
Click the Create button.
After clicking "Create," you will be taken to the main configuration screen to set up the rest of your order bump's rules and design.
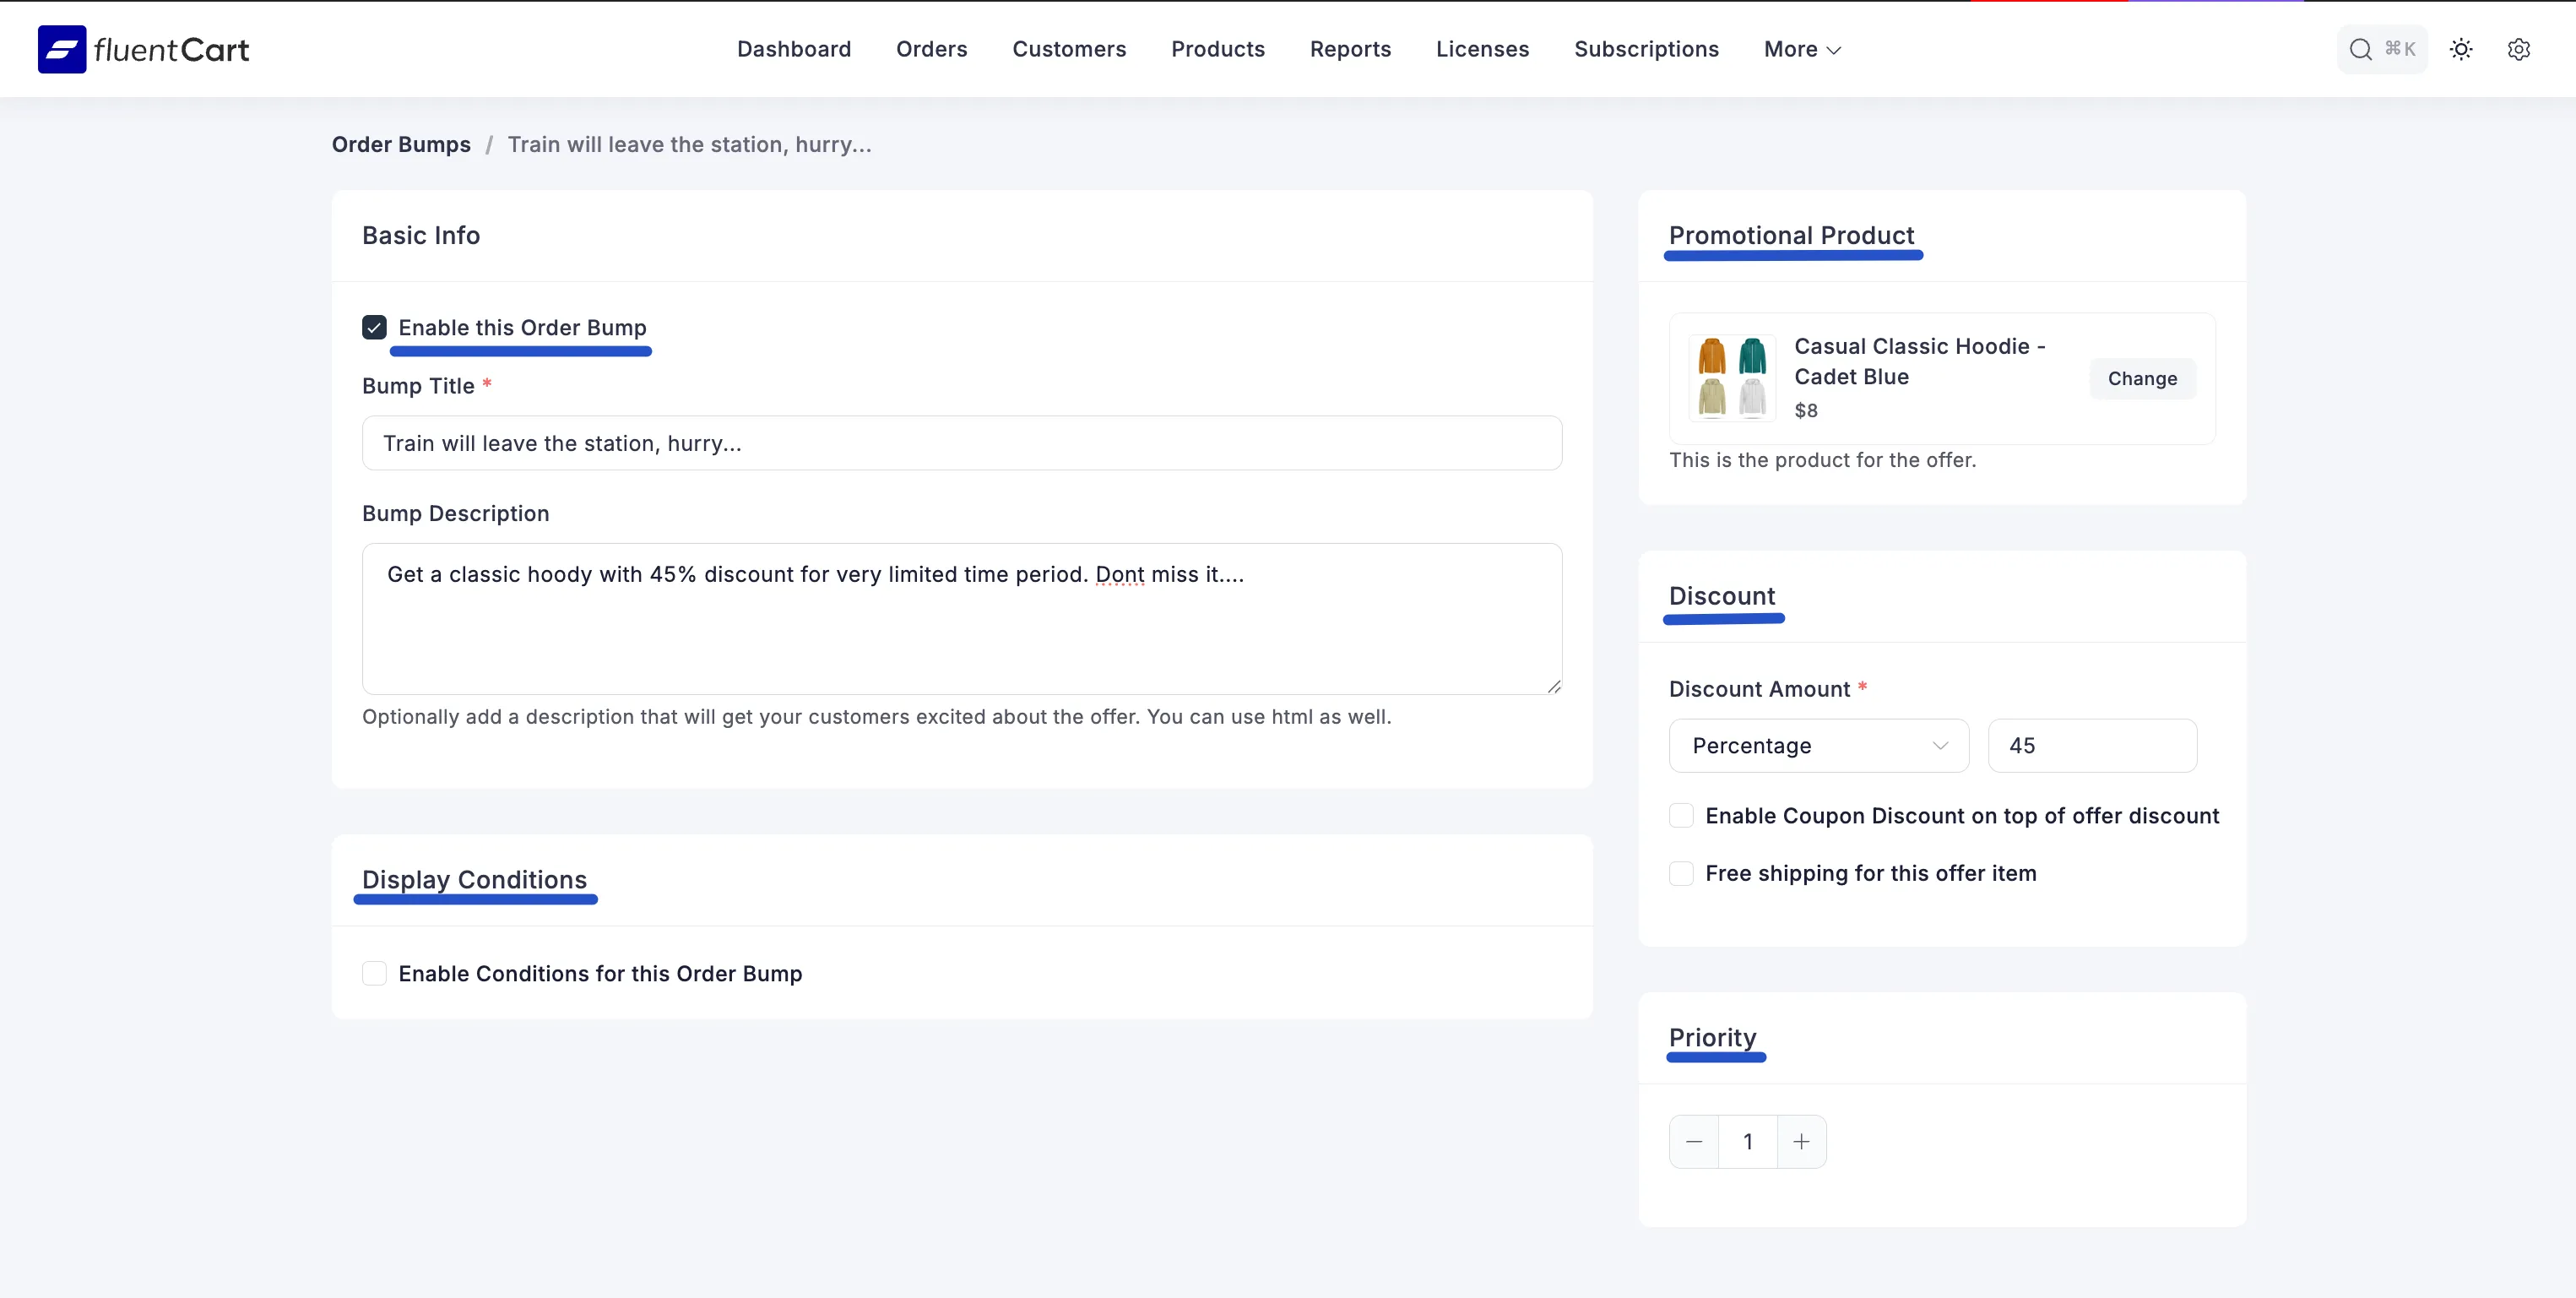
3. Configuring the Order Bump Details
The Order Bump configuration screen is broken down into simple, manageable steps:
A. Basic Info
- Enable this Order Bump: Toggle this switch to instantly turn the offer on or off without deleting the configuration.
- Bump Title: This is the headline that captures the customer’s attention at checkout (e.g., "Get this magic offer in 50% discount").
- Bump Description: Add a short, exciting description or a compelling reason why the customer should take the offer.
B. Promotional Product
- Select Product: Choose the specific product you want to offer as the bump. This item will be added to the customer's cart if they accept the offer. Both Published and Private products are now available in this dropdown — so you can offer hidden, customer-specific, or invite-only items as a bump without having to make them publicly visible in your store.
C. Discount
- Discount Amount: Define the savings for this bump product. You can set the discount as a fixed amount or a Percentage.
- Enable Coupon Discount on top of offer discount: This option determines if other global coupons applied to the main cart can also be stacked on top of the Order Bump discount.
- Free shipping for this offer item: If desired, you can enable free shipping specifically for the bump product.
D. Display Conditions (Detailed)
This is the crucial step where you define exactly when and for whom this offer appears at checkout using conditional logic.
- Enable Conditions for this Order Bump: Check this box to activate the conditional logic.
- Adding Conditions: You can stack multiple conditions using dropdown menus to create precise rules based on cart content and value:
- Cart Items: Check if a specific product (Fleece Jacket) Exists or doesn't exist in the customer's cart.
- Items Subtotal: Set a threshold for the cart value (e.g., Items Subtotal is Greater Than $30).
- Adding Condition Groups: The Add New Condition Group button allows you to set up separate, alternative sets of rules (OR logic). The bump will display if any of the defined groups' conditions are met.
E. Priority
- Set Priority: If you have multiple Order Bumps active with overlapping display conditions, the priority number (e.g., 1, 2, 3) determines which offer will be displayed first. Lower numbers mean higher priority.
After configuring all the details, click Save (standard practice) to activate your bump offer.
4. Managing and Viewing Order Bumps
On the main Order Bumps screen, you can manage all your existing offers:
- Status Tags: Quickly see which offers are Active, Draft (saved but not enabled), or All.
- Action Menu: The vertical ellipsis (
...) icon provides options to Delete an existing bump offer.

- Checkout View: Once active, the offers appear on your store's checkout page, clearly labeled (e.g., Recommended) with the title, description, and discount, ready for the customer to accept with a single click.
